
Game Boy Advance Speakers Replacement
Einleitung
Zu Schritt 1 der AnleitungUse this repair guide in order to replace the speakers.
Was du brauchst


-
-
Take the battery cover off by releasing the locking tab and hinging the cover away. Remove the batteries inside the cover
-
-
-
Remove the six back panel screws using a Tri-wing Screwdriver.
-
Remove bottom back panel screw with a Phillips #1 screw driver. (Image #2)
-
-
-
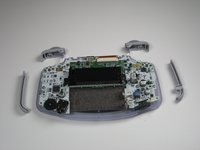
Remove the back panel by pulling away with one hand and the front secured in the other hand.
-
-
-
Remove left and right triggers by lifting and pulling them away from the system.
-
Do the same for side panels
-
-
-
Remove the gray On/Off Switch by pulling up and away from the unit. Replace with another switch if necessary.
-
-
In diesem Schritt verwendetes Werkzeug:Tweezers$4.99
-
Remove the rubber button pads from their pockets.
-
Remove the plastic buttons and the D-pad from beneath the rubber pads with tweezers or by hand.
-
-
In diesem Schritt verwendetes Werkzeug:Tweezers$4.99
-
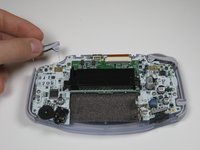
Using the tweezers, gently pull the ribbon from the logic board.
-
-
-
Slightly move the speaker to the right and desolder the two wires from the logic board.
-


Rückgängig: Ich habe diese Anleitung nicht absolviert.
9 weitere Personen haben diese Anleitung absolviert.
Team

Cal Poly, Team 16-29, Maness Winter 2010 Mitglied von Cal Poly, Team 16-29, Maness Winter 2010
CPSU-MANESS-W10S16G29
5 Mitglieder
62 Anleitungen geschrieben
2 Kommentare
When no sound in GBA. Is the broken speaker the most common problem ? Or some SMD part in circuit board ? What to do if the new replaced speaker emits no sound ?
I'm just going to say it. this guide kind of sucks fr. What am I supposed to do after the desolder? Why do I need the desoldering braid? Like you end it with step 8 "Slightly move the speaker to the right and desolder the two wires from the logic board." What temp should my iron be??