Zum Hauptinhalt wechseln
Garmin Fenix 3 HR Motherboard Replacement

Garmin Fenix 3 HR Motherboard Replacement

Jacob Smiley

Jacob Smiley und 3 weitere Mitwirkende

Zuletzt aktualisiert am February 20, 2025

Keine Schätzung
Mittel
Bessere Einleitung
Fehlende Angaben
Studierende im Gange!

This guide will give you all the necessary steps to change your old motherboard for a new one.

Was du brauchst

Werkzeuge

Mehr anzeigen …

  1. Garmin Fenix 3 HR Motherboard Replacement, Motherboard: Schritt 1, Bild 1 von 2 Garmin Fenix 3 HR Motherboard Replacement, Motherboard: Schritt 1, Bild 2 von 2
    • Remove the five 7mm screws with H1.3 hex screwdriver.

  2. Garmin Fenix 3 HR Motherboard Replacement: Schritt 2, Bild 1 von 2 Garmin Fenix 3 HR Motherboard Replacement: Schritt 2, Bild 2 von 2
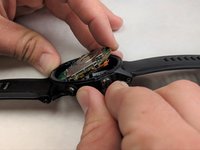
    • Use a plastic opening tool to remove the face of the device to expose the inner components.

    • There is one metal piece at the top of the face that is loose. This is the GPS antenna which will need to be removed as well.

    • Be careful of the ribbon that connects the motherboard to the display.

  3. Garmin Fenix 3 HR Motherboard Replacement: Schritt 3, Bild 1 von 1
    In diesem Schritt verwendetes Werkzeug:
    Tweezers
    $4.99
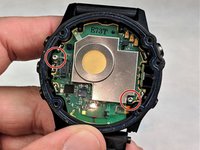
    • Disconnect this ribbon from the motherboard using tweezers.

  4. Garmin Fenix 3 HR Motherboard Replacement: Schritt 4, Bild 1 von 2 Garmin Fenix 3 HR Motherboard Replacement: Schritt 4, Bild 2 von 2
    • Using a T5 screwdriver, remove the two 5mm screws.

    • The motherboard should move freely.

  5. Garmin Fenix 3 HR Motherboard Replacement: Schritt 5, Bild 1 von 1
    • Another ribbon is attached from the underside of the motherboard. Disconnect this ribbon.

  6. Garmin Fenix 3 HR Motherboard Replacement: Schritt 6, Bild 1 von 1
    • Disconnect wires connecting battery to motherboard.

  7. Garmin Fenix 3 HR Motherboard Replacement: Schritt 7, Bild 1 von 1
    • The battery is glued to the motherboard and will need pried off with a nylon spudger.

  8. Garmin Fenix 3 HR Motherboard Replacement: Schritt 8, Bild 1 von 1
    • Now attach battery to new motherboard and reassemble.

Abschluss

To reassemble your device, follow these instructions in reverse order.

5 weitere Personen haben diese Anleitung absolviert.

Team

IUPUI, Team S1-G6, Harley Spring 2018 Mitglied von IUPUI, Team S1-G6, Harley Spring 2018

IUPUI-HARLEY-S18S1G6

3 Mitglieder

5 Anleitungen geschrieben

2 Kommentare

And where would one source replacement motherboard?

jonathan.hatchuel - Antwort

donde puedo encontras placa.madre reeemplazo????

luis zavala - Antwort

Kommentar hinzufügen

Seitenaufrufe:

Letzte 24 Stunden: 0

Letzte 7 Tage: 2

Letzte 30 Tage: 8

Insgesamt: 5,006