
HP EliteBook 745 G6 RAM Replacement

Einleitung
Zu Schritt 1 der AnleitungAdding more memory is the best thing you can do for your PC. The larger memory can provide an instant upgrade for the system. By following this repair guide, you could add or upgrade the memory in HP EliteBook 745 G6 Notebook by yourself.
You need to pay attention to remove power, disconnect batteries, and use an anti-static wrist strap during the repair process. This is a video for how to use an anti-static wrist strap.
The device & model of this repair guide is HP EliteBook 745 G6 Notebook. For more information on this device, refer to the maintenance and service manual.
Was du brauchst


-
-
Type CMD in the Start Menu and open Command Prompt.
-
Type the following command to view memory details and press Enter.
-
-
-
Power off the Notebook.
-
Select the Start button.
-
Select the Power button.
-
Select Shut down.
-
Disconnect the power adapter.
-
-
In diesem Schritt verwendetes Werkzeug:Plastic Cards$2.99
-
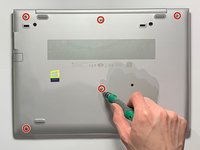
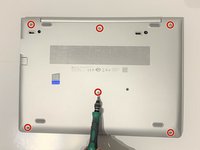
Turn the notebook upside down on a flat surface.
-
Loosen the six captive screws and the two inset captive screws counter-clockwise with the Phillips #00 screwdriver.
-
Pry the bottom cover with plastic card or spudger at the bottom right corner.
-
Lift the bottom cover off with plastic card.
-
-
In diesem Schritt verwendetes Werkzeug:Anti-Static Wrist Strap$7.95
-
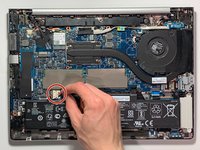
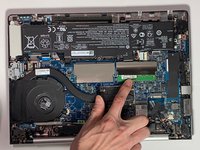
Pull the battery cable from the system board.
-
-
-
-
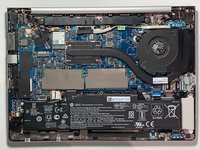
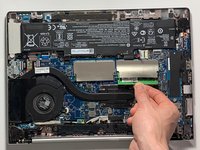
Spread the retaining tabs on each side of the memory module slot to release the memory module.
-
Pull the memory module away from the slot at an angle.
-
-
-
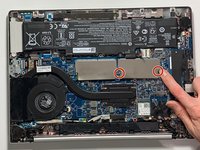
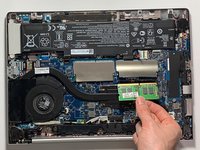
Insert the memory module into the slot at an angle.
-
Push down the center of memory module until the retaining tabs lock the RAM stick.
-
-
-
Push down the bottom cover at the four corner and center.
-
Tighten the six captive screws and the two inset captive screws clockwise with Phillips #00 screwdriver.
-
-
-
Type CMD in the Start Menu and open Command Prompt.
-
Type the following command to view memory details and press Enter.
-
wmic memorychip get devicelocator, manufacturer, partnumber, serialnumber, capacity, speed, memorytype, formfactor
-
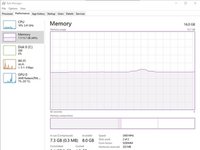
Right-click on the taskbar.
-
Select the “Task Manager”.
-
Select the "Performance".
-


To reassemble your device, follow these instructions in reverse order.
To reassemble your device, follow these instructions in reverse order.
Rückgängig: Ich habe diese Anleitung nicht absolviert.
Eine weitere Person hat diese Anleitung absolviert.

Team

York University, Team S1-G27, O'Regan Summer 2021 Mitglied von York University, Team S1-G27, O'Regan Summer 2021
YORK-O'REGAN-SU21S1G27
1 Mitglied
1 Anleitung geschrieben