
HP Envy 15-u001dx Hard Drive Replacement
Einleitung
Zu Schritt 1 der AnleitungThe hard drive is responsible for storing all of the data on your laptop. Information from a defective hard drive can sometimes be recovered depending on the extent of the damage or problem.
Was du brauchst
Werkzeuge


-
-
Remove the two no-slip covers on the rear, bottom side using spudger shown in top center of picture.
-
-
-
Remove the two cover tabs towards center of the bottom as there are screws underneath them.
-
-
-
-
Remove all fourteen 4.5 mm screws from the bottom using a Phillips #0 screwdriver. Each location is marked by a red circle in the picture.
-
-
-
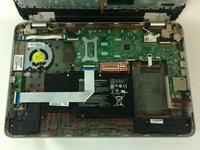
Separate the top cover by using a spudger to go around the sides freeing the inside latches.
-


To reassemble your device, follow these instructions in reverse order.
To reassemble your device, follow these instructions in reverse order.
Rückgängig: Ich habe diese Anleitung nicht absolviert.
2 weitere Personen haben diese Anleitung absolviert.
Team

USF Tampa, Team 9-4, Lacy Fall 2016 Mitglied von USF Tampa, Team 9-4, Lacy Fall 2016
USFT-LACY-F16S9G4
4 Mitglieder
7 Anleitungen geschrieben