Zum Hauptinhalt wechseln
HP Envy 17m-ae111dx Back Cover Replacement

HP Envy 17m-ae111dx Back Cover Replacement

Justin Ogihara

Justin Ogihara

Zuletzt aktualisiert am December 17, 2019

4 - 7 Minuten
Leicht
Grundständige Anleitung
Dies ist eine grundständige Anleitung, die nur als Teil einer anderen Anleitung verwendet werden sollte.

Pre-requisite only guide.

Was du brauchst

Werkzeuge

Mehr anzeigen …

  1. HP Envy 17m-ae111dx Back Cover Replacement, Back Cover: Schritt 1, Bild 1 von 1
    • Power off your laptop before beginning disassembly.

    • Place the laptop on its back.

  2. HP Envy 17m-ae111dx Back Cover Replacement: Schritt 2, Bild 1 von 3 HP Envy 17m-ae111dx Back Cover Replacement: Schritt 2, Bild 2 von 3 HP Envy 17m-ae111dx Back Cover Replacement: Schritt 2, Bild 3 von 3
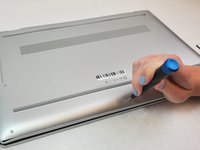
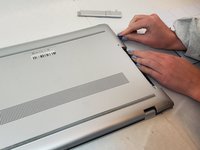
    • Remove the plastic covering to the Disk Reader.

    • Locate the small hole on the side of the disk reader. Insert the T5 Torx head screwdriver (or device of similar thickness) to release the covering for the disk reader.

    • If the button on the side is jammed, pry off the covering by using the iFixit Opening Tool.

  3. HP Envy 17m-ae111dx Back Cover Replacement: Schritt 3, Bild 1 von 3 HP Envy 17m-ae111dx Back Cover Replacement: Schritt 3, Bild 2 von 3 HP Envy 17m-ae111dx Back Cover Replacement: Schritt 3, Bild 3 von 3
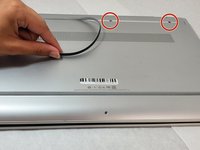
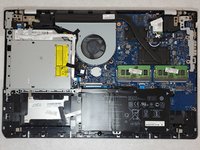
    • Unscrew all visible screws.

    • Use the T5 Torx Screwdriver and remove the four visible 6.5mm screws on the bottom of the laptop.

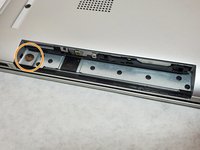
    • One 2.5mm screw, is located where the disk reader was once located. Use a Phillips #00 screwdriver to remove the single screw that connects the bottom cover of the laptop to the bottom frame.

  4. HP Envy 17m-ae111dx Back Cover Replacement: Schritt 4, Bild 1 von 2 HP Envy 17m-ae111dx Back Cover Replacement: Schritt 4, Bild 2 von 2
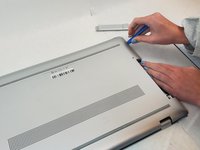
    • Pry the gripper completely off to expose the two screws.

    • Remove the 2.5mm screws under the gripper nearest to the hinge using the Phillips #00 screwdriver.

  5. HP Envy 17m-ae111dx Back Cover Replacement: Schritt 5, Bild 1 von 3 HP Envy 17m-ae111dx Back Cover Replacement: Schritt 5, Bild 2 von 3 HP Envy 17m-ae111dx Back Cover Replacement: Schritt 5, Bild 3 von 3
    • Use the iFixit opening tool to pry off the back cover.

    • Ensure that you go all the way around the laptop with the tool to take it off.

Abschluss

To reassemble your device, follow these instructions in reverse order.

Justin Ogihara

Mitglied seit: 09/18/17

29.072 Reputation

52 Anleitungen geschrieben

Team

EDU Team Mitglied von EDU Team

Staff

7 Mitglieder

753 Anleitungen geschrieben

0 Kommentare

Kommentar hinzufügen

Seitenaufrufe:

Letzte 24 Stunden: 0

Letzte 7 Tage: 0

Letzte 30 Tage: 3

Insgesamt: 9