Zum Hauptinhalt wechseln
HP Pavilion 15-ab165us Fan Replacement

HP Pavilion 15-ab165us Fan Replacement

Chad Christy

Chad Christy und eine weitere beteiligte Person

Zuletzt aktualisiert am January 7, 2020

10 - 15 Minuten
Mittel
Benötigt Bessere Bilder

This guide highlights the removal/replacement of the HP Pavilion 15-ab165us fan. The fan is a part used in electronics to dissipate heat out of the device. When the fan becomes damaged or the device stays at high temperature levels, it is recommended to replace the fan.

Was du brauchst

Werkzeuge

Mehr anzeigen …

  1. HP Pavilion 15-ab165us Fan Replacement, Battery and Back Cover: Schritt 1, Bild 1 von 2 HP Pavilion 15-ab165us Fan Replacement, Battery and Back Cover: Schritt 1, Bild 2 von 2
    • Flip the computer over so that the bottom cover is facing you.

    • Slide the two locks to the "unlock" position and remove the battery.

  2. HP Pavilion 15-ab165us Fan Replacement: Schritt 2, Bild 1 von 3 HP Pavilion 15-ab165us Fan Replacement: Schritt 2, Bild 2 von 3 HP Pavilion 15-ab165us Fan Replacement: Schritt 2, Bild 3 von 3
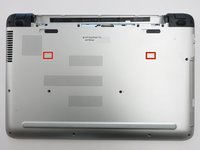
    • Remove the two 8mm screws underneath with a Phillips #1 screwdriver.

    • Use a plastic opening tool to remove the plastic feet.

  3. HP Pavilion 15-ab165us Fan Replacement: Schritt 3, Bild 1 von 3 HP Pavilion 15-ab165us Fan Replacement: Schritt 3, Bild 2 von 3 HP Pavilion 15-ab165us Fan Replacement: Schritt 3, Bild 3 von 3
    • Remove the two plastic tabs with a metal spudger.

  4. HP Pavilion 15-ab165us Fan Replacement: Schritt 4, Bild 1 von 1
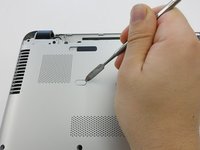
    • Remove the sixteen 8mm screws that hold the bottom cover with a Phillips #1 screwdriver.

  5. HP Pavilion 15-ab165us Fan Replacement: Schritt 5, Bild 1 von 1
    • Pull the Optical Drive out.

  6. HP Pavilion 15-ab165us Fan Replacement: Schritt 6, Bild 1 von 1
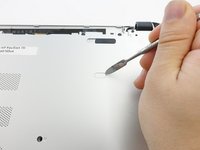
    • Remove the 3mm screws that were hidden under the Optical Drive with a Phillips #0 screwdriver.

  7. HP Pavilion 15-ab165us Fan Replacement: Schritt 7, Bild 1 von 2 HP Pavilion 15-ab165us Fan Replacement: Schritt 7, Bild 2 von 2
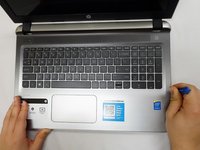
    • Flip the computer back over.

    • Use a plastic opening tool to release the clips holding the keyboard section in place.

  8. HP Pavilion 15-ab165us Fan Replacement: Schritt 8, Bild 1 von 1
    • Close the lid and pull the screen and keyboard section up and away from the disconnected bottom cover.

    • The hard drive is NOT screwed into place on the underside of the keyboard section.

  9. HP Pavilion 15-ab165us Fan Replacement, Fan: Schritt 9, Bild 1 von 1
    • Disconnect the fan from the motherboard.

  10. HP Pavilion 15-ab165us Fan Replacement: Schritt 10, Bild 1 von 3 HP Pavilion 15-ab165us Fan Replacement: Schritt 10, Bild 2 von 3 HP Pavilion 15-ab165us Fan Replacement: Schritt 10, Bild 3 von 3
    • Remove the the three 3mm screws with the Phillips#00 screwdriver.

  11. HP Pavilion 15-ab165us Fan Replacement: Schritt 11, Bild 1 von 2 HP Pavilion 15-ab165us Fan Replacement: Schritt 11, Bild 2 von 2
    • Remove the fan from the motherboard.

Abschluss

To reassemble your device, follow these instructions in reverse order.

Chad Christy

Mitglied seit: 11/07/19

205 Reputation

2 Anleitungen geschrieben

Team

IUPUI, Team S3-G1, Harley Fall 2019 Mitglied von IUPUI, Team S3-G1, Harley Fall 2019

IUPUI-HARLEY-F19S3G1

4 Mitglieder

2 Anleitungen geschrieben

0 Kommentare

Kommentar hinzufügen

Seitenaufrufe:

Letzte 24 Stunden: 0

Letzte 7 Tage: 0

Letzte 30 Tage: 3

Insgesamt: 637