Zum Hauptinhalt wechseln

HP Pavilion 17-g192dx Screen Replacement

Was du brauchst

  1. HP Pavilion 17-g192dx Screen Replacement, Battery: Schritt 1, Bild 1 von 3 HP Pavilion 17-g192dx Screen Replacement, Battery: Schritt 1, Bild 2 von 3 HP Pavilion 17-g192dx Screen Replacement, Battery: Schritt 1, Bild 3 von 3
    • Turn off the laptop.

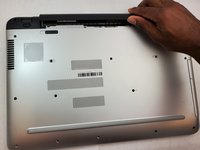
    • Slide the battery lock to the right until you see the open lock symbol.

  2. HP Pavilion 17-g192dx Screen Replacement: Schritt 2, Bild 1 von 1
    • Slide the battery release to the left until the battery pops up.

    • This may require significant force.

  3. HP Pavilion 17-g192dx Screen Replacement: Schritt 3, Bild 1 von 2 HP Pavilion 17-g192dx Screen Replacement: Schritt 3, Bild 2 von 2
    • Lift the battery up.

  4. HP Pavilion 17-g192dx Screen Replacement, Screen: Schritt 4, Bild 1 von 2 HP Pavilion 17-g192dx Screen Replacement, Screen: Schritt 4, Bild 2 von 2
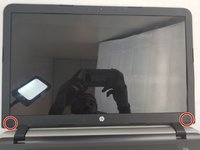
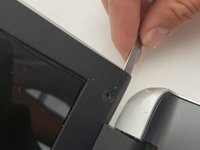
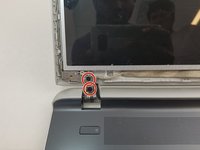
    • Using the metal spudger, remove the 2 plastic screw covers at the bottom corners of the screen.

  5. HP Pavilion 17-g192dx Screen Replacement: Schritt 5, Bild 1 von 1
    • Remove the two 7mm screws with a Philips #00 screwdriver.

  6. HP Pavilion 17-g192dx Screen Replacement: Schritt 6, Bild 1 von 3 HP Pavilion 17-g192dx Screen Replacement: Schritt 6, Bild 2 von 3 HP Pavilion 17-g192dx Screen Replacement: Schritt 6, Bild 3 von 3
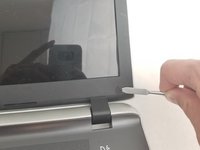
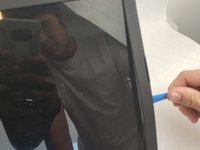
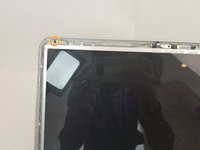
    • Use a plastic opening tool to remove the plastic cover surrounding the screen by running the tool around the edge.

    • It may be helpful to start with the metal spudger then transition to the plastic opening tool because you will need the metal tip get in initially.

  7. HP Pavilion 17-g192dx Screen Replacement: Schritt 7, Bild 1 von 3 HP Pavilion 17-g192dx Screen Replacement: Schritt 7, Bild 2 von 3 HP Pavilion 17-g192dx Screen Replacement: Schritt 7, Bild 3 von 3
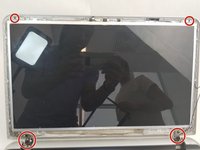
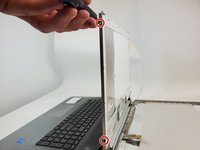
    • Remove the four 4 mm screws holding the back to the display assembly with a Philips #00 screwdriver.

    • Remove the two 3mm screws holding the back cover to the display assembly with a Philips #00 screwdriver.

    • Lay the cover on the workspace carefully as not to damage the wires still connected to it.

  8. HP Pavilion 17-g192dx Screen Replacement: Schritt 8, Bild 1 von 1
    • Unplug the wire connected to the display assembly by gently pulling on it.

    • Tape may be holding it in place.

  9. HP Pavilion 17-g192dx Screen Replacement: Schritt 9, Bild 1 von 2 HP Pavilion 17-g192dx Screen Replacement: Schritt 9, Bild 2 von 2
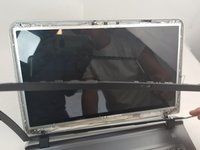
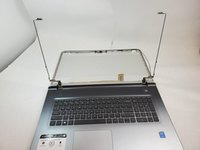
    • Remove the four 3mm screws connecting the display assembly to the metal framework with a Philips #00 screwdriver.

    • It may be helpful to have someone else support the screen while you remove it.

Abschluss

To reassemble your device, follow these instructions in reverse order.

3 weitere Nutzer:innen haben diese Anleitung absolviert.

0 Kommentare

Kommentar hinzufügen

Seitenaufrufe:

Letzte 24 Stunden: 0

Letzte 7 Tage: 2

Letzte 30 Tage: 10

Insgesamt: 328