Zum Hauptinhalt wechseln

HTC One S Battery Replacement

Was du brauchst

  1. HTC One S Battery Replacement, iOpener Heating: Schritt 1, Bild 1 von 2 HTC One S Battery Replacement, iOpener Heating: Schritt 1, Bild 2 von 2
    • We recommend that you clean your microwave before proceeding, as any nasty gunk on the bottom may end up stuck to the iOpener.

    • Place the iOpener in the center of the microwave.

    • For carousel microwaves: Make sure the plate spins freely. If your iOpener gets stuck, it may overheat and burn.

  2. HTC One S Battery Replacement: Schritt 2, Bild 1 von 1
    • Heat the iOpener for thirty seconds.

    • Throughout the repair procedure, as the iOpener cools, reheat it in the microwave for an additional thirty seconds at a time.

    • Be careful not to overheat the iOpener during the repair. Overheating may cause the iOpener to burst. Do not attempt to heat over 100˚C (212˚F).

    • Never touch the iOpener if it appears swollen.

    • If the iOpener is still too hot in the middle to touch, continue using it while waiting for it to cool down some more before reheating. A properly heated iOpener should stay warm for up to 10 minutes.

  3. HTC One S Battery Replacement: Schritt 3, Bild 1 von 1
    • Remove the iOpener from the microwave, holding it by one of the two flat ends to avoid the hot center.

    • The iOpener will be very hot, so be careful when handling it. Use an oven mitt if necessary.

  4. HTC One S Battery Replacement, Alternate iOpener heating method: Schritt 4, Bild 1 von 2 HTC One S Battery Replacement, Alternate iOpener heating method: Schritt 4, Bild 2 von 2
    • If you don't have a microwave, follow this step to heat your iOpener in boiling water.

    • Fill a pot or pan with enough water to fully submerge an iOpener.

    • Heat the water to a boil. Turn off the heat.

    • Place an iOpener into the hot water for 2-3 minutes. Make sure the iOpener is fully submerged in the water.

    • Use tongs to extract the heated iOpener from the hot water.

    • Thoroughly dry the iOpener with a towel.

    • The iOpener will be very hot, so be careful to hold it only by the end tabs.

    • Your iOpener is ready for use! If you need to reheat the iOpener, heat the water to a boil, turn off the heat, and place the iOpener in the water for 2-3 minutes.

  5. HTC One S Battery Replacement, Rear Case: Schritt 5, Bild 1 von 1
    • Handling it by the tag, place the heated iOpener across the bottom casing.

    • Let the iOpener sit for at least a minute to soften the adhesive beneath the casing.

  6. HTC One S Battery Replacement: Schritt 6, Bild 1 von 3 HTC One S Battery Replacement: Schritt 6, Bild 2 von 3 HTC One S Battery Replacement: Schritt 6, Bild 3 von 3
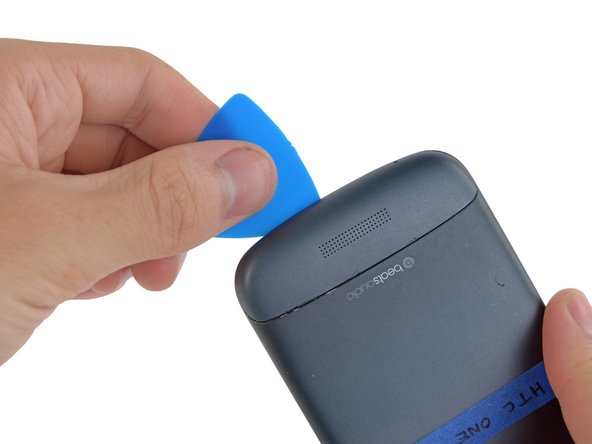
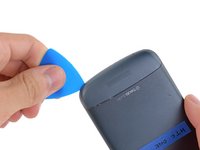
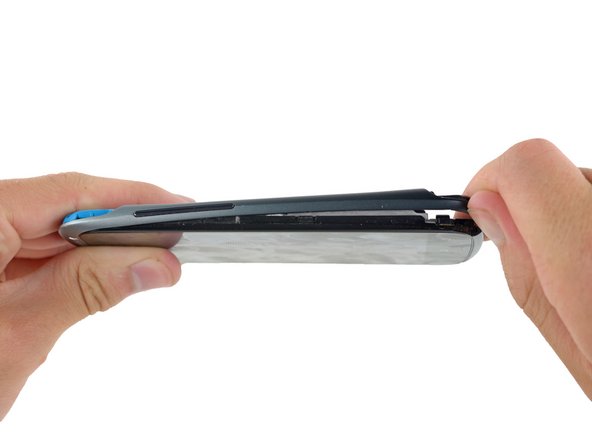
    • Gently place an opening pick in the corner of the gap between the bottom casing and rear case.

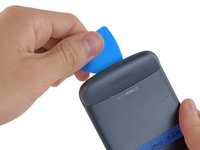
    • Slide the opening pick along the side of the casing, prying it away from the adhesive as you go.

  7. HTC One S Battery Replacement: Schritt 7, Bild 1 von 1
    • Use your fingers to pull the bottom casing off the rest of the phone.

  8. HTC One S Battery Replacement: Schritt 8, Bild 1 von 2 HTC One S Battery Replacement: Schritt 8, Bild 2 von 2
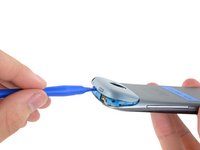
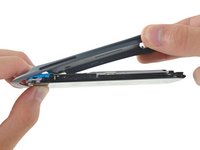
    • Starting at the groove near the headphone jack, use a plastic opening tool to lift the top casing.

  9. HTC One S Battery Replacement: Schritt 9, Bild 1 von 1
    • Use your fingers to pull the top casing off of the rest of the phone.

  10. HTC One S Battery Replacement: Schritt 10, Bild 1 von 1
    • Remove the following screws holding the rear case to the rest of the phone:

    • Two 3.15 mm Phillips #00 screws

    • One 4.15 Torx T5 screw

    • One 4 mm Torx T5 screw

  11. HTC One S Battery Replacement: Schritt 11, Bild 1 von 3 HTC One S Battery Replacement: Schritt 11, Bild 2 von 3 HTC One S Battery Replacement: Schritt 11, Bild 3 von 3
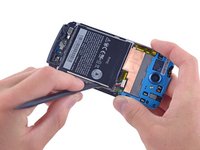
    • Place your fingers on either side of the phone and gently push up on the rear case.

    • It is important to start from the bottom of the phone because the rear case wraps around the front of the phone at the top which makes it impossible to start prying from there.

  12. HTC One S Battery Replacement: Schritt 12, Bild 1 von 1
    • Pull the rear case away from the rest of the phone with your hands.

  13. HTC One S Battery Replacement, Battery: Schritt 13, Bild 1 von 2 HTC One S Battery Replacement, Battery: Schritt 13, Bild 2 von 2
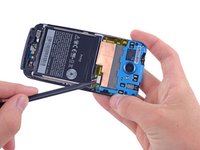
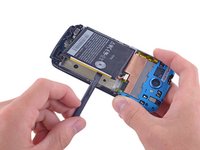
    • Using the pointed end of a spudger, lift the battery cable and release the connector.

  14. HTC One S Battery Replacement: Schritt 14, Bild 1 von 2 HTC One S Battery Replacement: Schritt 14, Bild 2 von 2
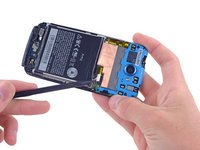
    • Switching to the flat end of the spudger, work your way underneath the battery and peel it away from the adhesive.

  15. HTC One S Battery Replacement: Schritt 15, Bild 1 von 1
    • Remove the battery from the phone.

Abschluss

To reassemble your device, follow these instructions in reverse order.

12 weitere Nutzer:innen haben diese Anleitung absolviert.

Jay Miley

Mitglied seit: 04/22/14

5.042 Reputation

13 Anleitungen geschrieben

Team

Cal Poly, Team 10-55, Amido Spring 2014 Mitglied von Cal Poly, Team 10-55, Amido Spring 2014

CPSU-AMIDO-S14S10G55

4 Mitglieder

31 Anleitungen geschrieben

4 Kommentare

i charge the battery very well but once i on the phone it will go off immediately

kene - Antwort

Hello thank you for the guide. Getting the backplate off was tough. When assembling a little rubber block was loose. this goes next to the motor

J Shepherd - Antwort

What do you use to glue the cover back on, so that in the future you can replace the battery again?

Natalie - Antwort

What adhesive(s) should be used under the battery and to

reseal the case after completing replacement of the battery?

Dan Koren - Antwort

Kommentar hinzufügen

Seitenaufrufe:

Letzte 24 Stunden: 0

Letzte 7 Tage: 2

Letzte 30 Tage: 5

Insgesamt: 7,798