
Lenovo Horizon 2s Rear Case Replacement
Einleitung
Zu Schritt 1 der AnleitungUse this guide to remove the rear case, which is designed to prevent damage to interior components.
This guide will provide step-by-step instructions on how to access the internal components.
Was du brauchst
Ersatzteile
Werkzeuge


Mehr anzeigen …
-
-
Flip the device so the rear case is facing upward.
-
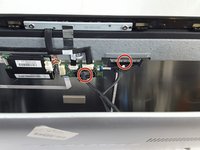
With the plastic opening tool carefully pry the plastic piece shown in the picture, until it is completely removed from the case.
-
-
-
Using your fingers, carefully remove the rubber boot from the right side of the rear case.
-
With the Phillips #1 head, remove the screw placed directly under the rubber boot.
-
-
-
-
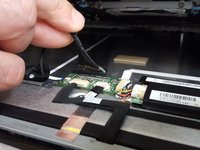
Using the plastic opening tool, push the display screen on the device forward until it separates from the rear casing.
-
-
-
Using the plastic opening tool, carefully pry around the perimeter of the screen until the entire screen is completely separated from the rear casing.
-
-
-
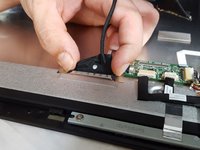
Before completely separating the screen from the rear casing you will carefully detach two wires that are connected to both sides of the device. This will allow you to completely separate the rear casing from screen.
-


To reassemble your device, follow these instructions in reverse order.
To reassemble your device, follow these instructions in reverse order.
Rückgängig: Ich habe diese Anleitung nicht absolviert.
Eine weitere Person hat diese Anleitung absolviert.
Team

USF Tampa, Team S3-G6, Cannon Fall 2017 Mitglied von USF Tampa, Team S3-G6, Cannon Fall 2017
USFT-CANNON-F17S3G6
3 Mitglieder
12 Anleitungen geschrieben