Einleitung
Es ist zum Glück bei diesen neueren MacBook Pros nicht mehr nötig, zum Akkutausch das Logic Board auszubauen!
Benutze diese Anleitung, um den eingeklebten Akku mithilfe eines iFixit Kits mit Klebstoffentferner aus deinem MacBook Pro zu entfernen. Der Klebstoffentferner weicht den Kleber auf, mit dem der Akku befestigt ist, und erleichtert so den Ausbau des Akkus.
iFixit Klebstoffentferner ist entzündlich. Arbeite bei dieser Anleitung in einem gut belüftetem Bereich. Rauche nicht, und arbeite nicht in der Nähe einer offenen Flamme.
Um das Risiko eines Schadens zu verringern, solltest du dein MacBook Pro anschalten und den Akku komplett entleeren, bevor du mit dieser Reparatur anfängst. Ein geladener Lithium-Ion-Akku kann zu einem gefährlichen und unkontrollierbaren Feuer führen, falls er versehentlich perforiert wird. Wenn dein Akku aufgebläht ist, musst du entsprechende Vorsichtsmaßnahmen treffen.
Hinweis: Das Lösungsmittel, dass zum Aufweichen des Klebers am Akku benutzt wird, kann manche Kunststoffe angreifen. Folge den Anweisungen genau und passe auf, wo du den Klebstoffentferner aufbringst.
Was du brauchst
-
-
Schalte deinen Mac ein und starte Terminal.
-
Kopiere den folgenden Befehl und füge ihn im Terminal ein (oder tippe ihn exakt so ein):
-
sudo nvram AutoBoot=%00
-
Drücke die Eingabetaste [return]. Wenn du dazu aufgefordert wirst, gib dein Administratorpasswort ein und drücke erneut [return]. Hinweis: die Return-Taste kann auch mit ⏎ oder "enter" gekennzeichnet sein.
-
sudo nvram AutoBoot=%03
-
-
-
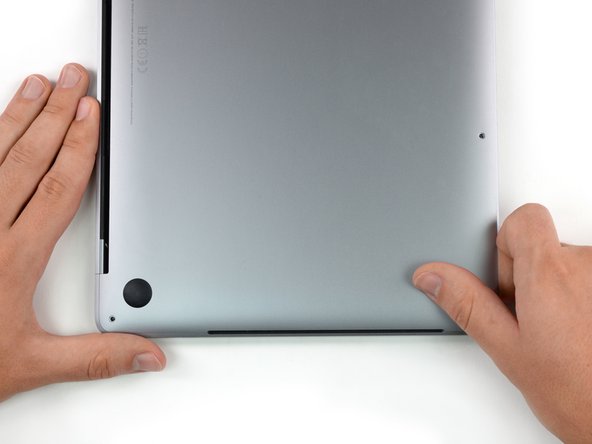
Entferne die sechs Schrauben, mit denen das Gehäuseunterteil befestigt ist, mit einem Pentalobe P5 Schraubendreher:
-
Zwei 6,2 mm Schrauben
-
Vier 3,4 mm Schrauben
-
-
-
Drücke einen Saugheber vorne mittig auf das Gehäuseunterteil des MacBook Pro.
-
Hebe den Saugheber an, damit zwischen dem Gehäuseunterteil und dem Rahmen ein kleiner Spalt entsteht.
-
-
-
Setze eine Ecke eines Plektrums in den Spalt zwischen dem Gehäuseunterteil und dem Rahmen ein.
-
Schiebe das Plektrum um die nächstgelegene Ecke und bis zur Hälfte an der Seite des Gehäuses entlang.
-
-
-
Wiederhole den vorigen Schritt auf der gegenüberliegenden Seite, indem du das Plektrum unter das Gehäuseunterteil steckst und entlang der Seite nach oben führst, bis die zweite Raste gelöst ist.
Recommend being very careful on this step and the following step when using any opening tool to always keep the “pointy end” up when prying, especially about 40mm up the side, to avoid completely destroying the speaker diaphragms.
-
-
-
Stecke das Plektrum jetzt nochmal unter den vorderen Rand des Gehäuseunterteils, bei einem der beiden mittleren Schraubenlöcher.
-
Drehe das Plektrum kräftig, damit die dritte Raste gelöst wird, mit der das Gehäuseunterteil am Rahmen befestigt ist.
-
Wiederhole diesen Vorgang bei dem anderen Schraubenloch in der Mitte und löse auch die vierte Raste.
-
-
-
Ziehe das Gehäuseunterteil fest zur Vorderseite des MacBooks hin (weg von den Scharnieren), so dass sich die letzten Rasten lösen, mit denen das Gehäuseunterteil noch befestigt ist.
-
Ziehe erst an der einen Ecke, dann an der anderen.
-
-
-
Entferne das Gehäuseunterteil.
-
Lege es richtig hin und richte die Klammern nahe am Scharnier aus. Drücke es nach unten und schiebe die Abdeckung zu den Scharnieren hin. Es sollte sich nicht mehr weiter schieben lassen, wenn die Klammern einrasten.
-
Wenn die Klammern ganz eingerastet sind und das Gehäuseunterteil korrekt ausgerichtet ist, dann drücke fest auf das Gehäuseunterteil, um die vier versteckten Klammern darunter einrasten zu lassen. Du solltest das Einschnappen spüren und hören können.
-
-
-
Ziehe vorsichtig das große Stück Klebeband ab, das den Akkustecker am Rand des Logic Boards ganz nah am Akku abdeckt.
-
Entferne das Klebeband.
-
-
-
Ziehe vorsichtig das kleine Stück Klebeband ab, mit dem der Stecker des Datenkabels an der Akkuplatine abgedeckt ist.
-
-
-
Mit der Spitze eines Spudgers kannst du jetzt die kleine schwarze Verriegelung umklappen, mit der das Kabel gesichert ist.
Be very careful here. It is easy to break the whole connector off the battery board, which is what I did. Luckily the connector is part of the replacement battery, so you just need to remove the connector from the cable. The pictures here should provide more detail so you can see better what is going on.
thanks a lot !!!!! great help :)
-
-
-
Schiebe das Datenkabel der Akkuplatine, aus seinem Anschluss heraus und trenne es ab.
-
Schiebe es parallel zum Logic Board in Richtung des Kabels.
As simple as this step might seem, the golden leads will disapper the moment you remove it as it has some adhesive under the black strip that covers it. Ensure you peel it back enough to display the golden leads after swapping the batteries out.
Your battery may come with this ribbon cable. In that case, disconnect the other end.
-
-
-
Biege das Datenkabel der Akkuplatine zur Seite, so dass es nicht mehr im Weg ist.
-
-
-
Nimm einen T5 Torx-Schraubendreher und entferne die 3,7 mm Flachkopfschraube vom Stecker der Stromversorgung am Akku.
-
-
-
Hebe jetzt den Stecker am Akkuanschluss mit einem Spudger vorsichtig an und trenne dadurch den Akku ab.
-
Hebe den Stecker so hoch an, dass er auch wirklich vom Anschluss getrennt bleibt. Wenn es im Laufe der Reparatur versehentlich zu einem Kontakt kommt, könnte dein MacBook Pro dadurch beschädigt werden.
To completely avoid accidental contacts I recommend to wrap this connector in a piece of paper and hold it in place with tape.
Do not put tape directly on the contact underside, as that may leave some glue that would affect the contact conductivity.
I put a piece of tape on the underside of the connector (sticky side up) to insure against accidental battery contact. If you put tape on the logic board side of the connection, some insulating padding material might accidentally stick to the tape when the tape is removed during reassembly.
-
-
-
-
Entferne die beiden 1,8 mm langen Torx T3 Schrauben, mit denen die Halterung am Stecker des Trackpadkabels befestigt ist.
-
-
-
Heble den Stecker am Flachbandkabel zum Trackpad behutsam mit dem Spudger vom Logic Board hoch und trenne ihn ab.
-
-
-
Erwärme einen iOpener und lege ihn etwa eine Minute lang auf das Trackpad-Flachbandkabel. Dadurch wird der Kleber aufgeweicht, mit dem das Flachbandkabel oben am Akku befestigt ist.
-
Wenn du keinen iOpener hast, kannst du das Kabel auch mit einem Haartrockner erwärmen. Das Kabel sollte warm sein, aber nicht so heiß, dass du es nicht mehr anfassen kannst. Überhitze den Akku auf keinen Fall.
-
-
-
Ziehe das Trackpad-Flachbandkabel behutsam vom Akku ab und schiebe es aus dem Weg.
-
-
-
Entferne die zehn Torx T5 Schrauben, mit denen die Trackpadeinheit befestigt ist:
-
Zwei 4,3 mm lange Schrauben
-
Acht 5,8 mm lange Schrauben
-
-
-
Klappe das Display ein wenig auf, um an das Trackpad zu gelangen.
-
Führe das Trackpad-Flachbandkabel sorgfältig durch die Öffnung im Rahmen des MacBook Pro.
-
-
-
Entferne die Trackpadeinheit.
-
Verliere die sechs kleinen Unterlegscheiben (zwei runde und vier eckige), die sich auf der Unterseite des Trackpads befinden, nicht.
-
-
-
Entferne die beiden 3,2 mm Torx T5 Schrauben von der Akkuplatine.
-
-
-
Lege ein Stück Alufolie zwischen das Display und die Tastatur, um dein Display während der Reparatur zu schützen.
-
Benutze zusätzlich Klebeband und/oder Folie, um den Bereich unter dem Trackpad so gut wie möglich abzukleben. Du kannst außerdem eine Schicht saugfähiges Küchenpapier direkt unter den Bereich des Trackpads legen, um überschüssigen Klebstoffentferner aufzunehmen.
This is an important point. I had missed. I feel a better image with a towel would better emphasize.
-
-
-
Schneide ein Stück Paket- oder Malerband ab und schiebe eine Kante zwischen den Akku und den linken Lautsprecher.
-
-
-
Drücke mit dem Spudger an der Kante des Klebebands entlang, so dass es fest am Aluminiumgehäuse des MacBooks Pro klebt und so den Lautsprecher vom Akku abdichtet.
-
Falte das Klebeband herum und klebe es leicht am Lautsprecher fest, so dass es nicht mehr im Weg ist.
The speaker membrane is also relatively delicate. You can put a small piece of paper to protect it, to avoid the tape gluing to it directly.
-
-
-
Wiederhole die beiden vorhergehenden Schritte auf der gegenüberliegenden Seite, um so den anderen Lautsprecher abzudichten.
-
-
-
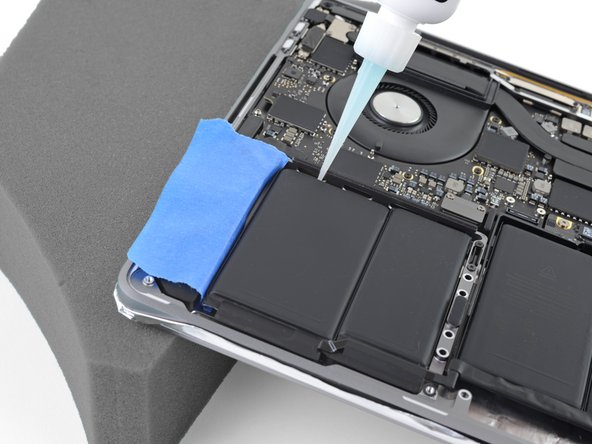
Um den Fluss des Klebstoffentferners zu kontrollieren, solltest du die rechte Kante deines MacBook Pro auf einem Buch oder einem Schaumstoffblock ein paar Zentimeter erhöht abstützen.
-
-
-
Dein MacBook Pro ist nun optimal vorbereitet, jetzt bist du an der Reihe.
-
Trage bei der Verwendung des Klebstoffentferners eine Schutzbrille. (Im Kit ist eine Schutzbrille enthalten.)
-
Trage keine Kontaktlinsen ohne eine Schutzbrille.
-
In deinem Kit sind auch Schutzhandschuhe enthalten. Um deine Hände vor eventuellen Reizungen zu schützen, solltest du sie jetzt anziehen.
-
-
-
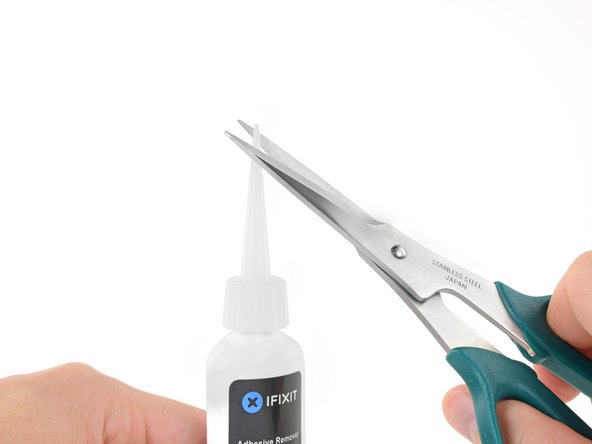
Ziehe den schwarzen Gummistopfen von dem Fläschchen mit Klebstoffentferner ab.
-
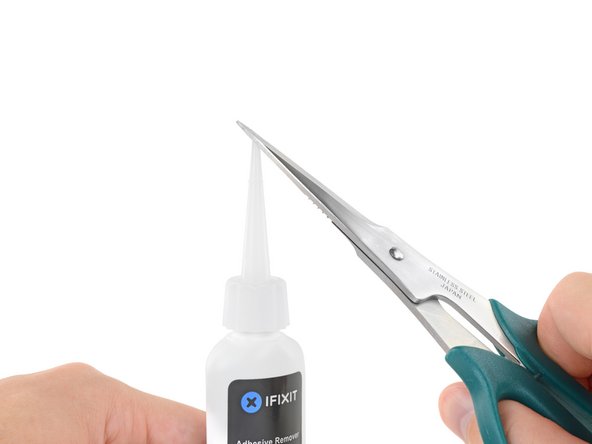
Schneide die verschlossene Applikatorspitze mit einer Schere ab.
-
Schneide die Spitze an der engen Stelle ab. Dadurch kannst du die Menge an Klebstoffentferner bei der Anwendung besser kontrollieren und kleinere Mengen auftragen.
-
-
-
Träufle einige Tropfen des Klebstoffentferners gleichmäßig unter die Akkuzelle ganz rechts.
-
Lasse den Klebstoffentferner zwei Minuten lang einwirken, um den Kleber aufweichen, bevor du zum nächsten Schritt übergehst.
-
-
-
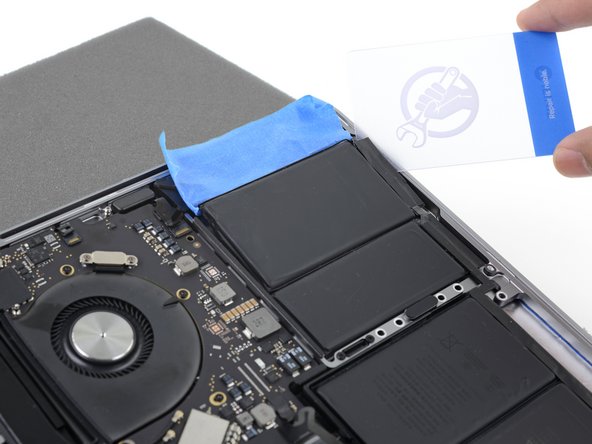
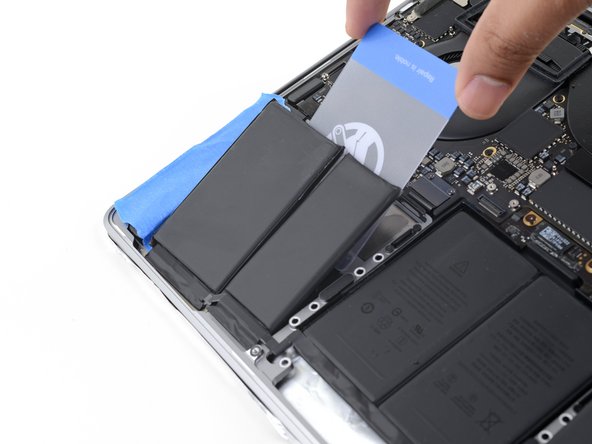
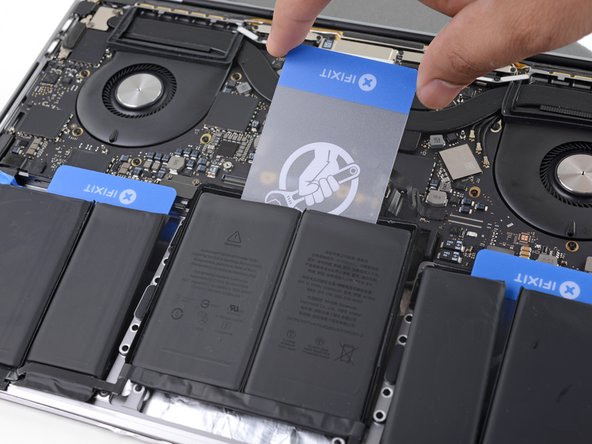
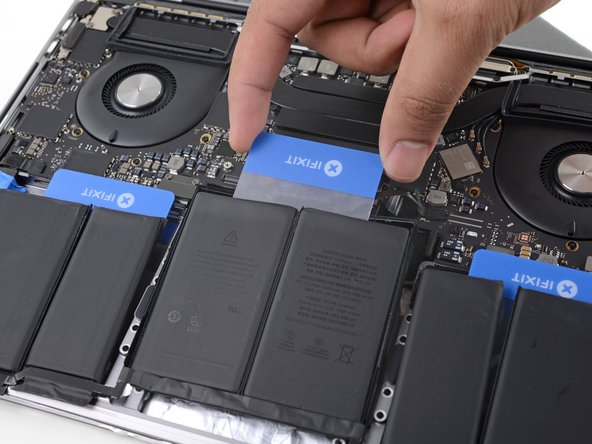
Nach ein paar Minuten kannst du die Ecke einer Kunststoffkarte unter die Akkuzelle ganz rechts schieben, fange dabei an der Vorderkante an.
-
Bewege die Karte hin und her und schiebe sie ganz unter der Akkuzelle entlang.
-
Hebe die Zelle an, um sie ganz vom Kleber zu lösen, aber entferne sie noch nicht.
-
Lasse vorläufig eine Kunststoffkarte unter der Akkuzelle stecken, damit sich der Kleber nicht wieder verbinden kann, während du mit dem nächsten Schritt weitermachst.
-
-
-
Wenn es dir schwer fällt, die Karte unter eine der Akkuzellen zu schieben, dann versuche ein Stück Nähgarn/Zahnseide oder Draht unter der Akkuzelle entlang zu führen. Ziehe es mit einer sägenden Bewegung von Seite zu Seite und trenne so den Kleber auf.
-
-
-
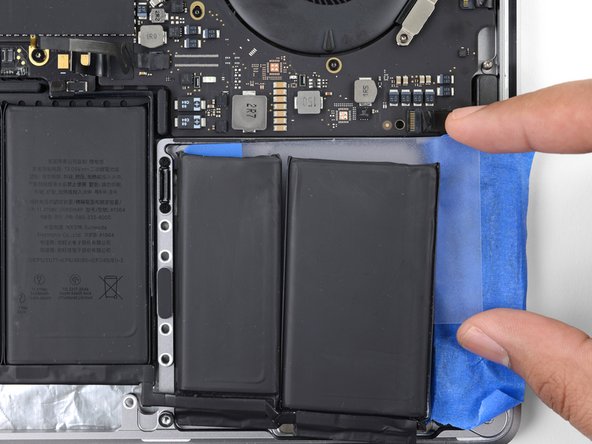
Wiederhole die letzten paar Schritte, um auch die Akkuzelle ganz links abzulösen.
-
Hebe zunächst die linke Seite des MacBook Pro an, so dass der Klebstoffentferner vom Lautsprecher wegfließt.
-
-
-
Träufle etwas Klebstoffentferner unter die Akkuzelle ganz links und lasse ihn etwa zwei Minuten lang einwirken.
-
-
-
Schiebe eine Ecke einer Plastikkarte unter die Akkuzelle ganz links und schneide behutsam die Klebeverbindung auf.
-
Lasse die Karte vorläufig unter der Zelle stecken, damit sich der Kleber nicht wieder verbinden kann.
-
-
-
Hebe die rückseitige Kante des MacBooks an, so dass der Klebstoffentferner von der Tastatur/ dem Logic Board wegfließt.
-
-
-
Träufle etwas Klebstoffentferner unter jede der drei noch verbliebenen Akkuzellen.
-
Achte auf eventuelle Lecks und träufle in den folgenden Schritten noch etwas mehr vom Klebstoffentferner hinein, falls nötig.
-
Lasse den Klebstoffentferner etwa zwei Minuten lang einwirken, bevor du weiterarbeitest.
-
-
-
Schiebe eine Plastikkarte komplett unter der Akkuzelle ganz links entlang - die du ja im vorigen Schritt schon abgelöst hast - und schiebe sie dann sorgfältig zwischen die andere linke Akkuzelle und das Aluminiumgehäuse des MacBooks Pro ein.
-
-
-
Trenne die letzte Akkuzelle links mit der Plastikkarte ganz ab.
-
Lasse die Plastikkarte vorläufig stecken, damit die linksseitigen Akkuzellen nicht wieder festkleben.
-
-
-
Wiederhole die vorhergehenden beiden Schritte und löse die letzte Akkuzelle rechts ab.
-
-
-
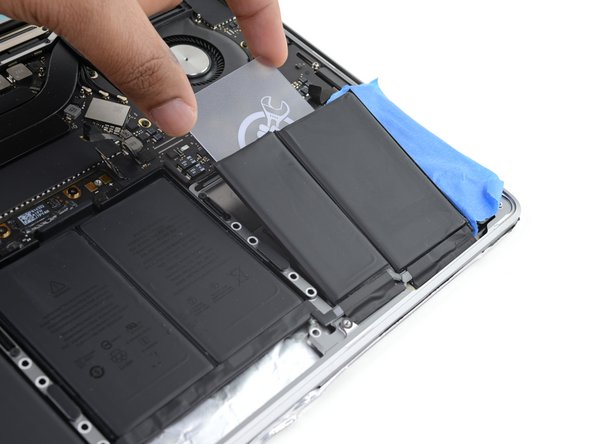
Schiebe die Ecke einer Plastikkarte unter die Oberkante einer der beiden Akkuzellen und dann weiter unter die zweite.
-
Bewege die Karte wackelnd hin und her, wobei du sie unter die Akkuzellen schiebst und den Kleber darunter aufschneidest.
-
-
-
Entferne den Akku.
-
Ziehe alle Reste von Klebestreifen mit einer Pinzette oder der Hand (mit Handschuhen) ab.
-
Schabe größere Ansammlungen von Klebstoff mit einem Plastiköffnungswerkzeug ab und reinige darunterliegende Bereiche mit Klebstoffentferner oder Isopropylalkohol. Wische nur in eine Richtung (nicht hin und her), bis der Rahmen sauber und für deinen neuen Akku gut vorbereitet ist.
-
Wenn du fertig bist, dann entferne behutsam das schützende Klebeband von den Lautsprechern.
-
-
-
Denke an das Akkudatenkabel und achte darauf, dass es nicht durch die Akkuplatine eingeklemmt wird oder sich darunter verfängt.
-
Wenn dein Ersatzakku auf der Unterseite mit Klebestreifen versehen ist, dann drehe ihn herum und ziehe die Schutzfolie ab, so dass die Klebeflächen freigelegt werden. Wenn keine Klebestreifen auf dem Akku sind, dann bringe dünnes doppelseitiges Klebeband an, wie zum Beispiel Tesa 61395 und befestige damit den Akku.
-
Richte den Akku sorgfältig aus.
-
Drücke und halte jede Akkuzelle 5-10 Sekunden lang fest, damit sie gut am unteren Gehäuse anhaftet.
Extremely detailed and easy to follow instructions! I ordered all the tools from ifixit and they worked great. I didn’t use the adhesive remover. I was able to carefully work a plastic card behind each battery section. This took a little more effort but I didn’t feel comfortable using acetone on a macbook.
Instead of acetone/alcohol blend adhesive remover I used 91% isopropyl alcohol available at any pharmacy. Acetone will melt many/most plastics, alcohol will not.
91% isopropyl alcohol and a thin plastic card worked fine, took a little more time and patience but worked.
While the acetone is better at loosening/removing adhesive, you also increase the risk of damaging plastics around the battery area or worse if it should leak into the keyboard or other area!
As the instructions note ... DO NOT over apply their adhesive remover!
Thanks iFixit for providing great tutorials, parts and supplies!
Happy Customer
-
Vergleiche dein Ersatzteil mit dem Originalteil. Möglicherweise musst du fehlende Teile übertragen oder Schutzfolien vom Neuteil abziehen, bevor du es einbauen kannst.
Um dein Gerät wieder zusammenzubauen, folge den Schritten dieser Anleitung in umgekehrter Reihenfolge.
Entsorge deinen Elektromüll fachgerecht.
Lief die Reparatur nicht wie geplant? Versuche zuerst einige grundsätzliche Lösungen . In unserem Antwortenforum kannst du Hilfe bei der Fehlversuche finden.
Rückgängig: Ich habe diese Anleitung nicht absolviert.
34 weitere Nutzer:innen haben diese Anleitung absolviert.
Besonderer Dank geht an diese Übersetzer:innen:
100%
Diese Übersetzer:innen helfen uns, die Welt zu reparieren! Wie kann ich mithelfen?
Hier starten ›
14 Kommentare
When remounting, putting back the trackpad in a nicely centered position can become a lengthy exercise of patience.
I haven’t find guides or tricks to help; the best I came up with was to
* put back just two corner screws, without tightening them, that is enough to keep it in place and not lose the washers
* flip back your macbook keyboard up
* center the trackpad and fix it in place with adhesive tape
* flip it back belly-up, tighten the two corner screws and add the remaining six.
Thanks; everything went well, except at the end I realized that I somehow damaged the battery connector from step 12/13. What is the part number, please?
Der Akkutausch funktioniert auch mit dem Heißluftfön bei max. 100° Celsius…
Einfach die Akku-Sektionen dazu eine Minute etwas erwärmen und dann mit der Karte den Klebstoff lösen!
Der Einbau des Trackpads ist etwas fummelig da es beim Zentrieren keine Arretierung oder ähnliches gibt, dazu am besten einige Schrauben etwas anziehen und dann systematisch festziehen! Ich legte das aufgeklappte MacBook über einen Überhang damit ich von oben das Trackpad immer justieren konnte und mit der anderen Hand schraubte ich von unten die Schrauben fest ;-)
I fixed it! My original battery had swollen badly and had been a fire hazard.
This was my first time fixing a phone / laptop. Instructions were quite clear and easy to follow. I didn't run into any problem.
Very proud of myself at the moment ☺️
Is it possible to remove the battery with heat rather and remover?
After completing this repair, my space bar feels slightly sticky and no longer registers presses, unless they are firm and in the very middle of the key. I think it's very important to let all of the solvent thoroughly dry out while the laptop is still open and before the new battery is installed, or some of the vapors may penetrate the keyboard and result in gunk getting deposited under the key dome, causing this issue. I'm not sure how to resolve this without removing and attempting to disassemble the entire keyboard, which is difficult on this model.
Excellent descriptions and photos. I did this without incident.
Instead of acetone/alcohol blend adhesive remover I used 91% isopropyl alcohol available at any pharmacy. Acetone will melt many/most plastics, alcohol will not.
91% isopropyl alcohol and a thin plastic card worked fine, took a little more time and patience but worked.
While the acetone is better at loosening/removing adhesive, you also increase the risk of damaging plastics around the battery area or worse if it should leak into the keyboard or other area!
As the instructions note ... DO NOT over apply their adhesive remover!
Thanks iFixit for providing great tutorials, parts and supplies!
Happy Customer
How long does your laptop run with battery you placed without connecting power source ? I mean the how is the battery performance? Did you buy from Ifixing ?
Thank you so much Tarun.
Great!!!
Muchas gracias Tarun.
The cable referenced in steps 11 through 13 was different than what was shipped. The battery pack I received had that cable glued in place on the battery side. I. disconnected the original cable from the motherboard and used the cable that was included (attached) to the replacement battery, connecting it on the terminal that the original was attached to. I'm not sure where the difference came from, I am charging the battery as I write this and hope that it charges correctly. I know it boots up, I did that and put the Auto Boot setting back to original.
Super Anleitung, hat alles wie beschrieben funktioniert und mit dem Tool Kit für den Batterie Wechsel waren alle benötigten Werkzeuge dabei. 10 von 10 Punkten !!! DANKE
MacBook Pro 13" Retina 2018














Is this step necessary? I can’t perform this step as I am attempting to repair water damage and need to remove logic board & most likely replace the battery.
Macrepair SF - Antwort
@mac_medic You definitely don’t want the power coming on while the board is wet. In your case, I think powering on the machine to disable Auto Boot would do more damage than it prevents. I agree, skip this step and be prepared to disconnect the battery quickly if the laptop automatically powers on. Good luck!
Jeff Suovanen -
Thats right! You don't want power running while working on your logic board.
Dan -
This did not work when running High Sierra.
Kyle B - Antwort
Tried this on a 2018 MBP 13” Touchbar (there’s no iFixit guide for this model yet). Need to replace a broken screen.
Luckily I managed to connect to an external screen (Cmd-Down Brightness to switch displays) and enter above command. Seems to work, but there’s another problem with this model - it powers up as soon as any key is pressed……. ffs <gnashes teeth>
Cool_Breeze - Antwort
I unscrew the battery first and wrap electrical tape over the logic board battery connector before attempting any repairs to the board. Haven’t had any problems yet and I’ve worked on about 10 of these models already. Also when you open the bottom case use a suction cup at the bottom and pull up then run a plastic spudger along the edges to disconnect the clips. Also only use a plastic spudger on the board. Saw a youtube video from a repair shop and he did not disconnect the power and used all metal tools during the entire process of removing the board. His last step was to disconnect the battery terminal.
Brian - Antwort
Is this step necessary if my mac can turn on? Battery fully dead(
Nursat b - Antwort
BEFORE YOU START: The included torx head stripped off before I was done (and you might need an additional T4) so stop now and go buy a good one. Also they fail to warn you above to get some blue threadlocker ahead of time.
Jason Sherron - Antwort
This command did not work for me and I read that sometime in later 2020 Apple stopped this command from working…any ideas on a work around?
Patrick Machacek - Antwort
Not able to do that with damaged screen
richardjgreen - Antwort
If you have a damaged screen you can still use a converter from thunderbolt (USB 3) to HDMI and plug your Macbook Pro to your TV as monitor display. Just make sure to chose the right Source (HDMI IN) in your TV. I did it and to make it work I unplug and plug again in my Macbook and so I could disable the Auto boot
Roberto Sanchez Bustos -
Hi. This does not work on 2018 13” MacBook Pro with Touch Bar. I did exactly this to disable auto boot. But when I check by using nvram -p it says: auto-boot true. Am I doing something incorrectly? I did everything step by step. Copied and pasted the sudo command, pressed enter and then entered my password. I have Big Sur 11.1 installed. Is there any other way since I need to replace the screen. Thank you. Adrian
Adrian Vizik - Antwort
Hi everyone. This is also a little pointless if you can’t see anything on the screen, and you don’t have a display adapter to USB C to display it. I agree with Brian about removing the back and disconnecting the battery cable before you even think about opening the lid of the MacBook. Applying the insulation tape is also a handy little tip that just makes sure there is no way to discharge from either the board or battery.
Roberto Enrieu - Antwort
running `nvram -p | grep 'AutoBoot'` in terminal verifies that it was accepted
result: `AutoBoot %00`
Marek Polák - Antwort
Running Big Sur 11.6.7 on a 2019 16" MBP, it's "auto-boot". So it's:
nvram -p | grep 'auto-boot'to display the current state, the default istrue- and then to change it,sudo nvram auto-boot=falsewhich turns it off.Ed Mechem -
This step is completely unnecessary if you follow the guide to disconnect the battery properly. Just put some tape between the battery and logic board connection to prevent it from accidentally touching and therefore powering on the laptop.
Grant Ormsby - Antwort
It took me a few tries to make this command work, as I was able to copy and paste the command into Terminal, but could not type in my laptop’s password. I finally typed my password into a text document, copied it (command C), and then pasted it into Terminal and it worked.
tommy404 - Antwort
I didn’t do this. Mine never auto-booted before I replaced the battery. Now it does.
hatuxka - Antwort
BEFORE YOU DO ANYTHING - CHECK THE BATTERY!
I-fixit sent me a bad battery, which I didn’t realize until it was already install. They sent me a new one, but I wasted hours uninstalling and reinstalled.
Get a volt meter and measure the voltage on the output of the battery pack. If it reads 0 V, SEND IT BACK. It should read over 2 V.
bcardanha - Antwort
I've just received my replacement battery and it reads 0,042V between the two main connectors. Do you think it's dead?
peter sussex -
When I did this from Terminal.app within Recovery Mode, the “sudo” was not recognized but I could invoke it without the sudo part. It seems to have been accepted when looking at “nvram -p”
johann beda - Antwort
When in Recovery Mode, you already have superuser powers. So you don't need to prefix commands with the sudo command to invoke them with root privileges; you already have them. Do a
pwd(print working directory) after opening Terminal in Recovery Mode, and you'll see that you're in the root user's directory.Ed Mechem -
I received the battery kit for my 2018 MacBook Pro and as per the above comment from bcardanha - Oct 12, 2021, I checked the voltage on the pads marked + and - . It was zero volts so I panicked a bit.
I sent a message on the iFixiT Facebook page and I got no reply. I finally found the customer service email for Ifixit Europe and sent them an email voicing my concern as I was not keen to work for couple of hours just to discover that the battery is faulty. I had an almost instant reply on the email (kudos to them) and they adviced me to go ahead and install the new battery as the voltage measured when battery is not connected is not relevant.
I took a leap of faith and after two hours… the new battery showed 50% charge and everything seems to be working just fine. I am happy it worked.
Mircea Comanici - Antwort
After removing the old battery and installing the new battery I powered up the MBP before screwing the bottom on. I discovered the my keyboard would not function. It took a few hours of investigation and frustration that I discovered the track pad power ribbon had become partially dislodged from the trackpad. I was able to see that this through the little machined slot where the battery sat. I had to remove the trackpad to reinsert the power ribbon back into the connector in the trackpad. after reassembling and reinstalling the battery etc the keyboard worked. Just food for thought if your run into the keyboard issue.
Ed Mease - Antwort
This should be the default. IMO I tell you to power on - not the lid.
G Sena - Antwort
Est ce que cela fonctionne sur un macbook pro 2017 sans touchbar ?
maël muzelet - Antwort
Bonjour Maël, oui, ce tutoriel concerne "les MacBook Pro 2016 (et plus récents) et les MacBook Retina 12" 2017 (et plus récents)"
Claire Miesch -
Excellent instructions. I was able to follow and install the new screen. I recommend that you get a good set of tools before you begin. I started with an inexpensive repair kit bought online. The Penta and torx bits failed. I bought an IFIXIT kit with quality bits and I was able to do everything I needed.
Tom Markham - Antwort
If you're not running an admin account the sudo command won't work (which honestly, you should not be running admin). Rather than logging in to your admin amount via the OS, in the terminal type "login [admin username]," then the password and you'll be able to do the sudo command as described above. Once you're complete, type "logout [admin username]" and you'll be good to go. Obviously replace [admin username] with whatever the account name for your admin user is.
arichard2401 - Antwort
For those unable to complete this step because the screen is too damaged I recommend leaving your macbook on until the battery dies.
Nicholas R Licato - Antwort
Just replaced my 2018 15" MBP battery. Running Sonoma.
I found no way to disable AutoBoot (The status can be checked in the Power section of system report).
Anyway, i left my battery completely drain before opening the MBP, and had no issues during the process.
Cédric Bontems - Antwort
After sending this command in terminal when I checked what happens if I now open the lid, instead the screen lit slightly up (still black) then a battery symbol showing the charging state showed up.
Now, after replacement of the battery, this is all I get to see.
No reset of NVRAM nor PRAM helped.
Currently the new battery charges (58% atm) and it feels like it‘s mocking me.
webrockers - Antwort
I suspected the keyboard or TouchID sensor wouldn’t work, so I went on and checked every connector.
I missed connecting the left TouchID sensor from step 31.
webrockers -
Read the comments section at the bottom of the article before proceeding with the repair. It is unnecessary to remove the logic board. I actually removed the 45mm plastic bar to enable the cables to slip out then in. It is only there to frustrate repairers!
Jack - Antwort