Zum Hauptinhalt wechseln
Motorola Razr V3 Camera Replacement

Motorola Razr V3 Camera Replacement

Christian

Christian und 8 weitere Mitwirkende

Zuletzt aktualisiert am May 7, 2024

45 Minuten
Mittel
Empfohlene Anleitung von Studierenden

This guide will show you how to install the Motorola Razr V3 camera. You may need to install a new camera if the camera doesn't show any picture or otherwise does not work.

Was du brauchst

Werkzeuge

Mehr anzeigen …

Einführungsvideo

  1. Motorola Razr V3 Camera Replacement, Battery: Schritt 1, Bild 1 von 2 Motorola Razr V3 Camera Replacement, Battery: Schritt 1, Bild 2 von 2
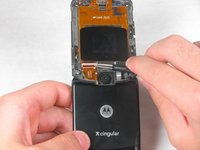
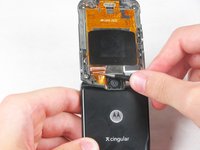
    • Remove the back cover by pressing down the silver button.

    • Pull the cover away from the phone.

  2. Motorola Razr V3 Camera Replacement: Schritt 2, Bild 1 von 2 Motorola Razr V3 Camera Replacement: Schritt 2, Bild 2 von 2
    • Remove the battery by pushing down on the top and pulling it away from the phone.

  3. Motorola Razr V3 Camera Replacement, Upper Casing: Schritt 3, Bild 1 von 1
    In diesem Schritt verwendetes Werkzeug:
    Tweezers
    $4.99
    • Use tweezers to pry off the four rubber screw covers from the inside face.

    • Our phone is missing the two left screw covers, be careful not to lose yours too!

  4. Motorola Razr V3 Camera Replacement: Schritt 4, Bild 1 von 1
    • Remove the four T5 Torx screws that were underneath the rubber covers.

  5. Motorola Razr V3 Camera Replacement: Schritt 5, Bild 1 von 1
    • Use the plastic opening tool to pry the top cover away from the phone.

    • The side buttons on the phone may fall out when the top cover is separated from the phone. They can easily be put back by placing them in their original spot.

  6. Motorola Razr V3 Camera Replacement, Camera: Schritt 6, Bild 1 von 2 Motorola Razr V3 Camera Replacement, Camera: Schritt 6, Bild 2 von 2
    In diesem Schritt verwendetes Werkzeug:
    Tweezers
    $4.99
    • Use tweezers to flip up the ZIF tab on the camera ribbon cable socket.

    • Gently pull the camera ribbon cable out of the ZIF socket.

  7. Motorola Razr V3 Camera Replacement: Schritt 7, Bild 1 von 1
    • Using a pair of tweezers gently grab and remove the camera from the phone.

Abschluss

To reassemble your device, follow these instructions in reverse order.

Eine weitere Person hat diese Anleitung absolviert.

Christian

Mitglied seit: 04/18/13

251 Reputation

2 Anleitungen geschrieben

Team

Cal Poly, Team 3-46, Amido Spring 2013 Mitglied von Cal Poly, Team 3-46, Amido Spring 2013

CPSU-AMIDO-S13S3G46

4 Mitglieder

10 Anleitungen geschrieben

0 Kommentare

Kommentar hinzufügen

Seitenaufrufe:

Letzte 24 Stunden: 1

Letzte 7 Tage: 12

Letzte 30 Tage: 25

Insgesamt: 2,092