Einleitung
Hier wird der Austausch des optischen Laufwerks gezeigt. Das Laufwerk verbleibt fast als Letztes in der Konsole, dies bedeutet, dass du praktisch alle Teile vorher ausbauen musst. Es sind viele Schritte durchzuführen, wenn du noch Garantie hast, würdest du sie dadurch verlieren.
Was du brauchst
-
-
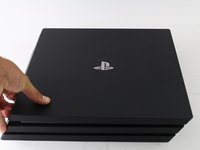
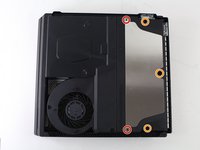
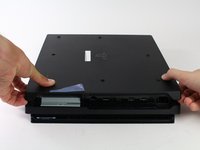
Drehe die Konsole mit der Unterseite nach oben.
-
Ziehe mit den Fingern am Plastikdeckel der Festplatte und lasse ihn aufschnappen.
-
-
-
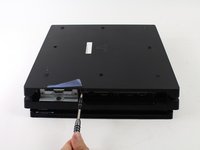
Drehe die Kreuzschlitzschraube #1 heraus, welche den Festplattenträger befestigt.
-
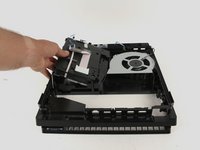
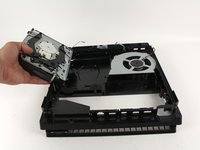
Ziehe den Festplattenträger gerade heraus.
-
-
-
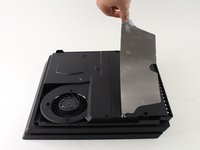
Drehe die Konsole auf die richtige Seite.
-
Fasse die beiden Ecken an der Vorderseite an.
-
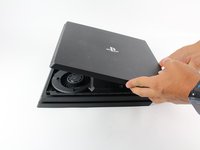
Ziehe sie nach oben, bis du ein lautes Klicken hörst.
-
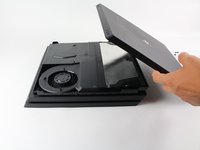
Wenn sich beide Ecken gelöst haben, dann kannst du die Abdeckung nach hinten schieben und abheben.
%#*@. I thought I was gonna break the thing. You really do have to give it some elbow grease.
there were also some screws that needed to come out before popping it off. Might have been a different version im working on. there were three screws attached to the console that I had to remove before popping off the top.
Same here. There were 3x T8 Torx Security screws on the back side of mine. (PS4 Pro with C14 power socket - same socket PC power supplies have).
They were all on the rear:
1) between drive caddy and LAN port
2) between USB port and optical audio out port
3) between HDMI port and power socket
TheWolf -
The 7215B has one TR8 security Torx behind the center “void” sticker.
-
-
-
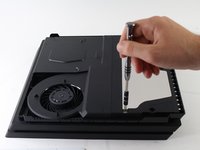
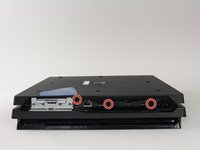
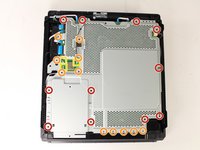
Entferne vier oder fünf Torx T8 Security Schrauben vom hinteren Teil des Geräts.
-
Zwei 31 mm Schrauben.
-
Drei 10 mm Schrauben beim 7000 Modell oder zwei graue 10 mm Schrauben, wenn deine PS4 Pro ein 7100er Modell ist (die mittlere Schraube ist dann nicht vorhanden).
-
Ziehe die Metallplatte nach oben und entferne sie.
I copy the comment written by Jason at the end of this guide, because it’s better to have it here:
This guide is for the initial release CUH-7000 models. Of note is the changes to the CUH-7100 series that do make this guide an issue. Steps 4 and 5 have a different items to note. You can damage it following this guide if you don’t adjust. There no longer 3 security screws for the case, but just one. This single screw is still covered by a warranty sticker, but the second one is a blank sticker and no screw behind it. There is also no 10mm screw in the center power supply in Step 4, it’s a support post. You still remove the 4 other screws, but you must then flip the console over and remove a T8 screw to the right on the HDD cage and another closer to the right side. You can then flip the console over again to remove the battery and plug it. Just remove all the metal plate screws to be sure, but make sure you hold the board when you flip it again or you will bend the battery prongs like I found out the hard way.
Oh! That explains why I stripped the middle screw. What’s a support post?
Had to use TR8 instead of 10mm here.
After I popped the top off, I got 4 out of 5 screws out. The 5 th screw for some reason, was a little bit bigger, therefore, I could not take out that screw so I could clean the heatsink and fan.
Me too it’s not like another screw it’s have black and I can’t remove if you know pls tell me how i do bro ???
I stripped the %#*@ screw in the middle. (orange highlighting) It’s a black head and the T8 Torx Security head doesn’t work! I have a CUH-7115B. I think it’s a regular T8 or some kind of Hex head. ? I don’t know what to do now!! :(
As mentioned above, this guide is for the old models. 7215B: There 4 TR8 screws (2 long, 2 short) holding the plate. The middle is a support post.
-
-
-
Drehe die Konsole um, so dass der Boden nach oben zeigt.
-
7000er Modelle: Entferne drei schwarze 7 mm Torx T8 Security Schrauben von der Rückwand.
-
7100er Modelle: Entferne die schwarze 7 mm Torx T8 Security Schraube in der Mitte und den Garantie-Aufkleber links.
-
Entferne die Bodenabdeckung auf die gleiche Art, wie die obere Abdeckung. Fasse die Abdeckung an beiden Seiten und ziehe daran, bis es klickt. Schiebe dann die Abdeckung weg. Passe bei den 7100er-Modellen auf die beiden Clips auf, die die Schrauben ersetzen.
Adding to this, the screws are not visible unless you remove the warranty stickers!
Also, the plastic on the back of the cover is prone to cracking. Be careful and undo snaps across the whole back of the panel gently!
Vielen vielen Dank. Endlich ist der jumbojet gelandet #fan
7215B has 1 TR8 screw beneath a sticker between the optical and USB ports, and two clips (1 next to the HDD slot and 1 beneath a sticker near the power port.)
-
-
-
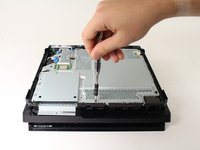
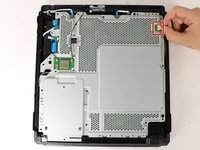
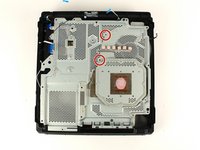
Entferne die elf 10 mm silberfarbenen Torx T8 Security Schrauben von der Metallplatte.
-
Entferne die elf schwarzen 4 mm Kreuzschlitzschrauben #1 von der Metallplatte.
-
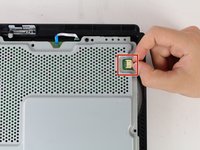
Heble mit einem Spudger die drei Antennenkabel (zwei schwarze und eine weiße) gerade aus ihren Anschlüssen hoch und löse sie ab.
Noted during my replacement that the PS4 Pro appears to have additional #0 Phillips Head screws in Step 6 required to remove the metal plate from the motherboard and that the metal “X” plate in Step 11 appears to be included now in this overall metal cover for the motherboard, no longer separate, which accounts for the additional screws.
Original pro here. Had 12 torx
(PS4 Pro) Bei mir ebenfalls 11 T8 Torx, von denen 3 Sicherheitstorx waren.
What are the 3 different antennas identifications or functionality ?
-
-
-
-
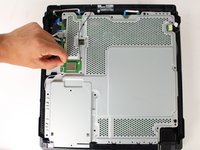
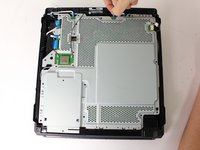
Ziehe den weißen Stecker des Lüfters gerade aus dem gelben Anschluss auf der Hauptplatine.
-
-
-
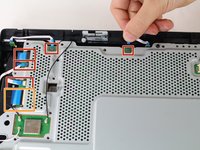
Löse die fünf kleinen blauen Flachkabel, die an der Metallplatte angeschlossen sind.
-
Klappe den Sicherungsbügel am ZIF Anschluss des breiten Flachbandkabels hoch.
-
Ziehe das breite Flachbandkabel aus dem Anschluss heraus.
What the cable in the up left corner is for? I broke it and i’d like to know at what is it connected?
Thanks
-
-
-
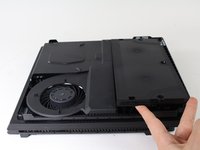
Drehe die Konsole wieder um und arbeite an der Oberseite weiter.
-
Ziehe das Netzteil hoch und lege es auf die Konsole.
-
Fasse den Stecker hinter dem Netzteil und ziehe ihn gerade heraus.
Why do I have to remove the PSU here? I do not see the necessity judging by the following steps.
This comes in handy when removing the entire motherboard which is necessary when cleaning the heat sink.
Bonjour, Que se soit le connecteur du bloc comme celui sur la partie ps4 , il est difficile à retirer ce câblage… peut-on tirer sans risque réellement ?
IMPORTANT: The connector on the motherboard is very sensitive. I’d recommend using pliers to put pressure down on the connector while slowly jerking the cable out of the socket to avoid serious damage to the connector and/or motherboard that could render the PSU connection useless and require advanced soldering / rewiring.
This!
Connector was quite tight in PSU side and I ended pulling connector from motherboard resulting me getting PS5 for Christmas.
tero -
Der Stecker am Netzteil (letzter Schritt) erscheint mir ungewöhnlich fest, und lässt sich ohne weiteres nicht entfernen. Besteht die Möglichkeit, dass dieser neuerdings verklebt ist oder dergleichen? :-/
Das würde mich auch interessieren. Ich habe den Stecker weder vom Mainboartd noch von der PSU abbekommen. Leider habe ich den Stecker dann abgerissen - aber er hat sich auf keiner Seite abziehen lassen.
Bei dieser Stecker-Buchse Verbindung handelt es sich um einen Molex-Stecker, der verriegelt ist. An der Seite befindet sie ein kleiner Hebel, den man nach innen drücken muss, damit sich der Stecker löst.
Danke für die Info!
An meinem Stecker war kein Hebel zu erkennen. Ich habe auch nicht den Stecker am Netzteil, sondern den am Mainboard gelöst, da dieser besser zugänglich ist. Dabei mit dem Fingernagel die Buchse am Mainboard heruntergedrückt und ganz vorsichtig mit einem kleinen Flachschraubendreher an der rechten Seite den Stecker minimal rausgehebelt. Dann das Ganze auf der anderen Seite wiederholt. Danach durch Hin- und Herwackeln bei gleichzeitigem Ziehen des Steckers diesen langsam gelockert, dabei immer mit dem Fingernagel die Buchse Richtung Mainboard gedrückt. Man braucht wirklich viel Geduld und Fingerspritzengefühl für die richtige Kraft die man gegen Buchse und Stecker anwendet. Nachdem der Stecker endlich raus war, habe ich diesen mit einer Nagelfeile etwas zurechtgeschliffen, damit der sich nicht mehr so derartig festsetzen kann.
Ich habe den Stecker am Netzteil rausgezogen.... und bekomme ihn nicht mehr drauf. Habt ihr nen Tipp bevor ich einen der vier Kontakte abbreche? Lieben dank
-
-
-
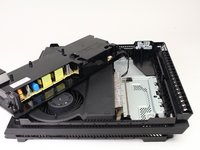
Drehe die Konsole vorsichtig um, so dass der Boden nach oben zeigt.
-
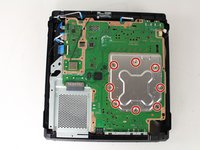
Entferne die acht 4 mm Kreuzschlitzschrauben #1, welche die Metallplatte mit der X-förmigen Prägung festhalten.
-
Entferne die Metallplatte mit einem Öffnungswerkzeug aus Plastik.
-
-
-
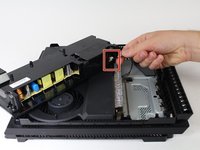
Entferne die vier 13 mm Kreuzschlitzschrauben #1, um die X-förmige Metallplatte darunter zu lösen.
-
Fasse die X-förmige Halterung und hebe sie gerade hoch.
Mine had an S shape with two screws.
Depending on the series it will have either a S or X shape bracket
I have heatsink issue 7016 (x-shaped). However I am only able to find S shaped heatsink plate (71xx model) in my country. Does anyone know how the heatpipes travel within the heatsink? I basically need to drill 2 more holes and thread it to put the x clamp. Also the hole and thread size would be helpful.
-
-
-
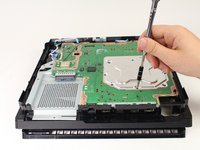
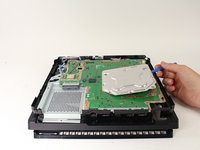
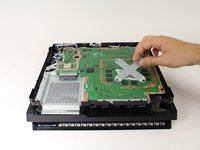
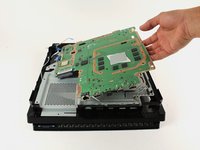
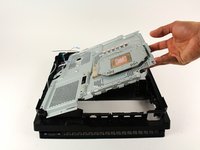
Fasse die Hauptplatine an der Kante und entferne sie vom Gerät.
Does anybody know the name of the white detail from the first screenshot step #13? (Plastic with square metal inside). I broke it by accident during dissembling and want to find replacement for it, but can’t find it anywhere.
I can read F2-4 >POM< on the plastic piece but i guess thisis a radiator/thermal dissipator support. HTH
Won't you also need a paired optical drive to replace the motherboard? My ps4 got broken some weeks ago and I've found out that I need to replace the motherboard for it to work again, but I keep seeing that you also need a paired optical drive. Is this true? My ps4 pro is a CUH-7216B if that helps
-
-
-
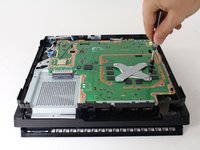
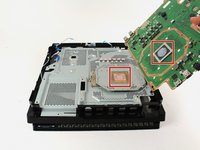
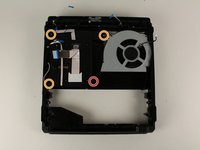
Entferne die beiden silberfarbenen 6 mm Kreuzschlitzschrauben #1 von der Metallplatte.
-
-
-
Hebe die Metallplatte, welche mit der Heatpipe verbunden ist, gerade hoch und entferne sie.
-
-
-
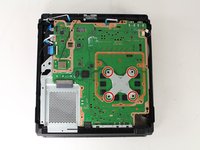
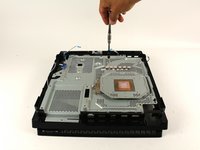
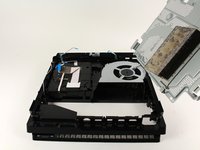
Entferne folgende vier Kreuzschlitzschrauben #0:
-
Eine 30 mm Schraube
-
Drei 6 mm Schrauben
-
Hebe das optische Laufwerk an und entferne es.
Great guide but it would be great if you could mention at the beginning that dismounting the heatseak will be required, as will reapplying thermal paste and add these tools to the list…
Yeah, they probably should have made it more obvious for those who are inexperienced, but one who’s repairing or disassembling any electronics should have thermal paste on-hand. Also, if you anticipate a teardown to the motherboard, it’s usually expected to remove any heatsink for the main processor.
Robert -
No es normal que deje de funcionar de repente sin ningún motivo. Hablamos de obsolescencia programada en contador de horas de función on?
I did this guide step by step and then in reverse. Worked out fine, but the optical drive is not reading disks. Anyone have any suggestions? Do I need to initialize my system after installing a new disk drive?
Same problem here. Mine works if i tap on the case in exactly the right spot, but I think i’ll buy a new carriage.
They seem to sell for about $30 in Aus.
low d -
After replacing the disc drive, the unit powers on 3 beeps, then turns off.
I've done 2 overheating treatments to the processor. Also, replaced the power supply. No luck. Any thoughts,? There isn't much info out there on the pros
Hallo mein Sohn hat eine Mini Musik CD ins Laufwerk geschoben. Bekommen wir sie wieder raus???
I have the same original optical drive as shown here, with the long cable. If you have this drive in a very early North American PS4 Pro (mine was US market) the replacement drive offered by iFixit DOES NOT WORK IN YOUR MACHINE. Even if you swap cables - the included primary data cable in the replacement is too short - it WILL NOT WORK. What you probably need is a KES-496A optical pickup, and swap that out inside your existing optical drive. That’s what I had to do, and it fixed it for me.
Hi, I know that PS4 original has a daughter board that needs to be swapped from old to new replacement optical drive. But what about PS4 pro model? There is no daughter board there. Is it possible just to swap same model optical drive and the PS4 will work normaly?
Thx for any answer
Hallo zusammen,
kurze Frage, ich möchte mein Laufwerk wechseln aber ich weiß nicht auf welche Nummer ich achten muss damit ich das richtige bestellen. Kann mir da wer weiterhelfen?
-


Um dein Gerät wieder zusammenzusetzen, folge den Schritten in umgekehrter Reihenfolge.
Um dein Gerät wieder zusammenzusetzen, folge den Schritten in umgekehrter Reihenfolge.
Rückgängig: Ich habe diese Anleitung nicht absolviert.
62 weitere Personen haben diese Anleitung absolviert.
Besonderer Dank geht an diese Übersetzer:innen:
100%
VauWeh hilft uns, die Welt in Ordnung zu bringen! Wie kann ich mithelfen?
Hier starten ›
Team

Cal Poly, Team S21-G5, Livingston Spring 2017 Mitglied von Cal Poly, Team S21-G5, Livingston Spring 2017
CPSU-LIVINGSTON-S17S21G5
4 Mitglieder
49 Anleitungen geschrieben
20 Kommentare
The PS4 Pro does not have a daughter board attached to the optical drive to match up the optical drive model numbers to like the regular PS4. Where do we find what replacement optical drive to buy? Would it be the most recent BDP-025?
I’m currently trying to find a replacement Optical Drive for my Ps4 Pro myself. Apparently, This is really hard to find. Managed to find a used one but the price to me seems a bit high at $123.
Excellent instructions just saved me a lot of dosh. I would recommend using Phillips #00 where #0 is noted however - worked better for me.
Thanks again though!
Forgot to say that I my drive was fine once I fished out the two Switch cartridges my 3 year old had posted in there! Obviously wanted to play Zelda on my PS4 pro - if only.
I had to open my optical drive up as a sticker had come off a disc and was lodged in there. Discs were going in and being ejected fine but would not read.
I opened the optical drive up and removed the sticker. Now when it's all back together and the console is running it won't accept a disc, the disc won't even go in far enough to trigger the motor to pull it in.
there a certain position the mechanisms should be in when re-assembling?
Did you solve the problem?
Konsol -
Not myself. I had it repaired by EB Games.
Will -
pro and slim have the same bluray?
Hab alles gemacht und auch wieder zusammen gebaut und jetzt startet die ps4 Pro nicht mehr :( es kommt nur ein kurzes blaues Licht wie wenn es sich Einschaltet und plötzlich schaltet sie sich wieder aus :/ was ist da jetzt?? Kann mir bitte der helfen?
I have a PS4 pro and have been having an issue where the drive will keep starting to spin with the characteristic ps4 whine, then stop, then start spinning again, then stopping, etc. until the system finally displays the unrecognized disc message.
After a couple attempts at fixing the drive, I decided that it must be malfunctioning, and needed to be replaced. I ordered a new drive and installed it. Unfortunately, the new drive is exhibiting the exact same issues.
So now I'm thinking it is not an issue with the drive itself, but don't know what else I can do to correct this problem. Does anyone have any suggestions?
Typo in step 6, Should say 6 Phillips screws
Awesome instructions - just used to remove a sticker which had come off a dvd and got lodged in the drive. I couldn't find anywhere online what the best pattern is to place the thermal compound on a PS4 pro, but have used vertical stripes across the shortest dimension on the chip and it seems to be doing fine.
Thanks again but please add a bit at the beginning warning that you will need thermal compound etc to complete fo others.
I suspect i placed my CD into the drive upside down, which is why the disk is unreadable. It is also not ejecting as there is no disk recognised. Tried the manual ejection and it has not worked so i think its stuck inside. My question is, can i remove it with force (E.g. Taking tweezers and pulling it out) or something like that or does it need to be opened ? I don’t know why it is stuck it should come out with manual ejection.
NO don't do this there is a screen that comes up a it will cost u more to replace that peice talking from experience here
Hello, I got a new drive, followed all instructions. Now the optical drive doesnt power on. Tried the old drive which use to power on and now it doesnt either. I was very careful (I am experienced enough with repair to know about ribbon cables and the delicate locks) and did not break anything. What else could be the issue? I have 10x checked and cleaned the drive’s ribbon connectors. I just dont know why they dont get power now?
Thank you very much guys. Great tutorial. It took me just 1.5 hour with new thermal paste installation.
You are the best!!
Hallo
ich habe an zwei Pros (7000 und 7100) die optischen Laufwerke getauscht. Jetzt ziehen beide die CD nicht mehr rein. So, also ob sie nicht angeschlossen wäre. Jedoch wenn die PS4 ausgeschaltet ist und ich eine CD rein schieben will, startet sie. Aber der Einzug tut nicht. Bei beiden der gleiche Fehler/Verhalten. Auch zurück tauschen hat nichts gebracht. Es es da einen besonderen Kniff den man beim Einbau beachten muss???
Ja, die 3 Flachbandkabel des Laufwerks habe ich mehrmals überprüft.
Das Laufwerk las nur noch DVD und keine Blu-ray mehr. Nachdem ich die PS innen soweit gesäubert habe und anschließend wieder zusammengebaut habe, läuft diese wieder einwandfrei... Besten Dank 👍
Defektes optisches Laufwerk einer CUH-7016B mit Ersatzlaufwerk von eBay repariert, hat einwandfrei funktioniert, tolle Anleitung, Danke!
DON’T FORGET TO HAVE THERMAL PASTE HANDY! It should be added to the “Tools Required” Section. You will NEED it!
Jaquell Chandler - Antwort
What if thermal paste is not applied again when remounting ? Will the playstation start and work anyway or not ?
Vincent Bee - Antwort
It will start and run normally until you put it under load. Then it will heat up and thermal throttle or it can overheat and destroy itself.
Jeremy Ivey -
I posted this down in another step too, but: if you have a very early North American PS4 Pro, with the exact optical drive shown here - the key way to tell is the very long data cable that’s folded a couple of times, see pictures in later steps - then the replacement drive iFixit offers WILL NOT WORK IN YOUR MACHINE. It has to be a very early model, apparently, but the model number isn’t enough to tell you.
Even if you swap the too-short cables in their replacement with the longer cables on your drive, it still will not work. At all. It’ll just sit there like the drive isn’t even getting power.
So if you do have this drive, what you probably need to do is get a replacement KES-496A Optical Pickup Assembly and replace that within your existing drive. That’s what I had to do after two different replacement drives sent by iFixit failed to work in my system. It worked immediately and I’m back online.
The optical pickup replacement is awfully fiddly, and adds a solid 20 minutes to the repair easily. But it does work.
Dara Korra'ti - Antwort
I had originally been told by several people that to properly repair the optical drive within the PS4 Pro (so that the PS4 actually works), you have to replace the Optical Pickup Assembly like you mentioned because the drive is paired with the motherboard. I was surprised to find that iFixit is pushing this repair tutorial when it has a low probability of success for many PS4 Pro models.
Instead, iFixit should be documenting replacement of the KES-496A Optical Pickup Assembly... when that repair has a near 100% chance of success, even though it's a fair bit more fiddly to complete and requires two different teardowns (one for the PS4 Pro and one for the optical drive... needed to install the replacement optical pickup assembly).
commorancy -
Follow-on note. I could be mixing up the original PS4's pairing with the PS4 Pro (which might or might not have device + motherboard pairing). Because I can't find a definitive source confirming if the drive is paired on the PS4 Pro, using a drive replacement might or might not work.
There are a number of commenters below who followed these instructions and found that the replacement drive didn't work after completing the repair. I think I'd still go with replacing the KES-496A Optical Pickup Assembly. That repair is more fiddly, but the optical assembly replacement part is a whole lot cheaper, costing less than $10 in some stores, than buying a full replacement drive at $70.
commorancy -