
Seville Classics MSC10166 Disassembly
Einleitung
Zu Schritt 1 der AnleitungThis repair guide solves any rotation and vibration problems that the fan might have. The track at the bottom of the fan is the main source of rotation and vibration problems. Use the tear-down guide to remove all other components to get to the track.
Was du brauchst
Werkzeuge


Mehr anzeigen …
-
-
Use the Phillips #2 screwdriver to remove the four 6 mm screws by unscrewing counterclockwise.
-
-
-
Remove the Phillips 6 mm screw that holds the circuit board to the outer shell of the fan.
-
-
-
-
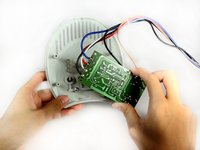
Remove the top cover containing the circuit board and the wires by pulling it away from the outer shell of the fan.
-
-
-
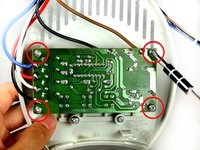
Remove the screws from the four corners of the circuit board.
-
Remove the circuit board from the top cover.
-
-
-
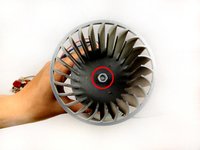
In order to remove the fan blade pliers were used to remove the holding nut.
-
After the holding nut is loose, use the pliers to pull up to remove the nut.
-
-
-
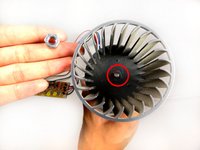
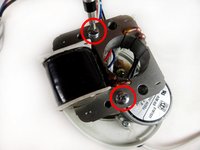
Remove the two bronze Phillips 29-mm bolts that hold the fan blade to the transformer.
-
Use a pair of pliers to hold the nut at the bottom of the transformer, as you unscrew from left-to-right at the top of the transformer. After, pull up and remove both the screw and nut.
-
-
-
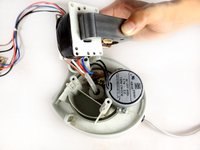
Next, remove the two silver Phillips (8-mm head) 40-mm screws from the transformer.
-
The transformer should be free after this step.
-
-
-
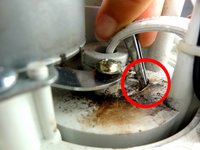
Clean the track, removing any obstructions.
-
Lubricate the track with grease.
-


To reassemble your device, follow these instructions in reverse order.
To reassemble your device, follow these instructions in reverse order.
Rückgängig: Ich habe diese Anleitung nicht absolviert.
2 weitere Personen haben diese Anleitung absolviert.
Team

Cal Poly, Team 15-46, Forte Fall 2012 Mitglied von Cal Poly, Team 15-46, Forte Fall 2012
CPSU-FORTE-F12S15G46
5 Mitglieder
6 Anleitungen geschrieben