
Sony Cyber-shot DSC-HX20V Flash Assembly Replacement
Einleitung
Zu Schritt 1 der AnleitungTo replace the flash on your device you are going to have to take quite a bit of pieces out.
Was du brauchst
Werkzeuge


Mehr anzeigen …
-
-
Orient the device so the bottom is facing up, and the lens is facing you ("bottom view").
-
-
-
Remove these two black M1.4 X 3.5 Phillips head screws.
-
The third, unmarked screw does not need to be removed at this time.
-
-
-
Orient the device so the LCD is facing you, and the hdmi cover is facing up ("left view).
-
Remove these three black M1.4 X 3.5 Phillips head screws.
-
-
-
After removing the panel, remove the two black M1.4 X 3.5 Phillips head screws.
-
-
-
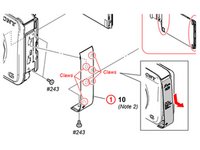
Use the plastic opening tool with a prying motion, going between the case and the LCD, from the middle of the LCD to the right of the device, undoing the claws retaining the back.
-
-
-
-
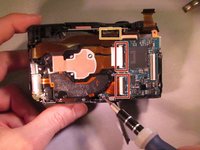
Unhook the small printed circuit board by gently pressing the board towards the top of the device and lifting up.
-
-
-
Using a plastic opening tool remove the black LCD retainer clip to the right of LCD.
-
-
-
Using the plastic opening tool to lift the black retaining clip up to disengage the ribbon cable. Then gently pull the ribbon cable to remove.
-
-
-
Remove the black M1.4 X 3.5 Phillips head screw in upper right corner of the device.
-
Service manual for reference: Click to go to the service manual.
-
-
-
Reorient the camera so you are looking at the "top view".
-
Remove the black M1.4 X 3.5 Phillips head screw next to the ON/OFF button circled in red.
-
-
-
Orient the device so you are looking at the "bottom view".
-
Remove the black M1.4 X 3.5 Phillps head screw located next to the tripod attachment.
-
-
-
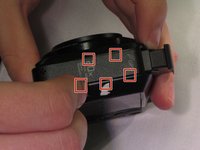
The connections (red squares) have small black retaining clips. Using a plastic opening tool, lift upward towards the cable to unlock.
-
The upper ribbon cable simply pulls loose.
-
-
-
Discharge the capacitor by connecting the resistor jig between the highlighted squares.
-
-
In diesem Schritt verwendetes Werkzeug:Tweezers$4.99
-
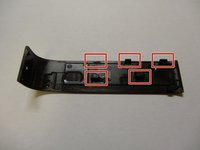
Use tweezers to remove the speaker retaining clip. The retaining hooks locations are indicated, but not exact.
-
-
-
From the top of the camera, Use a plastic opening tool between the flash and the case to remove the flash.
-
-
-
And here is the how the flash module should look after being removed.
-
This is a reference image: it is possible to further disassemble this module, and is not necessary.
-


To reassemble your device, follow these instructions in reverse order.
To reassemble your device, follow these instructions in reverse order.
Team

Eastern Washington University, Team 2-4, Matresse Spring 2015 Mitglied von Eastern Washington University, Team 2-4, Matresse Spring 2015
EWU-MATRESSE-S15S2G4
4 Mitglieder
10 Anleitungen geschrieben