Zum Hauptinhalt wechseln
WowWee MiP Robot Body Disassembly

WowWee MiP Robot Body Disassembly

Daniel Burkholder

Daniel Burkholder und 4 weitere Mitwirkende

Zuletzt aktualisiert am May 7, 2024

15 Minuten
Mittel
Empfohlene Anleitung von Studierenden

This guide is designed to help users disassemble the body of the WowWee MiP robot. This guide is a prerequisite for other replacement and repair guides.

Was du brauchst

Werkzeuge

Mehr anzeigen …

  1. WowWee MiP Robot Body Disassembly, Battery: Schritt 1, Bild 1 von 2 WowWee MiP Robot Body Disassembly, Battery: Schritt 1, Bild 2 von 2
    • Remove the three 12.0 mm Phillips # 2 screws from the battery cover.

  2. WowWee MiP Robot Body Disassembly: Schritt 2, Bild 1 von 2 WowWee MiP Robot Body Disassembly: Schritt 2, Bild 2 von 2
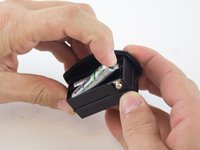
    • Carefully pull the battery pack from the robot.

    • Remove the batteries from the battery pack.

  3. WowWee MiP Robot Body Disassembly, Wheel: Schritt 3, Bild 1 von 2 WowWee MiP Robot Body Disassembly, Wheel: Schritt 3, Bild 2 von 2
    • Use a metal spudger to carefully pry off the hubcap without marring the plastic wheel or hubcap.

    • This plastic material is not replaceable. Any damage will be noticeable.

  4. WowWee MiP Robot Body Disassembly: Schritt 4, Bild 1 von 2 WowWee MiP Robot Body Disassembly: Schritt 4, Bild 2 von 2
    • Remove the 12.0 mm Phillips #2 screw.

    • Hold the wheel in place, or it will rotate as you attempt to remove the screw.

  5. WowWee MiP Robot Body Disassembly: Schritt 5, Bild 1 von 1
    • Pull the wheel off of the square axle.

    • Do not use excessive force while removing the wheel. Pulling too hard on the wheel can damage the axle.

  6. WowWee MiP Robot Body Disassembly, WowWee MiP Robot Body Disassembly: Schritt 6, Bild 1 von 2 WowWee MiP Robot Body Disassembly, WowWee MiP Robot Body Disassembly: Schritt 6, Bild 2 von 2
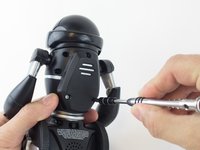
    • Remove the eight 9.3 mm Phillips #1 screws from the back of the robot.

  7. WowWee MiP Robot Body Disassembly: Schritt 7, Bild 1 von 3 WowWee MiP Robot Body Disassembly: Schritt 7, Bild 2 von 3 WowWee MiP Robot Body Disassembly: Schritt 7, Bild 3 von 3
    • Remove the arms from the body.

    • Carefully open the body compartment.

    • Open the compartment slowly. There are wires connecting the two body pieces together. If pulled too hard, the wires and/or the motherboard could be damaged.

  8. WowWee MiP Robot Body Disassembly: Schritt 8, Bild 1 von 1
    In diesem Schritt verwendetes Werkzeug:
    Tweezers
    $4.99
    • Using precision tweezers, disconnect the following three bundles of wires:

    • Connecting the battery pack to the motherboard.

    • Connecting the power switch to the motherboard.

    • Connecting the speaker to the motherboard.

Abschluss

To reassemble your device, follow these instructions in reverse order.

3 weitere Personen haben diese Anleitung absolviert.

Team

USF Tampa, Team 3-4, Wollert Spring 2016 Mitglied von USF Tampa, Team 3-4, Wollert Spring 2016

USFT-WOLLERT-S16S3G4

4 Mitglieder

10 Anleitungen geschrieben

0 Kommentare

Kommentar hinzufügen

Seitenaufrufe:

Letzte 24 Stunden: 2

Letzte 7 Tage: 8

Letzte 30 Tage: 27

Insgesamt: 2,754