Einleitung
Wenn dein iMac mit einer SSD (Solid State Drive) oder einem Fusion Drive konfiguriert war, dann enthält er eine Blade SSD auf der Rückseite des Logic Boards. Diese Anleitung zeigt, wie sie getauscht wird.
Bevor du am iMac arbeitest: Ziehe den Netzstecker heraus und halte den An-/Ausschaltknopf für mindestens zehn Sekunden gedrückt, um die Kondensatoren der Stromversorgung zu entladen.
Sei sehr vorsichtig und berühre keine Leitungen oder Lötstellen an den Kondensatoren auf der Rückseite des Netzteils. Fasse das Board nur an den Kanten an.
Was du brauchst
-
-
Reparaturen sind relativ schwierig, wenn der iMac aufrecht steht und man keine iMac Reparaturhilfe verwendet. Man kann den iMac zwar auch für Reparaturen hinlegen, jedoch ist es einfacher und schneller den iMac in aufgerichtetem Zustand zu reparieren.
-
Wenn du die Reparaturhilfe aus Karton von iFixit hast, dann baue sie erst mit Hilfe dieser Anleitung zusammen.
-
-
-
Beginne an der linken Seite des Bildschirms, auf der Seite der Ein-/Aus-Taste, und schiebe das iMac Opening Tool zwischen Bildschirm und Gehäuse.
-
-
-
Benutze das Werkzeug wie einen Pizzaschneider - rolle es entlang der Fuge zwischen Bildschirm und Gehäuse und es wird den Schaumstoffkleberstreifen durchschneiden.
-
Fahre mit dem Werkzeug entlang der linken Displayseite.
-
-
-
Fahre mit dem Werkzeug um die obere linke Ecke.
-
-
-
Schneide den Rest des Klebers an der rechten Seite des Gehäuses bis ganz nach unten durch.
-
-
-
Lege den iMac mit der Oberseite nach oben auf einen Tisch.
-
Beginne an der oberen rechten Ecke des iMacs und schiebe eine Plastikkarte zwischen Bildschirm und Gehäuse.
-
-
-
Verdrehe die Plastikkarte leicht, um den Abstand zwischen Bildschirm und Gehäuse zu vergrößern. Trenne allen Kleber in der Nähe der Ecke auf.
-
-
-
Schiebe die Karte in Richtung der Bildschirmmitte, um den Rest des Klebers durchzutrennen.
-
-
-
Schiebe die Karte zurück in die Ecke des Bildschirms und lasse sie dort stecken, um zu verhindern, dass der Kleber wieder anhaftet.
-
-
-
Schiebe eine zweite Karte in den Spalt zwischen Bildschirm und Gehäuse in der oberen linken Ecke.
-
-
-
Drehe die Karte leicht, um den Abstand zwischen Bildschirm und Gehäuse zu vergrößern.
-
-
-
Schiebe die Plastikkarte in Richtung Mitte und höre wieder vor der Mitte auf, um die iSight Kamera nicht zu beschädigen.
-
-
-
Setze die Karten, wie im Bild gezeigt, nahe an den Ecken ein und drehe die Karten leicht, um den Abstand zwischen Gehäuse und Bildschirm zu vergrößern.
-
Wenn Teile des Bildschirms sich nicht zu lösen scheinen, dann nimm eine weitere Karte, um in diesen Bereichen den Kleber ein weiteres Mal durchzutrennen.
-
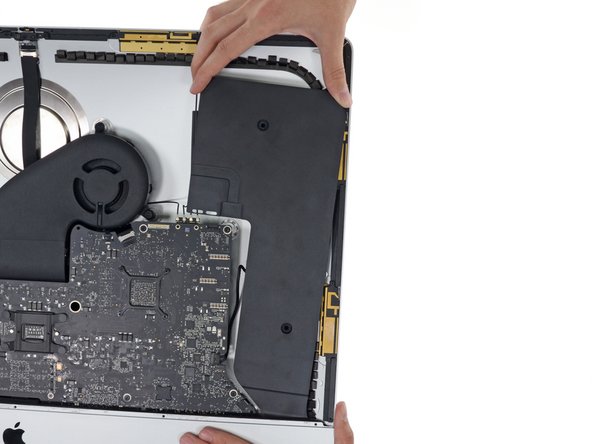
Beginne, die obere Seite des Bildschirms vom Gehäuse abzuheben.
-
-
-
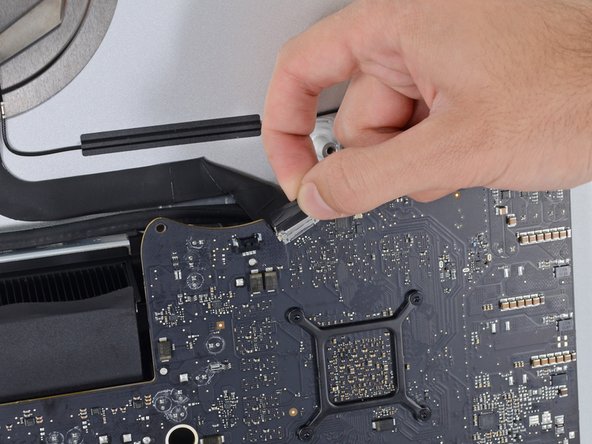
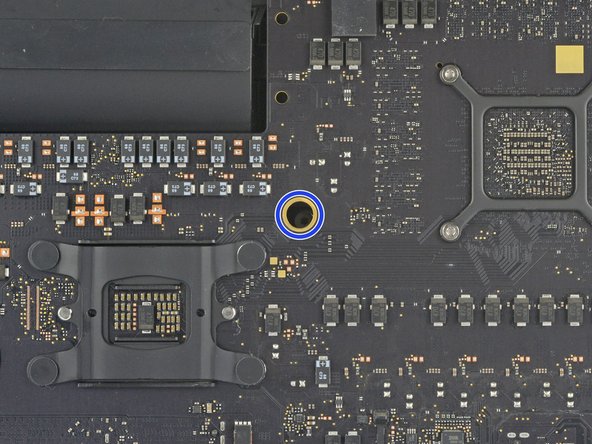
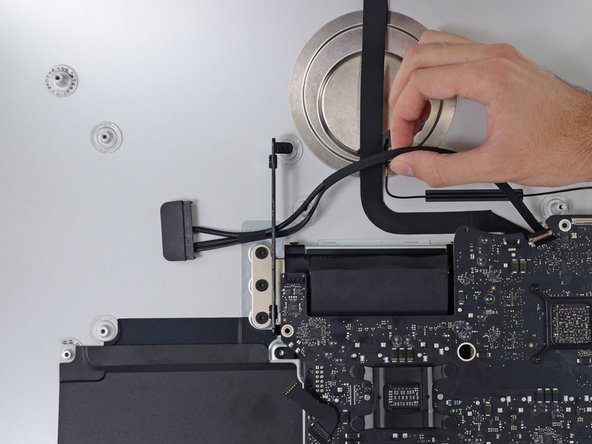
Während du den Bildschirm mit einer Hand nach oben hältst, trenne mit der anderen Hand das Versorgungskabel ab, welches zum Bildschirm führt.
Der Stecker muss seitlich wie die meisten anderen Stecker in diesem Modell komprimiert werden, um ihn aus der Buchse auf dem Logicboard zu ziehen. Die Zugrichtung ist parallel zum Logicboard in Richtung Oberkante des iMac. Ziehen ohne seitliches Zusammendrücken der Backen am Stecker könnte den Stecker oder die Buchse beschädigen.
These instructions are unclear. They imply the cable can just be pulled out but this step had me stuck for a bit. Searching the webs, I discovered that there are little tabs on either side of the connector. I used my prod tool and poked one side and the connector came out a little. I poked the other side the connector came out without a fight.
-
-
-
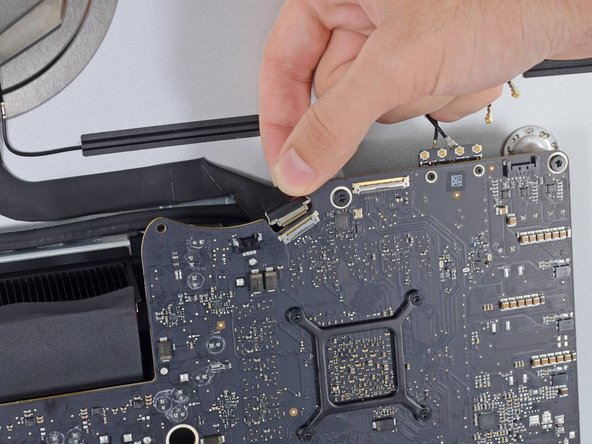
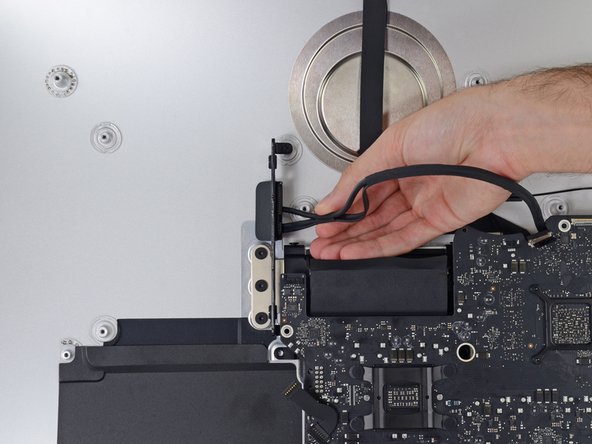
Klappe die Metalllasche am Anschluss des Bildschirm-Datenkabels um.
-
Trenne das Displaydatenkabel ab.
-
-
-
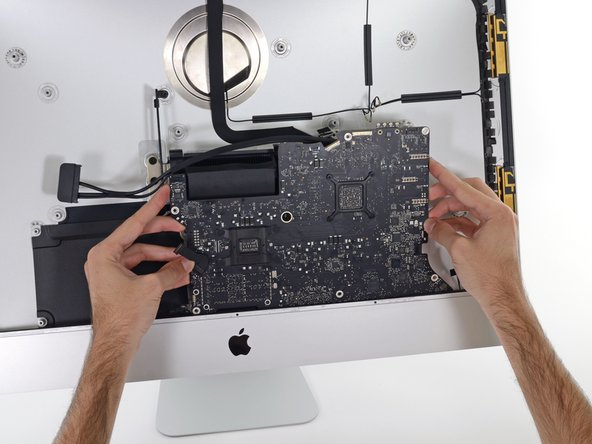
Hebe den Bildschirm soweit an, dass er fast senkrechte ist.
After rocking the display back and forth a bit, I found it helpful to use my iMac opening tool to gently slide ever so slightly underneath the bottom of the glass to cut the adhesive. This was with the display lowered back into it its normal position. I just worked about 1 millimetre deep at a time and eventually cut through the ~8” adhesive strip at the bottom centre.
It's possible to skip this step and go to step 24, leaving the display attached. You'll want to open the display just enough to replace the drive, with the machine upright and supported so the display doesn't swivel (I fold up a small pillow and wedge it in there). This way you don't have to worry about damaging the display when removing it, or aligning it when replacing it (which can be difficult to do solo as it's big and heavy).
Using a T8 with a short handle is helpful here, and make sure it's well magnetized so you don't drop the screws for the hard drive (just leave the other ones in the speakers).
-
-
-
-
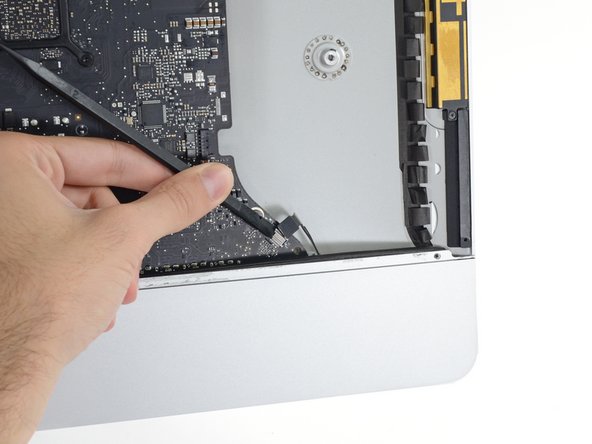
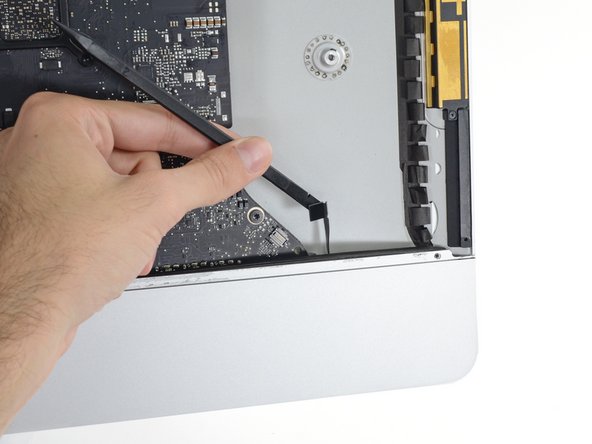
Fasse die kleine Lasche am Ende eines der Klebestreifen am unteren Displayrand an und ziehe sie zur Oberkante des Displays hin, so dass er sich ablösen.
-
Wiederhole diesen Schritt für den anderen Klebestreifen und entferne ihn.
-
-
-
Hebe den Bildschirm aus dem Rahmen nach oben und entferne ihn anschließend aus dem iMac. Lege das Display auf eine flache und weiche Oberfläche mit dem Bildschirm nach unten.
-
Möglicherweise musst du an einer Seite anfangen, den Bildschirm langsam anzuheben, um den Rest des Klebebandes zu lösen.
-
-
-
Entferne die neun 3,2 mm Kreuzschlitzschrauben, mit denen die untere Halterung befestigt ist.
-
Möglicherweise musst du die Display-Schutzfolie an der Unterkante des Gehäuses abziehen, um an die Schrauben heranzukommen.
I did not find it necessary to remove these screws and this bar
-
-
-
Entferne die untere Halterung (auch "Kinnriemen" genannt) aus dem iMac-Gehäuse.
No comments on this ?
It's quite possibly the most difficult part to put back in the entire process
The screws are tiny and the there is no easy way to line up the holes on the bracket with the screws
Having got this far - it wasn't even all that necessary to remove this part in the first place
Severe pain in the neck
With the right tools and technique, the bracket can easily be replaced in under a couple of minutes.
Use a screwdriver with a magnetized tip which frees up one hand and place a screw on the tip first.
Then line up the screw hole on just one end of the bracket and using a pair of tweezers from the side, hold the bracket in place while you put in the screw.
Next, do the same on the other end of the bracket. After that, all of the screws in the middle are quick to replace. I didn't really have to touch the bracket again after the end screws were in place.
Hope that helps someone else since removing this bracket does make later steps a bit easier.
-
-
-
Entferne die beiden 10 mm Torx T10 Schrauben.
I found i didn’t need to remove the speaker nor the hard drive. In fact I managed to remove the old PSU without even removing the chin strap. However, to install the replacement PSU, I had to remove the chin strap. So I would say, remove the chin strap, but you can optionally leave the speaker and hard drive in.
While you do not need to fully remove the screws as once you loosen them a few turns the speaker becomes free. I found that after the removal of the speaker, I turned it over and popped the screws out as this made it easier to replace it later as I could see the alignment before putting the screws back in. If not you may be off a little and you do not want to force the screw back in.
I used a pill container that I got from Walgreens to hold all of the fasteners I removed during the disassembly process. The container has 14 compartments (individual compartments for each morning and evening of the week). I put a small piece of paper in the compartment with the fasteners to note the name and step of the procedure and the size of the tool I used. Hopefully this will be useful when I go to put it back together again.
-
-
-
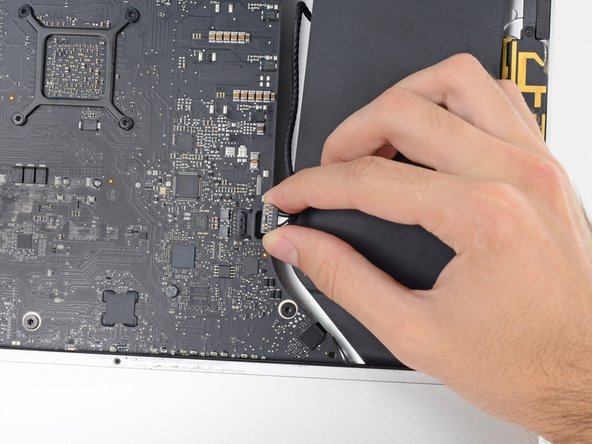
Ziehe das linke Lautsprecherkabel aus dem Anschluss heraus. Achte darauf, den Stecker gerade aus dem Anschluss auf dem Logic Board zu ziehen.
-
Entferne das Kabel aus der Lücke zwischen der Festplatte und dem Logic Board.
I didn’t unplug and de-route this cable. Later, Step 29, has you remove the left speaker. This isn’t necessary. If you can just move the speaker over to expose the hard drive mounting screws, so if you’re not going to remove the speaker, you don’t need to unplug it.
-
-
-
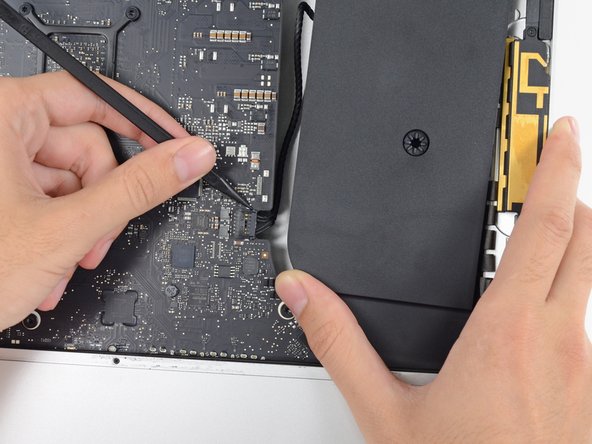
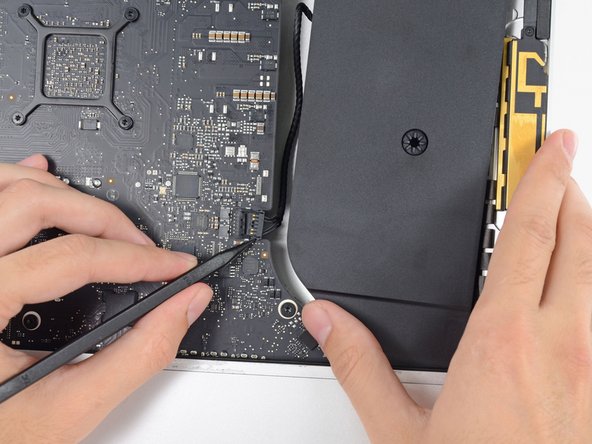
Verwende einen Spudger, um den Netzstecker aus der Buchse auf dem Logic Board zu trennen.
there is no need to disconnect the speaker, just unscrew it and move aside slightly to reach the HDD screws (about 5mm) - if you want to replace just the main HDD
Take note of exactly what direction this tiny little wire was.
The connector has a plain black side and the other side you can see the 2 silver connectors.. the side you can see the 2 silver connectors faces the front.. the plain side is to the back/against the logic board.
If I leave my iMac unplugged for an extended period, say 24 or 48 hours, is it still possible to get an electric shock from the PSU? Do the capacitors eventually discharge?
you can do this method, or just wear latex gloves.
make sure you’ve actually unplugged the mac when running this cable, and not had it plugged in to test the diagnostic LEDs, because one of those wee silver spots is carrying 230v, and its 6mm away from the place the cable runs, So if you have fat fingers like mine, that’s a free wake up zap
-
-
-
Hebe den linken Lautsprecher gerade nach oben hoch, bis das Kabel zur Einschalttaste frei liegt (ca. 13 mm).
This is MUCH easier to do if the support bracket along the bottom is removed first. See iMac Intel 21.5" Retina 4K Display (2017) Logic Board austauschen step 25.
Use a P00.
To replace it, introduce it like in the photo at the link to be able to hold the right most holes of the chassis and bracket. Replace the first screw, align the bracket to the horizontal and add the screws from right to left. Each one will bring up the next hole in the bracket close enough to screw through. Reverse those directions if you are a leftie.
-
-
-
Schiebe das Netzkabelkabel vorsichtig aus der Nut des linken Lautsprechers.
Pay attention: if pulling out the loudspeaker tear off the wire of the power button, Apple have not any service parts except for the whole rear housing!
This is MUCH easier to do if the support bracket along the bottom is removed first. See iMac Intel 21.5" Retina 4K Display (2017) Logic Board austauschen step 25.
Use a P00.
To replace it, introduce it like in the photo at the link to be able to hold the right most holes of the chassis and bracket. Replace the first screw, align the bracket to the horizontal and add the screws from right to left. Each one will bring up the next hole in the bracket close enough to screw through. Reverse those directions if you are a leftie.
-
-
-
Hebe den linken Lautsprecher gerade nach oben und entferne ihn vom iMac.
-
Ziehe an das Ende vom Konnektor während du den Lautsprecher entfernst, um den Kabel unter der rechten Abdeckung der Festplatte zu ziehen.
I found it wasn't necessary to remove the speaker from the left side to remove the hard drive. You can remove the screws, and then slide it over to the left — giving more than enough room to access the hard drive.
me too. don't need to remove it if you only want to change the hd
Agreed, wast of time to fully remove the speaker.
easier to remove the speakers if you unscrew the front ‘chin strap’ - 6/9 phillips screws that you can see in the picture hold that aluminum piece in place
Agree. This is MUCH easier to do if the support bracket along the bottom is removed first. See iMac Intel 21.5" Retina 4K Display (2017) Logic Board austauschen step 25.
Use a P00.
To replace it, introduce it like in the photo at the link to be able to hold the right most holes of the chassis and bracket. Replace the first screw, align the bracket to the horizontal and add the screws from right to left. Each one will bring up the next hole in the bracket close enough to screw through. Reverse those directions if you are a leftie.
-
-
-
Ziehe das SATA-Daten-/Versorgungskabel gerade nach oben und löse es von der Festplatte ab.
-
-
-
Entferne die beiden 7,3 mm Torx T8 Schrauben, mit denen die linke Festplattenhalterung am Rückgehäuse befestigt ist.
-
-
-
Fasse die Festplatte und linke Festplattenhalterung zusammen an.
-
Kippe die linke Seite nach oben und weg vom Gehäuse und schiebe die ganze Einheit nach links.
-
Entferne die Festplatte und die linke Festplattenhalterung vom iMac.
-
-
-
Trenne das Stromversorgungskabel von der Stromversorgung.
I found this cable very difficult to disconnect, be very careful because the cable is between a black tape and it's stuck very hard to the logic board and the cable is very short and you don't have space to move and separate it from the connection! Be patient and take the time you need
I found than putting the flat end of the spudger at the center of the cable, and tilting it got the cable out without an issue.
I was able to use the flat end of the spudger on the sides. You can see a tiny little clip on each side. Be very gentle!
These connectors seem pretty tough to remove until one understands the latch. Each side of the plug are two little sprung tabs (the tab is part of the spring clip which runs down the side of the plug on each side - makes sense once you see the removed plug!). Squeeze them in towards each other and then gently pull the plug from the socket. No great force, or even the spudger, needed once that is done.
One more tip, has worked on other cables for me. Fish the skinniest spudger tip you have under the cable, and with a finger of your other hand put opposite pressure on the cable against the spudger and gently work it out
If u are right handed, i can recomend to use your index left nail to press de bottom sprung, and a flat spudger on the right hand, came off so easy
If you have a insulated long nose pliers along with a splugger and can get underneath the cable WITH the long nose pliers on the RIGHT side of the cable, towards the logic board, with the splugger on the LEFT Side of the cable doing the same, you can get the leverage to GENTLY pull this cable out very easily.
-
-
-
Entferne die folgenden vier Schrauben, die das Netzteil am Rückgehäuse befestigen (Entweder T8 oder T10- Schrauben, je nach Modell):
-
Zwei 23,7 mm Torx Schrauben.
-
Zwei 7,3 mm Torx Schrauben.
-
-
-
Bewege die Netzteilplatine in Richtung des linken Gehäuserandes nach oben, um sie aus der Raste am Logic Board zu lösen.
This is MUCH easier to do if the support bracket along the bottom is removed first. See iMac Intel 21.5" Retina 4K Display (2017) Logic Board austauschen step 25.
Use a P00.
To replace it, introduce it like in the photo at the link to be able to hold the right most holes of the chassis and bracket. Replace the first screw, align the bracket to the horizontal and add the screws from right to left. Each one will bring up the next hole in the bracket close enough to screw through. Reverse those directions if you are a leftie.
The top right screw on the power supply actually screws into a stand-off screw connected to the back of the iMac case. Once you have removed the 4 x Torx 8 or 10 screws you can move the power supply enough to see the upper face of it.
It has a Torx 25 slot in it and comes out easily. This will give you a lot more room for your fingers in Step 40, depressing the tab on the DC power cable connector to pull it out, and when replacing it on reassembly. You may find it won’t require you removing the support bracket as in the suggestion above.
-
-
-
Drücke die Lasche am Stecker des Gleichstromkabels herunter, ziehe es dann senkrecht aus seinem Anschluss auf der Rückseite des Logic Boards.
Remember to push in the disconnect tab on the large connector. Carefully insert your finger and push on the tab before you pull on the connector.
Thank you Manuel, this was a tricky one.
Yes, I pulled the whole socket out because I didn’t know about the tab. Fortunately I was able to place it back in. Not sure if it was glued or how it was anchored but it seems to have a solid connection and I can’t easily pull it out by hand. Once I plug the power cable back in should be ok.
This connector was very difficult for me to remove (even after pushing the disconnect tab). Eventually I had to use a pair of needle nose pliers to wiggle it back and forth out of the socket. A lot of the cables on the my late 2015 model were very tight and a struggle to get out.
I'm struggling with this step. I presume that the tab to which you are referring is behind the connector. I can see a plastic protrusion there but it does not move when I push it. Just to get my finger behind it requires the power board to be moved quite a bit btw.
i could not get it out by the force of my fingers, so what i did was slightly turn the imac 90 degrees so i could reach the area better, push up (so, vertically) the power control board, push in the tab on the bottom of the connector with my right hand, and slightly wiggle the connector out of its socket with a plier
Left index finger pushing on the tab from behind the connector, using needle pliers in right hand to rock up & down did the trick thanks @starfleet_tone
Just be careful! I’ve seen two systems where the socket was pulled fully off! So the logic board then needs repairs or replacing being just a bit too aggressive!
Dan -
Needle nose and wiggling worked for us too. We were stuggling like heck with it when just using hands!
This is MUCH easier to do if the support bracket along the bottom is removed first - more space to angle the board upwards. See iMac Intel 21.5" Retina 4K Display (2017) Logic Board austauschen step 25.
Use a P00.
To replace it, introduce it like in the photo at the link to be able to hold the right most holes of the chassis and bracket. Replace the first screw, align the bracket to the horizontal and add the screws from right to left. Each one will bring up the next hole in the bracket close enough to screw through. Reverse those directions if you are a leftie.
I did as Andrew Gough did, per other videos reviewed. Removed it right away. Just makes things easier, more space for just a few screws :)
The top right screw on the power supply actually screws into a stand-off screw connected to the back of the iMac case. Once you have removed the 4 x Torx 8 or 10 screws you can move the power supply enough to see the upper face of it.
It has a Torx 25 slot in it and comes out easily. This will give you a lot more room for your fingers in Step 40, depressing the tab on the DC power cable connector to pull it out, and when replacing it on reassembly. You may find it won’t require you removing the support bracket as in the suggestion above.
I used your suggestion to remove the stand-off and then used my left hand index finger to press the tab while rocking the connector side to side with a needle nose pliers. Plug came out easily.
The tab is a pain in the a$$$ to get your finger in there. I was so horrified at the size of the capacitors that I put on gloves to reduce any amount of shock :-) . To get it loose I would pull out carefully the power board as far as I could than I wedge my index finger under and press the tab and slowly pull until I saw a slight gap between the end of the socket and the plug. I than place the flat part of the black spudger or blue one into the gap and use as it as a wedge to help move the plug forward as I kept the tab pressed.
-
-
-
Drehe das obere Teil des Netzteils zu dir, so wie wenn man einen Briefkasten öffnet, um an das Stromnetzkabel zu kommen.
-
Löse den Anschluss des Stromnetzkabels.
To reassemble, do the same in reverse but keep power supply board more upright than slanted down when re-inserting it in to the lower right corner. The lower right screw post has an protrusion under/behind it and the Power Supply's small 2 wire plug must fit between the front of your Mac and the obstruction. Then it just slides right in and then screw it down.
Wear gloves when doing this to reduce any shock. The size of those capacitors are very unnerving and scary. Also those solder joints.
-
-
-
Drehe zwei 9,8 mm Torx T8 Schrauben heraus.
I had one shorter one screw, and one screw shorter than the other two equal size speaker screws, but longer than the stubby screw. :) And I can confirm that these are T10s.
-
-
-
Rücke den rechten Lautsprecher leicht nach rechts, um an seine Kabelverbindung zum Logic Board zu kommen.
-
-
-
Löse den Stecker des rechten Lautsprecherkabels mit einem Spudger aus seinem Anschluss auf dem Logic Board heraus.
-
Ziehe den Stecker zum Ablösen nach rechts.
-
-
-
Mit der Spitze eines Spudgers kannst du den Verbindungsstecker des Lüfterkabels aus seinem Anschluss auf dem Logic Board lösen.
-
-
-
Löse das schwarze Klebeband leicht ab, welches den Lüfter mit dem Abluftschacht verbindet.
-
Löse das Klebeband nicht ganz vom Abluftschacht ab - nur die Verbindungsstelle muss frei sein, damit der Lüfter ausgebaut werden kann.
-
-
-
Entferne die drei 12,4 mm T10 Schrauben, die den Lüfter am Gehäuse befestigen.
-
-
-
Enferne den Lüfter vom iMac.
Use a piece of tape around the antenna cables to keep them in the same order, makes reassembly a little easier.
-
-
-
Drehe die beiden 4 mm Torx T5 Schrauben heraus, mit denen die AirPort/Bluetooth-Antennenkabel befestigt sind.
Rather than unscrew the antenna cables, I usually unscrew the screws on the board and slide out the whole AirPort/Bluetooth module, which means I need not keep track of which antenna cable goes where.
Fully agree with comment of johann! I did it that way and was glad to not having to deal with the microscopic IPEX "coax" antenna connectors and order of them.
I'd like to add that after removing the 2 screws, the wifi/bt module is still holding into these 2 holes with 2 metal pieces.
Before pulling the module out of its socket, one has to slightly lift it away from the mainboard (maybe 1mm, so the metal pieces leave the holes).
Fully agree. It is not only handy for order of cables but especially eliminates risk of damaging the quite delicate IPEX connectors on the broadcomm wifi/bluetooth board when removing and reconnecting later. This happened to me. It is a huge hassle to replace / repair.
This should be main option!! Wish I read this comment first.
-
-
-
Trenne jeden der vier Antennenstecker mit der Spudgerspitze von der Airport/Bluetooth Karte ab.
-
ganz links
-
oben
-
oben rechts
-
unten rechts
TIP: Tape all 4 cables first to keep them in the correct position when re-assembling.
-
-
-
Klappe die Metallhalterung auf dem iSight Kamerakabel nach oben.
-
Ziehe den Stecker des Kamerakabels senkrecht aus dem Anschluss zur Oberkante des iMac hin.
-
-
-
Löse mit dem flachen Ende eines Spudgers den Stecker des Kopfhörerbuchsenkabels aus seinem Anschluss auf dem Logic Board heraus.
-
Schiebe das Kabel behutsam aus dem Weg.
-
-
-
Klappe den Sicherungsbügel am ZIF-Verbinder des Mikrofonkabels mit der Spudgerspitze hoch.
-
Ziehe das Mikrofon-Flachbandkabel mit einer Pinzette gerade aus seinem Anschluss heraus.
Make a 10x macro photo of that connection with a good camera (showing how far the ribbon cable is inserted into the connector) BEFORE opening/pulling and later AFTER reinserting/closing it. Then carefully compare the photos concerning how far the cable is inserted.
The only mistake I made while fixing my iMac was not to fully reinsert that ribbon cable and thus the mic did not work at first.
-
-
-
Entferne folgende Schrauben, mit denen das Logic Board befestigt ist:
-
Zwei 23,7 mm Torx T8 Schrauben
-
Eine 20,1 mm Torx T25 Abstandshalterschraube
-
Eine 17,6 mm Torx T8 Schraube
-
Eine 7,2 mm Torx T8 Schraube
-
Drei 7,1 mm Torx T8 Schrauben
-
Eine unverlierbare Torx T8 Schraube
A 3.0 Hex driver worked for the T25 spacer screw.
-
-
-
Ziehe das SATA-Kabel und den Stecker der Festplatte durch die rechte Festplattenhalterung. Bewge das Kabel auf die rechte Seite des iMac aus dem Weg für den Abluftschacht.
When reassembling one should not "pull it through the right bracket", but rather "pull it through between the right bracket and the case".
-
-
-
Drehe die beiden 5,6 mm Torx T8 Schrauben aus dem oberen Teil der Kühleröffnung.
-
-
-
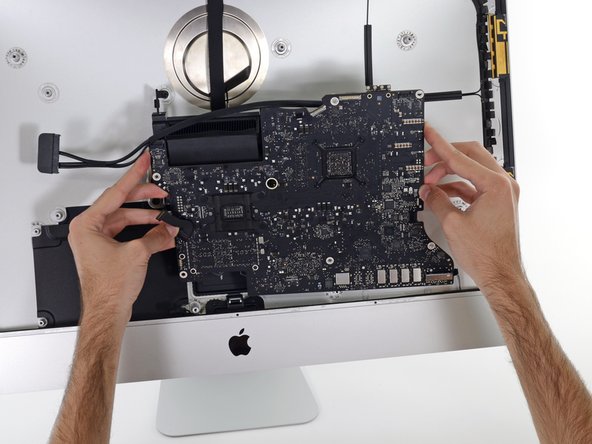
Kippe das Logic Board leicht nach vorne.
-
Hebe das Logic Board nach oben und aus dem iMac heraus. Sei vorsichtig, dass du an keinen Schraubenpfosten kratzt, die im Gehäuseinneren hervorstehen.
-
-
-
Beim späteren Zusammenbau musst du darauf achten, dass alle äusseren I/O Anschlüsse sauber in die Öffnungen passen. Das Logic Board könnte schief sitzen, sogar wenn alle Schrauben befestigt sind.
-
Du kannst einen USB-Stecker oder ein Ethernetkabel benutzten, um den korrekten Sitz des Logic Boards zu gewährleisten während du es festschraubst.
Insbesondere die USB3.1 Port sollten mit einem Stecker belegt werden! Ich habe nur die USB3.0 (A?) Ports mit Steckern belegt und konnte nach dem Zusammenbau alle Port benutzen, aber nicht die USB3.1 (C) Ports. Am besten überall einen Stecker rein.
Confirmed. Used the rightmost USB-C and the leftmost USB-A connector and it aligned perfectly.
-
-
-
Ziehe den Verbindungsstecker der SATA Stromversorgung nach oben und trenne ihn ab.
-
Drücke auf die Sicherungslasche am SATA Datenkabelstecker und ziehe den Stecker nach oben ab.
-
Entferne das SATA Kabel vom Logic Board, damit es nicht beschädigt wird.
Is this picture correct with 7 pins? Or is it form the 5k version? (See comments on that case below).
There is an cable on eBay with 5 pins.
This guide was written the year before the 5K model first came out. The cable in the photo is definitely for the model listed, although it’s always possible Apple made more than one variation.
Hey, if you got this far and your iMac is getting along in years, maybe pick up a BR2032 battery and replace the PRAM battery while you’re at it, as you have to get to this point to access it.
I'm waiting on the battery now! I have a CR2032 in the house, but I looked them up, and they're too different to make me comfortable using one. And I accidentally ordered the BR3032, AAAGH. Sigh. Stupid Amazon put them side by side, and I clicked on the wrong one. :) Must've been Amazon's fault. :) But for sure, I was looking at my computer in pieces, and I looked at that battery, and I thought, wait, when was this thing built? 2017? Um. Might be time for a change.
Tom, great tip on the battery. I put a new one in my 3½ year old iMac.
Could have used a warning that this cable is not present in models that shipped with a SSD. I was replacing my blade SSD and adding a new SSD at the same time, only to find that I was missing this cable while my iMac was in pieces. Had to reassemble it without adding the SATA SSD, major hassle.
This is a bit of a grey space.
Clearly you don’t need the cable if you are replacing the HDD or switching it out of a SSD. Its only when you are enhancing your system by adding a drive which you didn’t have before.
Dan -
Hello congratulations on your ssd blade upgrade. Have you used the owc blade or a samsung + adaptor? Regarding the cable, do you know if we can buy the cable and plug it into the logic bard so to add another ssd in the aluminum frame ? thanks a lot have a niceday
Patrick -
@patrick7508 - I encourage you to stick with a pin-compatible drive not use a M.2 adapter as they are not reliable and some drives are not compatible. Stick with a real Apple drive or OWC. Just think of the work you needed to do just to get to the drive.
Dan -
-
-
-
Entferne die einzelne 5,3 mm T8 Schraube, die die SSD am Logic Board befestigt.
What type och screw is this? I just need the measurements, is it a standard M-size screw?
Did you find out any details about the screw in the end?
djones -
I am also searching for the right screw. There wasn’t one there before as there was no M.2 SSD there before (late 2015 iMac with HDD configuration). It’s definitely smaller than the T8 Torx’s I have been taking out so far.
Boris -
I bought the 1TB PCIe SSD for my 5K iMac (late 2015). Worked like a charm without any hiccups; great vendor: https://beetstech.com/product/solid-stat...
I have bought an iMac 2015 with 3TB Fusion drive, from which the SSD blade was out of order.
A serviceman had split the Fusion drive and the iMac ran on HDD only. Awfully slow...
On the top of it the boot time was very long since the bootloader waited 3 minutes for the defective SSD to show up.
Since I had an Apple 121GB blade from an upgrade on a Macbook Air I replaced the SSD.
Now my iMac boots directly from the 121GB blade (AFPS), lightning fast. The 3TB HDD is HFS+ and holds my user files and Time Machine. -
-
-
Hebe die SSD leicht an und ziehe sie aus ihrem Anschluss auf dem Logic Board.
What do you mean? I'm going to buy a ssd to add it in my imac 27 late 2013 the came without it.
Which part I need?
I think what he meant to say is the SSD shown (Samsun) is for a late 2013. The 2014 iMac uses a Sandisk unit (see the 5k teardown).
Ifixit have made the mistake of referencing the late 2013 iMac teardown photos here.
Brent -
Not get confused! Apple used different vendors of their SSD’s both SanDisk & Samsung supplied SSD’s in this series.
Dan -
For the 2012 iMac 27”, I can confirm the Blade SSD is an 8+18 pin SSDD and I believe this is a SATA drive, NOT a PCIe (NVMe) drive. I took my 2012 apart to try to add an NVMe drive with 2013 macbook adapter, and it does not fit. I didn’t have an adapter that worked so I just replaced the 3.5” HDD with a 2TB SATA 2.5” SSD and left the blade slot empty.
The SSD drives available from OWC have speeds consistent with SATA drives, so I think the benefit of replacing or filling the blade slot are pretty minimal unless you’re really trying to maximize your available storage space, in which case it’s likely better to invest in an external or network attached solution.
TL;DR 2012 iMac is an 8+18 pin setup that is likely SATA, not PCI-E so just replace the HDD with a big SATA drive.
Here’s a good source of info The Ultimate Guide to Apple’s Proprietary SSDs And BeetsTech is a good source for the SSD’s
iMac 27” 2019!
I did it ;-) and ist works fine … but I had no microfon after reinstall. I had put the adhesive strips over the mic holes.
So I need to open again with a new pair of adhesive strips ;-)
I Have installed a Samsung NVME SSD 970 EVO 1TB with the “long” sintech adapter and a Sandisk Ultra SSD 2TB (SATA).
I am about to do this to my 27” late 2015. Haven’t decided on which Blade SSD to use yet. But I have bought af Crucial MX500 2 TB SSD SATA.
I have read a lot of problems with the Samsung NVME SSD 970 EVO.
Also read a lot about needing a SATA cable from OWC (OWCDIDIMacHDD12) In-Line Digital Thermal Sensor for 27-Inch iMac, to ensure the fann does not spin uncontrollably.
Have you had any problems with your setup with the Samsung SSD, and did you use the OWC cable ?
Lars -
I also did it with the same adapter, ordered for a few bucks from china.
I’m usign the 970 EVO Plus 1TB, they have updated the firmware and it works out of the box.
The firmware for older models can be updated directly on the mac with the updater from Samsung (can be installed on a USB stick and used to start the mac with it)
The standard 970 EVO does not have had the firmware issues, just the Plus had in the past.
For the blade SSD no OWC cable is required, that is only if a SATA-HDD is replaced by a SATA-SSD, thats a completely different thing.
maccy -
Is there supposed to be a heatsink attached to the replacement drive? I don't recall receiving one in the OWC package and I am seeing temps hitting 190 F (almost 88 C) under heavy load.
No heat sink on the blade SSD, you could add one but it won’t really change what you are facing here.
It does sound like your SSD maybe to small (and/or your system needs more RAM) given what you are doing.
Keep in mind boot drive (SSD here) is used for virtual RAM, caching and depending on the app scratch space. You want to leave at least 1/4 of the drive empty for best performance. 256 GB or smaller drives will need 1/3 reserved.
Dan -
How to boot the system after replacing the ssd? Where is the recovery partition? I have followed all the steps but the screen is black and not even the question mark is displayed.
Then you have an issue with your installation as you should be treated with a flashing question mark. Check your displays connections and maybe see if an external display works. Did you use the proper tools and technique within the guide to lift the display off? Many people have damaged the display in the process if they don’t follow the guide to the letter.
Dan -
Installed a 2019 SSD in my late 2015 iMac retina, purchased from fast_macs on eBay AOK with nearly 1900MB/s write 1800MB/s read (ish). Also installed Apple 2TB drive too whilst I was doing it.
The 2017 and 2019 SSDs should be the same (or very similar). Both are SSPOLARIS and the same generation. I’m in the middle of doing the same on mine (mid 2017), going from a 2TB Fusion to a straight 1TB blade.
I purchased this one, based on the excellent feedback:
If I install a new 2TB SSD to replace my HDD (2019 imac 27), do I have to install a new logic board SSD? I’d rather not have a fusion config any longer (S/W seems buggy - hence my fusion drive problems). I’d much rather have just the new 2TP SSD in place of the old HDD, if possible?
Replacing your SATA HDD for a SSD makes a lot of sense! Any size will work.
You should pull the blade SSD which was mated to the HDD to create the Fusion Drive pair.
Dan -
Thanks Dan - blade SSD to be discarded!
Hola. Quería saber que iMacs de 27” pulgadas llevan ese tipo de conector M2. Gracias
@chucklott I'm in the same situation as you were. I have a new 2.5" SSD in-hand and would like to just use that, and pull the existing blade SSD out. I think I have to purchase a SATA cable though, because the iMac doesn't appear to come with one. Is that what you did too? Any other issues that you encountered with your fix?
Depending on what your system was configured with for drives you may have the needed cables.
The low end config came with a SATA HDD as such you will have the needed SATA cables
If you bought the Mid tier config then you have a Fusion Drive which is really two physical drives the SATA HDD as well as a small blade SSD which is used as a cache drive (not visible from within the OS or Disk Utility as a mountable volume) again you will have the SATA cables. But you will need to remove the blade SSD as it gets in the way.
The last config is the high end which is where a much larger blade SSD is installed this is the only config that will require a SATA cable.
These setups are independent of the CPU/GPU the system also offered.
Dan -
-


Vergleiche dein Ersatzteil mit dem Originalteil — möglicherweise musst du fehlende Bauteile übertragen oder Schutzfolien abziehen, bevor du es einbauen kannst.
Um dein Gerät wieder zusammenzusetzen, folge den Schritten in umgekehrter Reihenfolge.
Entsorge deinen Elektromüll fachgerecht.
Hat die Reparatur nicht ganz geklappt? In unserem Forum findest du Hilfe bei der Fehlersuche.
Rückgängig: Ich habe diese Anleitung nicht absolviert.
39 weitere Nutzer:innen haben diese Anleitung absolviert.
Besonderer Dank geht an diese Übersetzer:innen:
100%

Diese Übersetzer:innen helfen uns, die Welt zu reparieren! Wie kann ich mithelfen?
Hier starten ›

9 Kommentare
is there any way to replace the I.O without swapping the motherboard?
From cutting through the adhesive to the smoke test this was just under a four hour job for me. One adhesive strip left a complete layer of glue on one side of the screen, and it took me the better part of an hour, about half my supply of wipes, and a plastic razor blade just to clean that one edge up. I’d break the time down as: removing, cleaning, or reapplying adhesives, 2 hours; non-adhesive disassembly, 50 minutes; reassembly, 40 minutes; “oh crap, where’s that tool?” 15 minutes; and about 10 minutes for cleanup, including vacuuming out the fan, heat sink, and vents.
Hi there, I need your professional help. I followed all instructions to change my iMac 2017 27" 5K fusion drive with a Samsung EVO 970 PLUS 2TB (with upgraded firmware) for macOS bootable drive and extra EVO 860 SSD 4TB data drive. Then updated to Monterey. My first test was 1200w 2900r, which was different from the youtube video which was roughly 3Krw. Why was that? Then after a few days of work, the mac froze during youtube watch and again during excel spreadsheet, and restarted with a "?" in a folder. I made an online hardware check all OK, then performed first aid, and again all OK. Then rebooted to the same "?" screen. And then rebooted again and now it works. So far! I see in the system prefs - Link Width x1. I made the speed test again and the reading now is roughly 700rw. Screenshots and sys error report bellow. What have I done wrong? And what to do to fix it all? Thanks!
Did anyone already thought or experienced to just cut out a square at the back of the frame? its not elegant but my imacs back just faces the wall :) for thermal reasons i can imagine just to stick it back.
It's a shame Apple couldn't manage to put this on the front of the logic board--such a pain (by design).
Hi, I'm about to change my SSD as well. But I'm unsure because of the slot. In the pictures the slot is almost in the center. But on the Samsung 970 EVOPlus, the slot is almost on one side. Does anyone therefore know it this product will work?
https://www.digitec.ch/de/s1/product/sam...
I have the iMac 2017 27" 5K model with a fusion drive.
You need a adapter, like this:
info -
Think that a screw part uninstall was missing, it will hold the motherboard in, until you remove it. Located at the bottom of the hard drive bracket, Requires a T20 to remove it. Then the motherboard come out easily as the instructions state. I'd post a photo, but can't on this comment section. My Mod for a customer, is to remove the "fusion", replace that PCIe "blade" with a 2TB from OWC. Reformat the internal 1TB hard drive to be used as extra storage or backup. The screw could have been referred to as : One 20.1 mm T25 spacer screw, mine was a T20. Perhaps there are some differences in models.
SSD type:
Looked at other options (OWC, Samsung/WD M.2 + sintech adaptor), then went with a used original Apple "Polaris" SSD:
- Apple seems to install firmware when upgrading macOS and there have been reports about it stumbling over 3rd party SSDs.
- M.2 adaptors seem to have insulation issues, requiring adding capton tape to avoid short circuiting with the mainboard connector shield.
- Samsung M.2 SSD controllers seem to have compatibility issues with macOS. There were recommendations to rather go with WD SSDs.
- A lot of currently (2024) available WD M.2 SSDs are not listed as compatible with the sintech adaptor. The ones listed as compatible are not available any more.
Original Apple SSD was expensive (per GB, but ok at 40 EUR for 512GB used), but it seemed like the only way to avoid all issues.
First tried an external SSD (with a realtek USB-C-PCIe bridge) and install macOS, Windows, Linux onto that:
- slow macOS boot (3mins)
- unsupported by bootcamp
- unsupported by w10 installer
- 1 USB-C port occupied
What’s the point of this? You run the wheel around the outside, and then you lay it down anyway to pull the glass and do the rest. The wedge is not needed.
ebay - Antwort
I have a story to tell about this teardown. It all went wonderfully well until after I completed the process and attempted to format my new SSD drive only to discovery that the capacity of the drive was 256GB… not the 2TB I was sure I had ordered. iFixit was very supportive and helpful in sending me a new set of sticky tape strips and and RMA to return the SSD and some of the other parts.
I finally had received my new set of strips and the 2TB SSD…. I figured, piece of cake… I already know how to do this… but I watched the video again and started following the teardown…
…apparently the new sticky tape strips was way more powerful that the original tape and while using the pizza cutter tool and not advancing much, I proceeded to use one of the iFixit credit card style wedges…. I now have 2 pretty severe cracks on the glass of my display, which as clearly explained by @mayer can only be replaced by an entire display… which runs at about $500. Cosmetically it looks horrible, but it works… for now.
Erich Hentschel - Antwort