Einführungsvideo
-
-
Wir haben uns in einer chaotischen Mitternachts-Aktion vor unserem GameStop angestellt, um euch folgenden Teardown zu präsentieren. Keine Kosten wurden gescheut, um euch mit folgendem eine Freude zu machen.
-
Direkt von der Presse liefert der Nintendo New 3DS XL 2015 folgende technische Spezifikationen:
-
"Super stabiles 3D Face-Tracking"
-
Neu hinzugefügter C-Stick, in Kombination mit den neuen ZL und ZR Tasten
-
Eingebauter Near-Field-Communictation (NFC) leser
-
Erhöhte CPU Leistung
-
Aktualisierte Heckkameras und microSDHC kompatibilität
-
-
-
Mit seinem Comeback feiert der C-Stick seine Wiedereinführung. Er wurde seit der Gamecube Ära nicht mehr gesehen. Geheiligt sei der C-Stick.
-
Wie funktionieren die Dinger eigentlich nochmal?
-
-
-
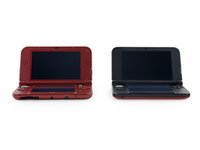
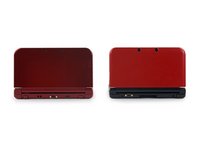
Es wird Zeit für einen Vergleich zwischen dem NEW 3DS XL und seinem älteren Bruder, dem originalen 3DS XL.
-
Die vermutlich größte Änderung ist die Umpositionierung des Cartridge-Lesers, um Raum zu schaffen für die neuen ZL und ZR Knöpfe.
-
Es sieht auch so aus als hätte der New 3DS XL etwas an Gewicht verloren! Mit einem Gewicht von 329 Gramm hat Nintendo es geschafft, ganze 7 Gramm im Vergleich zum originalen Gewicht von 336 Gramm einzusparen.
-
Der New 3DS XL ist auch ein wenig größer und dünner als sein Vorgänger, mit 160 x 93.5 x 21,5 mm im Vergleich zum Original mit 156 x 93 x 22 mm.
-
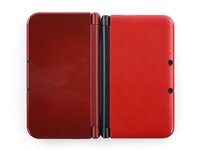
Außerdem ist die neue Version glänzend.
-
-
-
Es ist ein bisschen schwer zu erkennen, aber auf dem glänzenden Äußeren des New 3DS XL ist ein sehr subtiler Moiré-Effekt zu sehen.
-
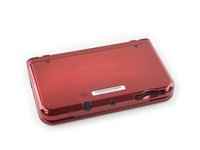
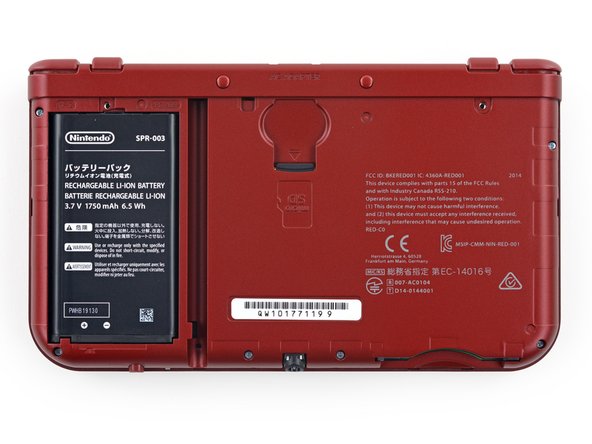
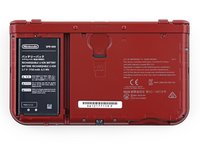
Die Rückabdeckung zeigt wie gewohnt den Haftungsausschluss und Herstellerabbildungen, die dir mitteilen, dass es sich um die Neue Version und nicht die alte handelt.
-
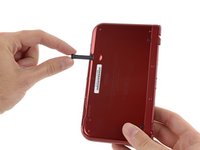
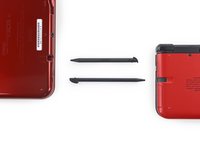
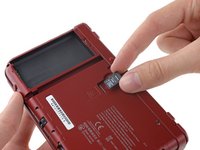
Du musst den Stylus entfernen, bevor du deinen New 3DS XL auseinanderbaust. Nachdem wir ihn herausgezogen haben, ist uns aufgefallen, dass er etwas anders ist als der alte.
-
Er wiegt genauso viel wie der alte - 1,8 Gramm, zumindest laut unserer Feinwaage. Trotzdem ist er etwas kürzer und fühlt sich billiger an.
-
-
-
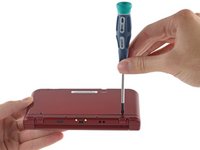
Richtig, ihr braucht einen verdammten Schraubendreher um eure (jetzt micro) SD-Karte zu wechseln. Die Zeiten, in denen man eine einfache Klappe verwenden konnte, sind vorbei.
-
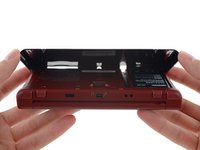
Sobald du drinnen bist, sind die SD Karte und der Akku leicht zu erreichen.
-
Und sehr einfach entfernbar...
-
-
-
Batteriewechsel in nur 3 Sekunden. Hey Apple, macht euch Notizen. So macht man das.
-
-
-
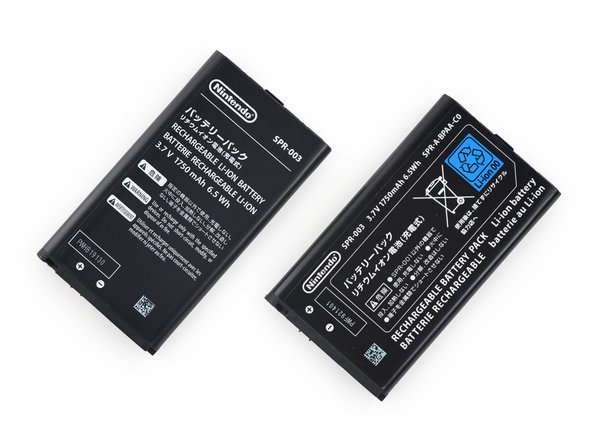
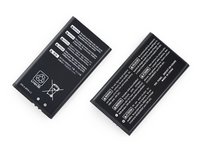
Zwei Teardowns zum Preis von einem! Wir haben euch nie einen originalen 3DS XL Teardown gezeigt (obwohl wir viele schöne Anleitungen haben), also hier zumindest die Infos zu den Akkus.
-
Links befindet sich der Akku des New 3DS XL, rechts der Akku des „alten“ 3DS XL.
-
Es scheint, dass Nintendo den Akku im New 3DS XL nicht verbessert hat. Beide Modelle verfügen über einen 3,7 V, 1750 mAh Akku mit einer Nennleistung von 6,5 Wh.
-
-
-
Alles, was es braucht, ist ein kleiner Druck mit dem Fingernagel um die microSD-Karte aus ihrem kleinen Fach zu bekommen. Uns kam sie mit wenig Aufwand entgegen.
-
Apropos microSD-Karte entfernen: Wenn du von einem 3DS, 2DS oder 3DS XL upgradest, schau dir unseren (und Nintendos) Leitfaden an, wie du deine Daten übertragen kannst.
-
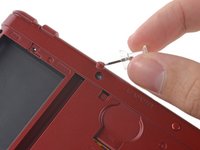
Nintendo hat zwei Schrauben unter ein paar Gummifüßen versteckt; die anderen sechs waren sichtbar, als wir die Unterseite abgenommen haben. Wir sind schon lange genug in diesem Geschäft, um nicht auf diesen versteckten-Schrauben-Trick hereinzufallen.
-
Wir haben die kleinen Gummis mit einer Nadel herausgepult und zack — offen!
I unfortunately have a stripped screw on my refurbished console, and I’ve no idea how I’m going to get it out. Could you please show some steps on solving this issue? Thank you very much if so.
-
-
-
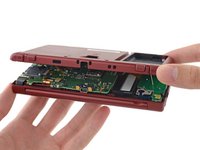
Welche „neue“ Magie verbirgt sich im Inneren des New 3DS XL? Lasst es uns herausfinden!
-
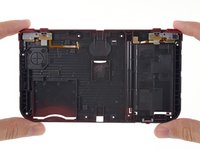
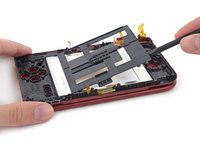
Die wackeligen Schultertasten bleiben im unteren Gehäuse, also setzen wir ein wenig Kabelheber-Technik ein, um die Teile zu trennen.
-
Es sieht so aus, als ob Nintendo nicht viel Wert auf das innere Erscheinungsbild legt – sie haben etwas nicht ausgehärteten Pulverlack im Inneren des unteren Gehäuses gelassen.
-
-
-
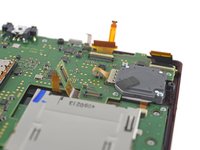
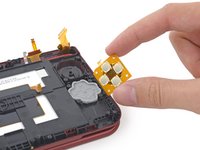
Was für ein Ouroboros-Geschäft geht hier vor sich?
-
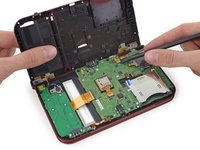
Das Schiebepad-Kabel ist seltsam über seinen eigenen ZIF-Anschluss gewickelt, was den Zugang zu... ihm selbst erschwert.
-
Unser erster Impuls war es, den ZIF-Anschluss abzutrennen und mit dem Entfernen des Motherboards fortzufahren. Aber es ist so ein winziger, zerbrechlicher Anschluss und Kabel, dass wir uns entschieden haben, zuerst das Schiebepad zu entfernen.
-
Das Schiebepad geht raus! Mehr dazu gleich – zuerst konzentrieren wir uns auf das Motherboard.
-
-
-
-
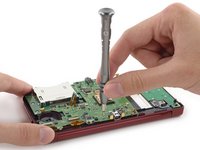
Nachdem wir drinnen waren, begann unser zuverlässiger Kreuzschlitzschraubenzieher uns auf mysteriöse Weise im Stich zu lassen – die Schrauben schienen zwischen zwei Größen zu liegen.
-
Überraschung, es sind JIS-Schrauben! Wo bekommen wir jetzt einen JIS-Bit her...?
-
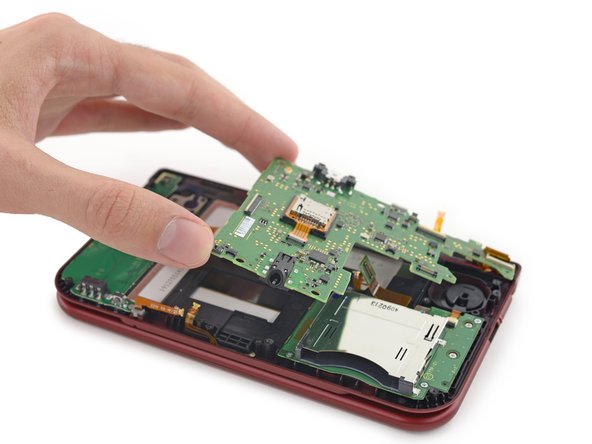
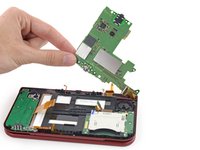
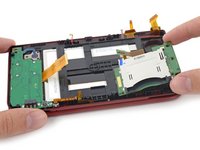
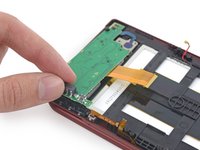
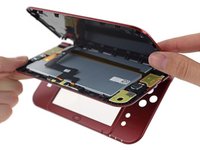
Mit dem richtig ausgerüsteten Schraubenzieher fliegt das Motherboard ohne Verzögerung heraus...
-
...oder doch nicht? Es sind nicht nur ein, sondern gleich zwei Kabel an der Rückseite des Motherboards befestigt, um die Sache komplizierter zu machen.
Regarding Step 11's attached photo: exactly how ARE those cables supposed to be attached?
Perchance someone could take a photo of their nN3DS XL and show me? 'Cause I was attempting to replace my D-Pad, and now either I hooked something up wrong or (far worse) I broke like ALL of the black ZIF connectors, 'cause my nN3DS XL isn't booting anymore. :(
We do have guides on this device, this is a teardown and not meant to be followed as a disassembly guide. Check out the directional pad guide, it has more in-depth photos for those connectors. If you only broke the locking tabs on the ZIF connector you should be fine, you can use tape to secure the ribbon cables if they slide out. If you broke connectors off the board, you might be out of luck. Hope this helps!
Well, I HAD followed that guide when I disassembled my nN3DS XL. :)
None of the connectors have been physically separated from the board (unless you count the top half of the Circle Pad's connector — the bit that locks down), and as far as I can tell, I've got everything hooked up correctly. :/ But for some reason, it just won't turn on anymore.
I think I'll ask how to get my nN3DS XL working again on that particular guide; it'd probably be more on-topic. :)
Oh good! You can also post in our Answers forum, there's more traffic there, so you may have better luck =)
In the photo attached to “Oh boy reassembly’s gonna be fun”, the ribbon cable that the tweezers are closest to, I have some small dents in the ribbon cable and want to know either if that’s fine or just possibly where to get that ribbon cable from. The reason is because everytime I try to turn it on it has a blue light on and then turns off, nothing, just a black screen.
-
-
-
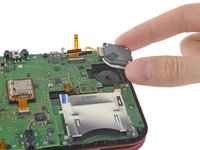
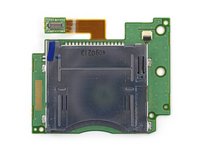
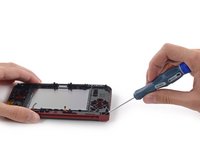
Nachdem das Motherboard entfernt wurde, können wir nun den microSDHC-Kartenleser entfernen.
I have added 200gb micro SD card and it is reading/writing it just fine. It shows 999,999 fre blocks.
Any 3ds family system can use up to a 128gb card just fine, as long as it's formatted to FAT32
-
-
-
Zeit für ein bisschen Motherboard-Action!
-
Nintendo 1446 17 CPU LGR A (custom CPU, wahrscheinlich basierend auf einem ARM-Kern.)
-
Atheros AR6014G-AL1C Wi-Fi SoC
-
Samsung KLM4G1YEMD-B031 4 GB eMMC NAND Flash
-
Fujitsu 82MK9A9A 7LFCRAM 1445 962 FCRAM (Fast Cycle RAM)
-
Texas Instruments 93045A4 49AF3NW G2 (vermutlich Power Management IC)
-
Renesas Electronics UC KTR 442KM13 TK14
Any sound chip information?
New 3DS CPU: ARM946 x1 (@134MHz, Frequency down when runs GBA VC) +ARM 11 x4 (@804 MHz on supported title and home menu 268MHz on other)
Anyone know where I can get one of the wifi chips (Atheros AR6014G-AL1C Wi-Fi SoC) for cheap?
the 3ds gpu is dmp pica200
Is there a sound chip information?
-
-
-
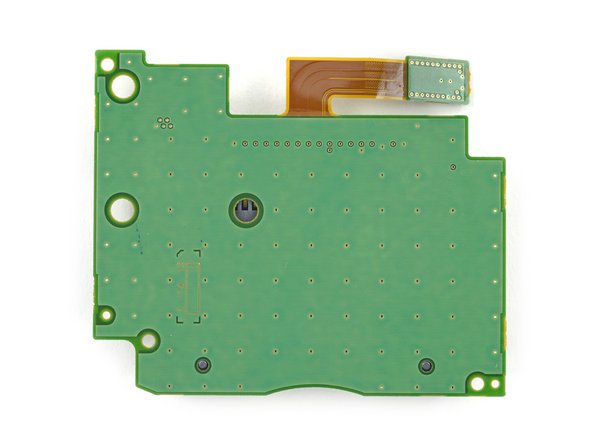
Die Rückseite des Motherboards hat ebenfalls ein paar Schätze zu bieten.
-
Texas Instruments AIC3010D 48C01JW (Möglicherweise ein Codec IC)
-
NXP S750 1603 TSD438C Infrarot IC
-
Texas Instruments PH416A I/O Expander
20791, this is the Broadcom NFC chip BCM20791.
Where is it on the board??
-
-
-
Pause: Wir haben schnell wieder alles zusammengebaut und wurden von der Nostalgie überwältigt.
-
Jetzt, da die Technik-Redakteure satt und mit Koffein versorgt sind, machen wir weiter...
-
-
-
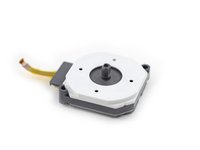
Hey Leute, habt ihr euch schon mal gefragt, wie ein Schiebepad funktioniert? Ja? Wir uns auch!
-
„Dürfen wir euch präsentieren, Xzibit A:. Hier ist es in Aktion.“
-
Aber warte, es gibt noch mehr!
-
-
-
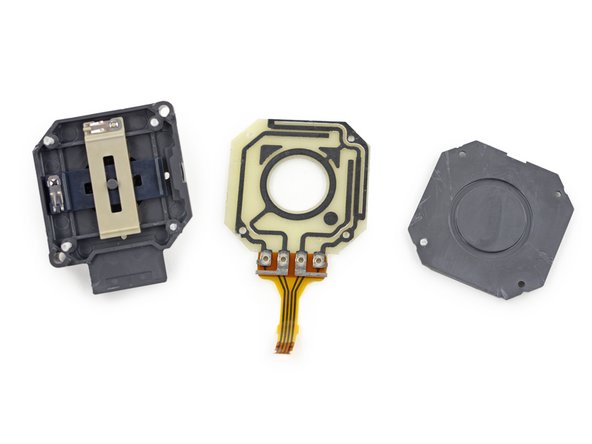
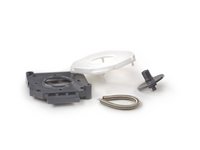
Das Schiebepad besteht aus einer kleinen, donutartigen Leiterplatte, mit Leiterbahnen, einer Rückplatte und den federbelasteten X-Y-Schiebern.
-
Die X-Y-Schieber haben jeweils zwei Metallkontakte, die ständig Kontakt zur Leiterplatte haben.
-
Wenn du die Schieber nach oben/unten und links/rechts bewegst, regeln die Metallkontakte den Widerstand in der Schaltung auf der Leiterplatte.
-
Dies wird wiederum als Bewegung im Spiel registriert, welches du gerade spielst.
-
Zu den federbelasteten Schiebern: Eine Feder im Inneren des Mechanismus sorgt dafür, dass der ‚Stick‘ immer in die Mitte zurückkehrt. Wenn du das Schiebepad in eine Art Steuerhebel umwandeln möchtest, bei dem es nicht automatisch in die Mitte zurückkehrt, müsstest du einfach das Schiebepad auseinandernehmen und die Feder entfernen.
-
-
-
Ah, der Cartridge-Leser. Das weckt wirklich Erinnerungen an die guten alten Zeiten, als man noch in die Cartridge blies.
-
-
-
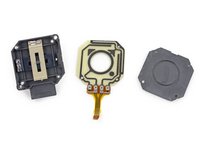
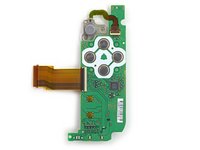
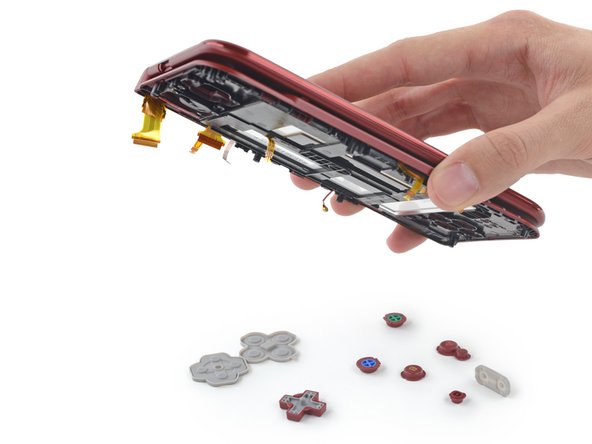
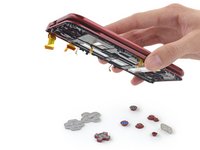
Oh hey, die Tasten-Platine lässt sich herausnehmen!
-
Die ABXY-Tasten befinden sich direkt auf dem Board, aber der C-Stick kann kommen und gehen, wie er will.
-
Der besagte C-Stick bewegt sich tatsächlich nicht, sodass er wohl irgendwie von Magie betrieben wird.
-
Du schiebst ihn mit dem Finger und der 3DS weiß einfach Bescheid. Unsere beste Vermutung ist, dass hier tatsächlich Dehnungsmessstreifen verwendet werden, um zu erkennen, wie stark du drückst.
Don't try to dissasemble it! I've tried, then I had to glue it back and it is not functioning now :(
It looks as if the circle pad and c stick use the same connectors would it be possible to replace the c stick with the circle pad and move said circle pad under the buttons?
-
-
-
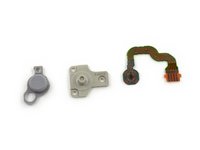
Nachdem der Cartridge-Leser aus dem Weg ist, entfernen wir problemlos die D-Pad-Tasten.
-
(Shake, Shake, Shake) Schüttel deine Knöpfe.
-
-
-
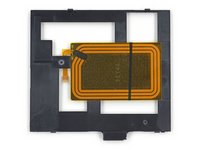
Der untere Bildschirm hat einen großen schwarzen Rahmen der vielleicht als Schutz gegen zu eifriges Tippen ist.
-
Dieser Rahmen beherbergt auch das, was offenbar die NFC-Antenne für Amiibo-Figuren ist.
-
Nintendo ist immer darauf bedacht, mit den Kindern hip zu bleiben und hat sich über AR-Karten hinaus auf die Sammeln-zum-Spielen-Goldesel ausgeweitet.
-
-
-
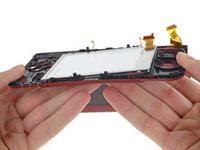
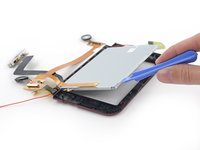
Das Entfernen des unteren LCDs wirkt zwar beängstigend, ist aber gar nicht so schlimm. Es ist keine Hitze erforderlich!
-
Der Plastik-LCD-Schutz ist mit einem ganz schwach sichtbaren Raster von Punkten versehen. Wir haben es zunächst nicht bemerkt und ein Foto davon zu machen ist fast unmöglich – aber es ist da! Versprochen!
-
-
-
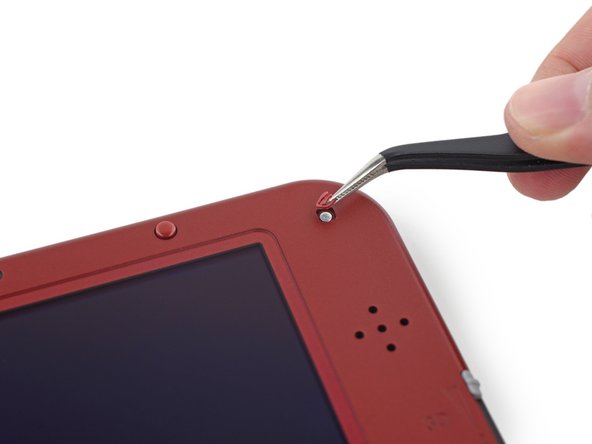
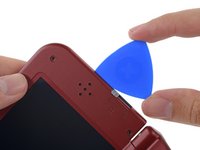
Vier versteckte Schrauben und Kunststoffclips entlang des Rahmens sind der Schlüssel zu seinem Geheimnis.
-
Unser Plektrum ist das perfekte Werkzeug, um die beiden Hälften des Oberen Bildschirms auseinander zu hebeln.
-
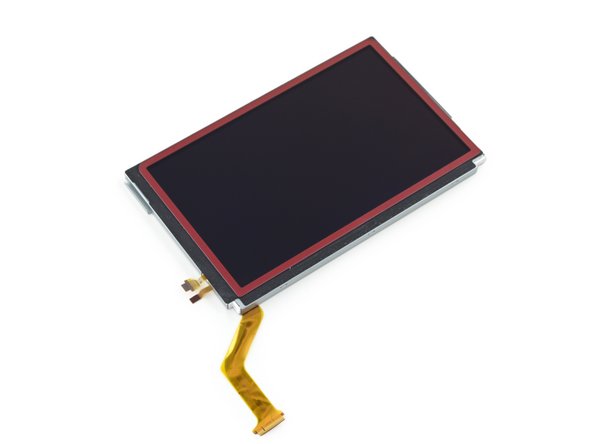
Willst du Bilder von unseren Katzen sehen? Nein, nur ein Spaß, das ist keine Geldbörse, das ist die Rückseite des LCDs. Das hier sind unsere Katzen.
Does anyone know what size screws these are?
You should explain that the cover needs to be pulled down before lifting it. I messed up mine thinking that it needed to be lifted only.
This is a teardown meant for an entertaining look at the interior, not a repair guide. Be sure to check out the step by step guides found on the 3DS XL repair manual for specific details and procedures!
-
-
-
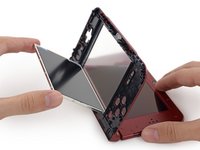
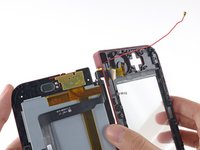
Hier wird uns klar, dass der 3DS XL im Grunde wie ein riesiges Klapphandy gebaut ist.
-
Eine Seite des Scharniers wird mit einem Stift zusammengehalten, die andere ist hohl, um die Display-, Audio-, Kamera- und Antennenkabel hindurchzulassen.
-
Mit dem herausgepoppten Scharnierstift rutscht die untere Baugruppe von der hohlen Seite ab, und die Kabel finden Platz in einer Rille, bereit für die Trennung.
You need to put an extreme, (did I say extreme?) CAUSE I MEANT EXTREME amount of force, to push the pin out of the hinge assembly.
If anyone is still using this tutorial… I heard that uh it’s “keyed”, just like the original DS and DS Lite I believe. I suppose different revisions of the New 3DS XL may be very slightly different in how they are disassembled, but this is what worked for my two units…
.
The correct way to do it is to open the console up to the second ‘click’, most of the way open, but not such that the top and bottom half are flat with one another. It’s open at about a 150 degree angle.
.
From here, you can use your favorite small tool (possibly a small enough screwdriver, tweezers, or even a paperclip can work!) and it should come out without too much hassle.
.
I was applying all the force I possibly could trying to get out the barrel hinge with the console fully closed, slightly opened, and fully opened, and it didn’t work.
.
Do note that the top LCD screen will slightly block the barrel hinge from coming out all the way. If it’s still attached, either lift it slightly at that corner or remove it.
.
Hope this helps!
Thank you dude, this really helped me.
hey man you're a goat for this comment. the video i was watching did NOT do this and i was THIS close to breaking my 3ds. This is by far the MOST PRECARIOUS part of the entire tear down imo and that's entirely preventable if you open the hinge before removing it instead of trying to remove it from a closed position.
i really had to step back and get some perspective while doing this. im an adult and can afford to by another model if i screw mine up but if i was a kid and this was the only 3ds i had there's no way in hell i would recommend anyone do this.
David He -
-
-
-
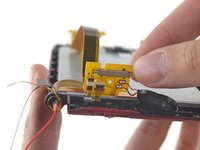
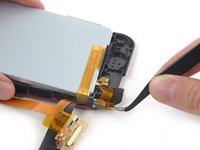
Lass uns einfach die Kameraleiste entfernen. Oh, warte mal.
-
Es gibt mehrere Kabel, die in die Seite der Displaybaugruppe führen. Unser Tipp ist, dass diese die Parallaxenbarriere steuern, die verwendet wird, um den beeindruckenden 3D-Effekt ohne Brille zu erzeugen.
-
Was ist eine Parallaxenbarriere? Stell dir vor, du platzierst einen sehr kleinen Lattenzaun vor deinem Bildschirm, sodass jedes Auge beim Blick auf das Display unterschiedliche Pixel sieht, während es um den Lattenzaun herumspäht.
-
Dann, mit einer Kombination aus der Magie der Geometrie und mit Hilfe des "super-stable-3D"-Augenfolgers weiß der 3DS genau, welche Pixel jedes Auge sehen kann, und zeichnet zwei Versionen derselben Szene – eins für jedes Auge. Die Kombination dieser beiden Versionen wird in deinem Gehirn zu einem tollen, stereoskopischen 3D-Bild zusammengesetzt.
-
-
-
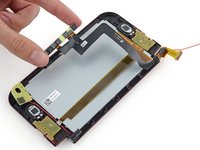
Gute Nachricht: Die Displaybaugruppe ist nur leicht mit dem Rahmen verklebt, was bedeutet, dass wir sie mit wenig Aufwand lösen können.
-
Schlechte Nachricht: Das Flachbandkabel und zwei weitere Kabel verlaufen durch das Scharnier und müssen in einem furchtbaren, mühsamen und riskanten Manöver aufgerollt und hindurchgezogen werden.
-
Aber dann ist es frei!
Does anyone knows if the upper LCD screen is the same of the 3DS XL? If I substitute a New 3DS XL broken upper LCD for a working LCD from a 3DS XL will it work (plus the eye tracking)?
-
-
-
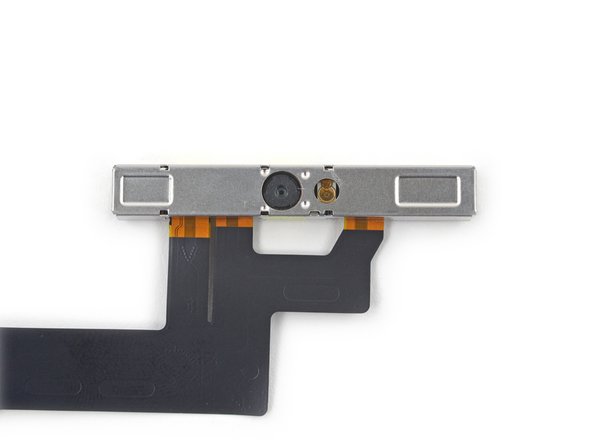
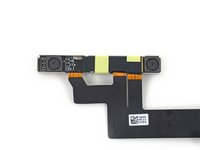
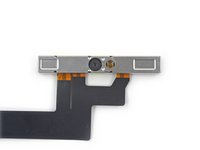
Vorder- und Rückkamera-Leiste! Nintendo hat alle drei Kameras in einer einzigen Leiste und einem Kabel zusammengefasst.“
-
Die Frontkamera beobachtet jede deiner Bewegungen, um dir das bestmögliche 3D-Erlebnis mit möglichst wenig Ruckeln zu bieten.
-
Die beiden rückseitigen Kameras verfolgen AR-Karten und nehmen Fotos mit offenbar verbessertem Low-Light-Aufnahmevermögen auf.
-
Leider gibt es hier nicht viele Informationen zu den Komponenten. Auf keinem der Kameraboards oder Kabel sind auffällige Markierungen zu finden, abgesehen von einem vagen QR-Code-Etikett mit der Aufschrift 3600 4C11 03YG.
-
-
-
Nintendo New 3DS XL 2015 Reparierbarkeits-Score: 5 von 10 (10 bedeutet am einfachsten zu reparieren).
-
Der Akku lässt sich relativ einfach austauschen, indem man zwei Schrauben entfernt und die Rückabdeckung abnimmt.
-
Schrauben und Kunststoff-Clips sind die Hauptbefestigungselemente, statt Kleber. Außerdem werden keine besonderen Schraubentypen verwendet – nur Kreuzschlitz- und JIS-Schrauben.
-
Die Kabel des oberen Displays sind so verlegt, dass sie ziemlich schwierig zu entfernen sind, ohne sie abzureißen und ebenso schwierig richtig wieder anzuschließen, wenn das Gerät wieder zusammengebaut wird.
-
Es gibt jede Menge kleiner Teile im 3DS XL, die möglicherweise Probleme verursachen können falls du sie beim Reparieren verlierst.
-
Die meisten Verbinder sind ZIF-Anschlüsse (Zero Insertion Force) und es ist schwierig sicherzustellen, dass jeder korrekt verbunden ist, ohne das gesamte Gerät wieder zusammenzubauen und es einzuschalten.
-
Der Kopfhöreranschluss und der Ladeanschluss sind auf die Hauptplatine gelötet, was bedeutet, dass du einen Lötkolben zur Hand nehmen musst, falls du sie versehentlich beschädigst.
-


Besonderer Dank geht an diese Übersetzer:innen:
100%
Diese Übersetzer:innen helfen uns, die Welt zu reparieren! Wie kann ich mithelfen?
Hier starten ›

43 Kommentare
Anyone know if some 3rd party will make case bottoms with a SD card slot on the side via a simple cable?
Not until someone knows how to reverse engineer the motherboard and the MicroSDHC card slot PCB parts. After that, 3rd party components will be available, but it's still risky business/corporate-wise.
Looking at console replacement cases theres not much to do other than match up screw holes and the MICROSD card itself is done via a ribbon/super flat cable connected to A MICRO or normal SD port on the side of the replacement case, no need to rebuild the electronics since its just an extension to the MICROSD port. The replacement case would be a slightly different size but exterior size is not that big of an issue.
********Note: If your top or bottom screen was working before disassembly and doesn't work after reassembly, then it's likely that the connector is loose or dirty or damaged or not clipped or PLACED UPSIDE-DOWN. I had this issue with my Super3DS XL(2015 New3DS XL) and it turns out that the reason why my top screen wasn't working after put together, was because I had the top LCD connector upside-down. After I correctly put the connector in, It worked again! :) ********
On step 23: All portable Nintendo's since the original DS have "sliding clips" for the top screen, ie. you have to slide the outer cover slightly up to open it. This way, no efforts or tools are needed (assuming the "hidden" screws are already out). From the pictures, it looks like it's still the same for the new 3DS XL you opened, or am I wrong?
Step 24. HOW THE HECK DO YOU GET THE TOP SCREEN OUT OF THE HINGE!!?? THIS GUIDE DOESN'T EXPLAIN HOW.... I'VE BEEN PUSHING WITH A FLAT HEAD ON THE SMALL WHITE PART BUT NOTHING IS HAPPENING! PLEASE HELP SOMEONE!! PLEASE!!
Nevermind about step 24.... You just need to apply an extreme amount of force on the white hinge to pop it back and take out the screen. They should have mentioned this; it was probably THEE MOST difficult thing to do of all the steps.
Teardowns provide a look inside a device and should not be used as disassembly instructions.
********Note: If your top or bottom screen was working before disassembly and doesn't work after reassembly, then it's likely that the connector is loose or dirty or damaged or not clipped or PLACED UPSIDE-DOWN. I had this issue with my Super3DS XL(2015 New3DS XL) and it turns out that the reason why my top screen wasn't working after put together, was because I had the top LCD connector upside-down. After I correctly put the connector in, It worked again! :) *********
You have no idea how much I love you right now. I thought I'd broken a friend's DS after reassembling it, so I swapped out myt motherboard for his only to find neither of them worked anymore after reassembly. What I thought was a $400 mistake was just both top display connectors being upside-down! Someone should really note this in the guide, as it's very easy to do as that's how it sits naturally.
kaise123 -
Broken can anyone guide me the lcd cables I think I messed up cause I hear pop sound and it turns off.
did a LL to XL case swap and I'm having problems with the home button and mic.? Has anyone ran into this? And as for that ZIF connector on them is there a right way and wrong way to connect/disconnect?(specifically talking about mic and the one next to it since this breakdown doesn't label what connector is to what)
I'm also having this problem with my home button and microphone. Very frustrating. If anyone can shed some light on how to properly get this fix, it would be very much appreciated.
Blair -
Its the black ZIF connectors that i'm talking about. they dont lock down all the way.
What are those new ZIF connectors called? Old ZIF had a white tab and locked into place. these new ones are black and doesnt go all the way up or lock back down. What am I doing wrong?
FYI, This *New* 3DS motherboard appears to be a mix of old ZIF and new ZIF connectors. the black ZIF connectors are for the Homebutton and LCD brightness and others.
They should call this the Ibreakit 3ds teardown. Reassembly will never happen because the zifs lifted will result in the home button not working and other problems. Extra care should be taken if you are to remove any of the black zif connectors. I might recommend not lifting them at all.
Hi guys, after I open my New3DSXL the 3D effect slider does´t work anymore. Its like its at 30% or so. When I slide the slider up and down, nothing changes. Any idea what could be wrong?
Sorry for my bad english guys.
I just want that Optimus Prime Transformers coffee mug!!! But anyway I just attempted a repair of the Top LCD screen, did that without many issues, aside from the fact that the area where you have to wrap the display connectors and push them through the hinge. But that all turned out fine. The real problem I ran into was when I got it all back together and was testing the device. The 3D does not work on the top screen, the mic is not picking up any sound, and the home button no longer works. What a mess I've gotten myself into with this one. Any advice? I reconnected everything and double checked everything. And those 3 things are still not working! Ugh!
What is the long red cable with the gold connector that travels between both top and bottom shells?
I think I kinked mine and I really can't tell what it was even supposed to do.
Thanks!
Lol blowing into the game cartridge holder thats what I did with my ds lite
hello..i want know what is the flat related to the 3d slider? cause my 3ds have always that turned on..
So I am half way through replacing and 3ds xl top screen and have had a piece fall out that I don't know where it came from. Is there a CAD drawing or parts list I can reference? Or at least some company that replaces these things that I can ask a question to?
Hi Landon, you might have better luck posting in our Answers forum, our users are more responsive there. Be sure to post a photo of the part that fell out, to help us identify it!
please do one for the new 3ds regular!
This guide doesn't show how to take the R, L, ZR, and ZL buttons out. It also doesn't show the flex cables for these buttons. I was hoping to see the cables in this guide so I would know for sure that I'm ordering the right replacements without having to take apart my system again.... I just put it back together and realized I forgot to take a pic of the cables :(
Hi there
I have a question here I know this post is old and all but I want to know something about the onboard wifi card I tear mine apart and want to know the pin layout of the wifi card to use on a project any idea’s where to find it
Thanks
Anyone know where I can get a replacement connector for my digitizer? It appears to be the same connector used by the joystick. Even if you don’t know where I can get one, just tell me if you know the connector type/name, and I can try to find it on sale.
Used this guide to disassemble my new 3ds xl, but the smallest cables on the motherboard, the holders don’t seem to close down properly.
how repair the microphone?
Follow the guide for the motherboard replacement until step 8 (included). Then jump to step 13 (only). You need to disconnect one ribbon which is the one marked by a red square on the most lower left part of the picture. Do not lift the flap as it will break if you try to. You only need to pull it gently. You can find replacement on ebay or amazon. Be careful to choose the right model as there are different kind of microphones.
bojano -
I mean hear me out. The dpad, joystick, game card slot, even sd card slot, all are modular and replaceable. also the speakers and cameras etc. I think this is super repairable, like anything can break but the probability of needing to change the whole mainboard is really really low
If anyone is having trouble with the Barrel Hinge, I commented under Step 24.
For fixing the ZIF connector problem (Black ones for Home botton, NFC antenna etc…) disconnect the cable and press softly down the “moveable” part . Then just plug in the cable without any lifting . IMHO this connector hasn't any moveable parts so no lifting at all, just heave the cable a little if you want to disconnecting it.
I just fixed my daughter's 3DS. Thank you guys could not done it without you!