Zum Hauptinhalt wechseln
ARRIS Surfboard SB6183 Modem Heatsink Replacement

ARRIS Surfboard SB6183 Modem Heatsink Replacement

Bradyn Braithwaite

Bradyn Braithwaite und 3 weitere Mitwirkende

Zuletzt aktualisiert am January 16, 2023

15 - 20 Minuten
Mittel

If your ARRIS Surfboard cable modem is overheating — restarting, or slowing down intermittently — it may struggle with heat dissipation. Usually a metal heatsink help keep the temperatures down, but some newer versions of this modem don’t include a heatsink, and will have problems maintaining a high connection speed.

Before trying this guide, make sure the modem has access to plenty of air and that nothing is blocking the vents on either side. If that doesn’t help, these instructions will show you how to open the device and apply a new heatsink to the system.

Before beginning, disconnect all cables from the back of the modem. Then, let the modem cool down for 5 minutes.

Was du brauchst

Werkzeuge

Mehr anzeigen …

  1. ARRIS Surfboard SB6183 Modem Heatsink Replacement, Heatsink: Schritt 1, Bild 1 von 3 ARRIS Surfboard SB6183 Modem Heatsink Replacement, Heatsink: Schritt 1, Bild 2 von 3 ARRIS Surfboard SB6183 Modem Heatsink Replacement, Heatsink: Schritt 1, Bild 3 von 3
    • Use pliers to remove the thin nut and washer from the coax port.

  2. ARRIS Surfboard SB6183 Modem Heatsink Replacement: Schritt 2, Bild 1 von 1
    • Remove the single 9mm Torx screw using a Torx T10 screwdriver.

  3. ARRIS Surfboard SB6183 Modem Heatsink Replacement: Schritt 3, Bild 1 von 3 ARRIS Surfboard SB6183 Modem Heatsink Replacement: Schritt 3, Bild 2 von 3 ARRIS Surfboard SB6183 Modem Heatsink Replacement: Schritt 3, Bild 3 von 3
    • Use a spudger to press the plastic retention clip inward and toward the center of the modem.

    • The plastic clip is hidden in a hole beneath the sticker on the bottom of the case.

  4. ARRIS Surfboard SB6183 Modem Heatsink Replacement: Schritt 4, Bild 1 von 3 ARRIS Surfboard SB6183 Modem Heatsink Replacement: Schritt 4, Bild 2 von 3 ARRIS Surfboard SB6183 Modem Heatsink Replacement: Schritt 4, Bild 3 von 3
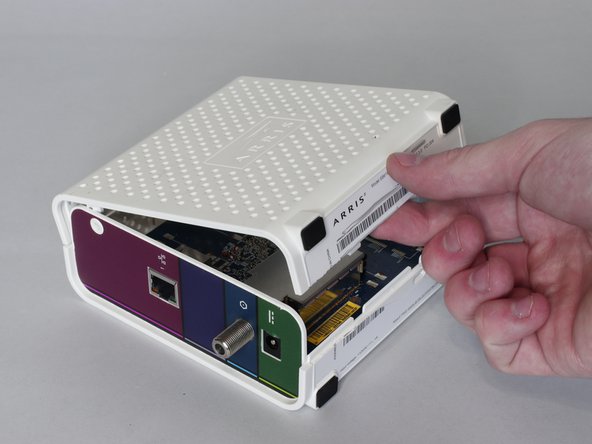
    • Slide the left side panel of the modem toward the back, then up and out at a shallow angle.

  5. ARRIS Surfboard SB6183 Modem Heatsink Replacement: Schritt 5, Bild 1 von 3 ARRIS Surfboard SB6183 Modem Heatsink Replacement: Schritt 5, Bild 2 von 3 ARRIS Surfboard SB6183 Modem Heatsink Replacement: Schritt 5, Bild 3 von 3
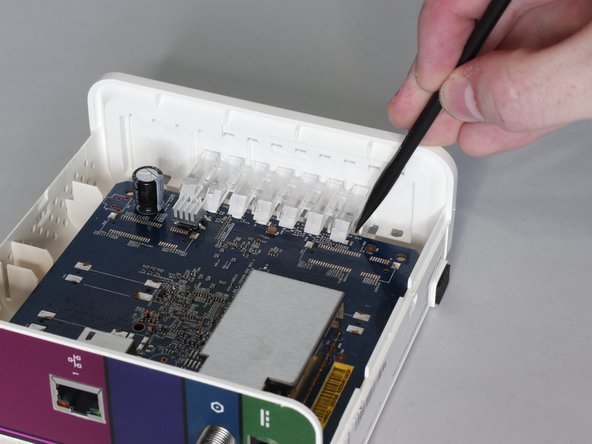
    • There are small plastic tabs on either side of the clear LED diffuser. Use the flat end of a spudger to pry both of them outwards slightly.

  6. ARRIS Surfboard SB6183 Modem Heatsink Replacement: Schritt 6, Bild 1 von 2 ARRIS Surfboard SB6183 Modem Heatsink Replacement: Schritt 6, Bild 2 von 2
    • Rotate the diffuser upward to unlatch it.

    • You may need to hold the plastic tabs on either side out of the way.

  7. ARRIS Surfboard SB6183 Modem Heatsink Replacement: Schritt 7, Bild 1 von 2 ARRIS Surfboard SB6183 Modem Heatsink Replacement: Schritt 7, Bild 2 von 2
    • To remove the board, lift the front end up slightly and gently pull toward the front to remove.

    • You may need to wiggle the board loose from the thin clips on either side.

  8. ARRIS Surfboard SB6183 Modem Heatsink Replacement: Schritt 8, Bild 1 von 1
    • If your device doesn't have a heatsink, skip this step. To remove an existing heatsink, hold the board steady and use pliers to gently twist it off.

  9. ARRIS Surfboard SB6183 Modem Heatsink Replacement: Schritt 9, Bild 1 von 1
    • Peel off the paper backing that protects the thermally conductive adhesive to prepare the heatsink for application.

  10. ARRIS Surfboard SB6183 Modem Heatsink Replacement: Schritt 10, Bild 1 von 2 ARRIS Surfboard SB6183 Modem Heatsink Replacement: Schritt 10, Bild 2 von 2
    • Center the sticky side of the heatsink over the bare chip, then press down gently to secure it.

    • Make sure the heatsink is stuck in place and will not slide off.

Abschluss

To reassemble your device, follow these instructions in reverse order.

2 weitere Personen haben diese Anleitung absolviert.

Ein Kommentar

Thank you for this review, helped me to open it. The only thing i did differently is peeled oof the sticker from the bottom - carefully, so not to damage it. Why do u place the heatsink on that specific tiny chip - is it the one that heats up the most? My feeling when opening it was that the RF part was the hottest.

Andru Nl - Antwort

Kommentar hinzufügen

Seitenaufrufe:

Letzte 24 Stunden: 0

Letzte 7 Tage: 6

Letzte 30 Tage: 36

Insgesamt: 3,596