
Acer Aspire One ZG5 RAM Replacement
Einleitung
Zu Schritt 1 der AnleitungUse this guide to replace or upgrade the RAM in the Acer Aspire One ZG5.
Was du brauchst
Ersatzteile

Werkzeuge


Mehr anzeigen …
-
-
Turn the netbook upside down with the battery at the top, facing away from you.
-
-
-
Unlock the battery by sliding the switch located near the left hinge to the left "unlocked" position.
-
-
-
Slide the latch located on the opposite hinge from the lock while pushing the battery up.
-
-
-
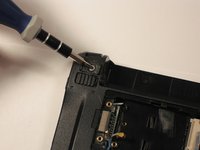
Gently loosen the two Phillips #0 screws in the small panel that covers the wireless card.
-
-
-
Remove the single 3.9 mm Phillips #1 screw from the bottom left of the wireless card.
-
-
-
Gently lift up the left side of the wireless card and slide the card out of its socket.
-
-
-
Turn the netbook over and open the display so that the keyboard is facing you.
-
-
-
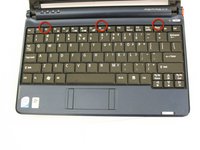
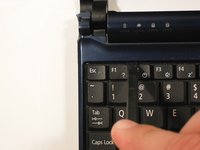
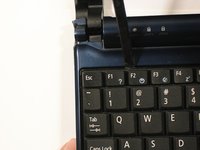
There are three tabs located on the top of the keyboard.
-
Start with the spudger pointing towards the display and pry up to push each tab off the keyboard.
-
As you move to the next tab, ensure the previous tab doesn't reset itself.
-
-
-
-
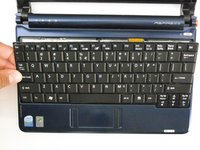
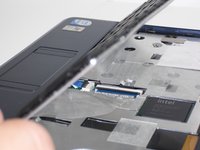
Lift top of keyboard up. If it doesn't lift easily, there may be tabs on the sides - use the tool to ease them aside and/or shift the keyboard from side to side.
-
-
-
Disconnect the ribbon by lifting the black plastic hinge and removing the clear blue cable.
-
-
-
Close the display and turn the ZG5 over so that the battery compartment faces away from you.
-
-
-
Remove three 5.8 mm Phillips #0 screws from the bottom of the case
-
Remove three 3.9 mm Phillips #1 screws from the battery compartment.
-
Remove two 5.8 mm Phillips #0 screws from underneath the feet near the hinges.
-
-
-
Turn the netbook back over and open the display with the keyboard cavity facing you.
-
-
-
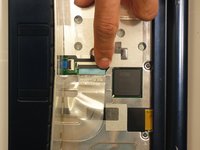
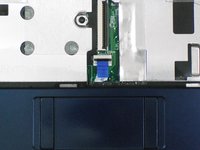
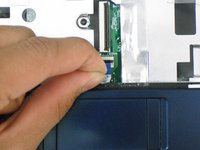
Flip up the retaining flap on the trackpad ribbon cable ZIF connector.
-
Using the blue tab, pull the trackpad ribbon cable from its socket on the motherboard.
-
-
-
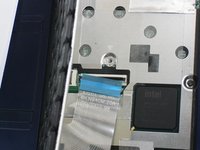
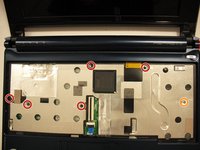
Remove the five black 4.7 mm Phillips #0 screws from the metal casing.
-
Remove the single silver 4.3 mm Phillips #00 screw from the right side of the metal casing.
-
-
-
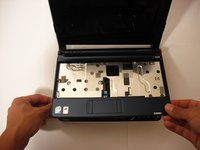
Starting at the red rings along the hinge, insert a spudger or plastic opening tool into the seam between the two halves of the case.
-
Slide the spudger toward the front of the device, releasing the small clips that hold down the top case.
-
Gently lift off the top case.
-
-
-
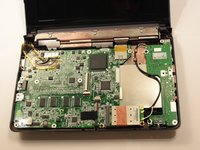
Disconnect the two antenna cables from the right side of the wireless card.
-
-
-
Disconnect the display cable from the top left of the motherboard.
-
-
-
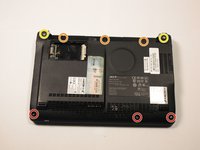
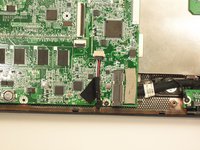
Remove three 3.9 mm Phillips #1 screws from the small I/O board.
-
Remove a single 3.9 mm Phillips #0 screw from the front of the motherboard.
-
-
-
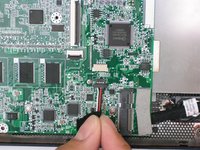
Remove the two 4.7 mm Phillips #1 screws that connect the display to the motherboard.
-
-
-
Gently lift the I/O board up from the right side of the case.
there are 2 silver screws that need to be removed in this step your picture shows them still installed (one is located neer audio plug, the other is located neer keyboard plug) in step 27 (next step) they have been removed without mention
I have added 1 gb of memory to my ZG5 thanks to this helpful guide. Total cost, including a spudger and a new mini screwdriver, to tackle the 00 Philips, GBP 17.57
I fear I haven't put the trackpad connector back properly, but device works great with a wireless mouse. Very many thanks.
-
-
-
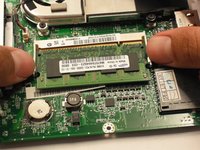
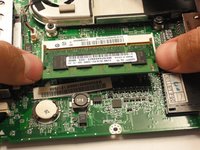
Simultaneously release both latches on opposing sides of the RAM.
-
The RAM should spring up.
-


To reassemble your device, follow these instructions in reverse order.
To reassemble your device, follow these instructions in reverse order.
Rückgängig: Ich habe diese Anleitung nicht absolviert.
63 weitere Personen haben diese Anleitung absolviert.
Team

Cal Poly, Team 7-49, Amido Fall 2010 Mitglied von Cal Poly, Team 7-49, Amido Fall 2010
CPSU-AMIDO-F10S7G49
5 Mitglieder
27 Anleitungen geschrieben
23 Kommentare
Thanks a lot!!
It worked for me!
This guide lacks important information and technical accuracy.
The ZG5 can handle a maximum of 1.5GiB RAM, and realistically, can handle only an extra 512MiB RAM on top of the 512MiB fixed RAM, because of variations in the actual amount of RAM on the card you install.
I followed the entire guide, I have no more available RAM, and the tracker pad no longer works.
Thanks a bunch! I now have a netbook that is no longer a functioning netbook.
Please remove this guide until it addresses these important issues.
You are unfair to the author. This guide worked absolutely fine, and the guide has nothing to do with how much capacity your Acer Aspire One has, it has to do with how to exchange the RAM...
IF you want to fix things like highly compressed technology / like a mini laptop / yourself, you need to be sensitive. The way I have seen 9 out of 10 persons, they do not have that sensitivity. It is not a fault on you, and does not make you wrong. But you must be conscious about if you do not have the necessary sensitivity to do this work.
IFF your pad is not working, then try to do the same operation once more and be aware of how the mini laptop is to be handled at the various parts. I would guess that we are missing a wire in your laptop or something like that.
And - if you want it put in another way - since you couldn\t master doing it - then the money you saved on that RAM exchange - you can now spend them on fixing that small pad problem - with a professional.
I am blaming you for blaming the author.
facebook -
@Stone Forest - Come on, I followed this guide to upgrade my son's and my wife's friend's netbooks without problems at all. All you have to do is make sure you do the work on a static-free surface, wear your anti-shock/static wristband (do this ANY time you handle computer equipment!) and follow the steps. Voila!
I tried to install Kingston KVR667D2SO/2GB. the result is that doesn't work. did anybody try to install the 1GB?
Very good guide!
I upgraded up to 1,5Mb my netbook.
It works fine.
woked for me, using crucial CT1286AC800 M8FJ18
(1gb 200pin DDR2 Sodimm 128Mx64)
step 8, with no cell radio this is not needed (as mentioned)
step 24, with SSD no need to remove daughter board, can pivot MB on cable and insert memory (as mentioned)
step 25, hinge bracket, dont need to completely remove screws, the hinge has a part that is above the MB, can just losen and slide MD down
when reinserting the cables with the locking arms, SSD/keyboard/trackpad, make sure fully home, can be quite hard to tell due to the still/short cables. (experience from other stuff.)
I used this guide once to replace the motherboard then again to upgrade the ram. Now I have a serviceable portable starting from a completely useless paperweight. Thanks a bunch!
Worked in first shot, and have given new life to my outdated netbook.
Thanks a lot!!
would like to try it myself...
got a suitable 2gb-card laying-around...
all i need:
did not yet find a PIN-LAYOUT of the board to identify the RIGHT line to open on the pcb...
(maybe it wont work as these pcbs are multi-layer and it could well be that the line coming from the controller-chip is in the depth only...)
for the record
am waiting for further feedback...
to get to the right position it needs complete disassembly...
-dislike to procede opening the ebook to avoid unneccessary damage to the joints etc
especially theses delicate foil-connectors only have a limited number of in/out-cycles...
are others out there less hesitating? -yet am quite convinced its the way to go!
Worked like a charm, thank you so much!!
This is way too much work to upgrade ram, But I'll give it a go.
I know this may seem logical 1 + .5 = 1.5 gig but My system reads 1 gig not 1.5 gig but speccy says 1 slot of 2 used.
It says it has as a single 1 gig stick.
So does that mean I have a 512 stick installed ??
related but not, does vram setting effect stability of the system?
No. I think, You have a so called high density ram module put inside. But You need a low density module. You are on the right side if the modul (1G) has 8 chips on bouth sides of the modul. Otherwise You must ask the dealer if this module is a low density one. Your module seems to be recocnised to half the capacity. You have to change it if You wish to have 1,5 G on Your netbook.
very good guide ,works fine ,g a oakley
2022: I have upgraded from 500Mb RAM to 1Gb (1.5Gb total amount of RAM), with the same procedure described here, also changed the HDD for a SDD. Win XP upgraded to Win 7. It’s not a bullet, but is funcional. Wrote this comment with my netbook.