
Acer Aspire R5-571T-59DC Back Cover Panel Replacement
Einleitung
Zu Schritt 1 der AnleitungThis guide will show the reader how to remove the back panel from their Acer Aspire R5-571T-59DC.
Be sure to be gentle opening the inner snaps around the lining of the cover - gently running a credit card or spudger around the inside of the lining should be sufficient to loosen the cover.
This is a prerequisite step to replacing any component connected to the motherboard.
Was du brauchst


-
-
Disconnect all power from the laptop and turn over so the bottom is facing you.
-
Remove the twelve 07.mm Phillips #0 screws from the back cover.
-
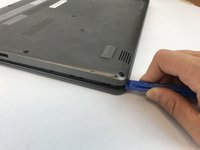
Work a plastic opening tool underneath and around the perimeter of the bottom cover.
-
Once unclipped, remove the bottom cover.
-
-


To reassemble your device, follow these instructions in reverse order.
To reassemble your device, follow these instructions in reverse order.
Rückgängig: Ich habe diese Anleitung nicht absolviert.
Eine weitere Person hat diese Anleitung absolviert.
Team

USF Tampa, Team S20-G2, Passmore Spring 2018 Mitglied von USF Tampa, Team S20-G2, Passmore Spring 2018
USFT-PASSMORE-S18S20G2
3 Mitglieder
7 Anleitungen geschrieben