
Akkutausch bei AKG Y50BT/C50BT Kopfhörern
Einleitung
Zu Schritt 1 der AnleitungErsetze den Akku bei den AKG Bluetooth Kopfhörern. Dasselbe gilt für die AKG C50BT.
-
In diesem Schritt verwendetes Werkzeug:Technician's Razor Set$14.99
-
Kreuzschlitzschraubendreher
-
Doppelseitiges Klebeband
-
AOLIKES 3.7V Wiederaufladbarer Lithium-Polymer-Ersatzakku 1500mAh oder einen ähnlichen
-
-
Entferne das linke (L) Ohrpolster, indem du es gegen den Urzeigersinn drehst und es anhebst.
Not so easy. Earpad spins but does'n’t come off — yet.
Never mind… earpad is held on with elastic band only- got it. It doesn’t unscrew as I assumed
-
-
-
Entferne die vier Schrauben mit einem Kreuzschlitzschraubendreher.
-
-
-
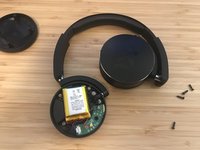
Drehe die Kopfhörer um und entferne die AKG-Abdeckung. Dadurch wird der Akku freigelegt
-
-
-
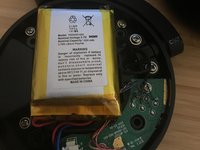
Überprüfe, ob der Ersatzakku die richtige Verkabelung aufweist (Rot / Schwarz / Gelb oder "Travellerdraht"). Falls dies nicht der Fall sein sollte, heble den Stecker auf und korrigiere die Verkabelung.
Hello,
My current headphones are AKG C50BT with a wire diagram as Red, Black, Blue, the replacement battery shows, Red, White, Black.
TECHTEK battery on Amazon+ compatible with [AKG] Y50BT replaces P083040-Q02
Will this battery be ok to install in the headphones
I'm not sure if this P083040-Q02 will replace it. In terms of wiring, you'll need to swap white & black. It'll be Red / Black / White.
It doesn't matter what color the traveler is.
Kevin -
Hello Again Kevin,
Does it matter what colour the Traveller wire is.
Thanks
James
-
-
In diesem Schritt verwendetes Werkzeug:Tweezers$4.99
-
Entferne den Akkuanschluss, indem du ihn nach hinten ziehst. Tipp - verwende eine Pinzette
-
Verbinde den Ersatzakku und überprüfe, ob dieser funktioniert.
-
-
In diesem Schritt verwendetes Werkzeug:Technician's Razor Set$14.99
-
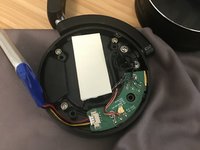
Der Akku ist mit doppelseitigem Klebeband befestigt. Entferne den Akku vorsichtig, indem du das Klebeband mit einem Werkzeug, z.B. einem Skalpel, heraushebelst.
-
Entferne die Rückstände mit Reinigungsalkohol.
-
-
-
Klebe einen Streifen doppelseitiges Klebeband rein.
-
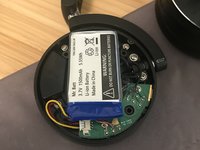
Setze den Akku so ein, dass er nicht die Löcher der Schrauben versperrt.
-


Um das Gerät wieder zusammenzubauen, folge der Anleitung in umgekehrter Reihenfolge.
Um das Gerät wieder zusammenzubauen, folge der Anleitung in umgekehrter Reihenfolge.
Rückgängig: Ich habe diese Anleitung nicht absolviert.
7 weitere Personen haben diese Anleitung absolviert.
Besonderer Dank geht an diese Übersetzer:innen:
100%

Cafugo hilft uns, die Welt in Ordnung zu bringen! Wie kann ich mithelfen?
Hier starten ›
10 Kommentare
Very clear directions with excellent photo accompaniment. Battery shown is not the 1500 mAh recommended by manufacturer.
Is ist possible to get a Link for the korrekt Battery
Foto and Instruktion very good!!
I have linked it in the instructions but here it is, https://www.amazon.ca/gp/product/B07K1J4.... The key is to find a battery that fits the headset.
Remember to reorient the wires, Step 5. For this battery, I had to swap the yellow and black wires.
Kevin -
Great, thanks Kevin!
For the other not so terribly handy fortune-hunters out there, here's another instruction to Step 5:
To remove the 2 wires from the connector in order to swap them, with a thin/sharp cutter/knife/needle you can carefully move up a little the plastic parts of the connector that cover and block the ends of the wires, and then pull out the wires, then push the plastic parts back down, and then push the wires back in correctly.
Bought a replacement battery. Didn't work so replaced my old battery which, surprisingly, charged up (for a couple of months) and then died. Went back to the replacement, realised the wires were not in correct places. Read this, swapped two over and now working fine.
Thank you so much!
Will not charge and had battery dead for 3 yrs, before disposing the set, I decided to open it and short circuit the battery, surprisingly, charged to 100% and now I using them again with my desktop. When battery replacement comes, there are better choices in ebay with more mAh and way cheaper, sure thing, re-wire the connector ahead of time.
Here is a link to the recommended battery at US Amazon (currently at $7.99) https://www.amazon.com/dp/B07K1J433J
Here is a link to a video on how to rewire / swap the wires. Be very careful to keep the wires separate from each other while doing this! https://www.youtube.com/watch?v=0G7iIwfu...
@km4n is there any trick to removing the AKG face plate in step 4? I'm attempting this on a slightly different model, the N60nc wireless, and to me this does not seem able to come apart. Only the back cover, close to the ear, seems able to be removed.
Never mind - I was able to get it removed!