
Anki Cozmo Akku tauschen

Einleitung
Zu Schritt 1 der AnleitungWenn dein Anki Cozmo Roboter sich ständig abschaltet oder der Bildschirm nicht aufleuchtet, folge dieser Anleitung. Diese Anleitung unterstützt Benutzer beim Austauschen des Akkus in einem Anki Cozmo Roboter, sodass dieser wieder funktioniert. Der Akku, der sich im Untergehäuse von Cozmo befindet, sorgt dafür, dass er funktioniert. Ohne einen funktionierenden Akku wird nichts anderes funktionieren. Bevor du beginnst, musst du deinen Anki Cozmo Roboter abschalten und ihn von der Anki Cozmo App trennen.
WARNHINWEIS: Achte darauf, dass du dich nicht schneidest oder dir die Fingernägel abreißt, wenn du die Hände zum Ausbauen eines Teils verwendest.
Was du brauchst


-
-
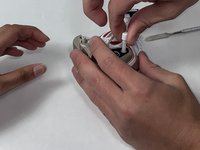
Ziehe die beiden schwarzen Gummiketten vorsichtig mit den Fingern von den Rädern ab.
-
-
-
Entferne die weißen Radkappen von jedem der vier Räder, indem du sie mit dem Metallspudger abhebelst.
Note: The hubcaps are the same color of your Cozmo. My Cozmo is black to gray, but the one from the creator shows a white Cozmo.
-
-
-
Entferne die 7,5 mm lange JIS-Schraube #1 in der Mitte bei jedem der vier roten Räder.
-
-
-
Entferne die 5,5 mm lange JIS-Schraube #1 an der rechten Seite des goldfarbenen Antriebsgehäuses.
-
-
-
Entferne die 5,5 mm lange JIS-Schraube #1 an der linken Seite des goldfarbenen Antriebsgehäuses.
-
-
-
Entferne den vorderen goldenen Stoßfänger, indem du ihn mit den Fingern abziehst.
-
-
-
Entferne mit einem JIS #0 Schraubendreher die beiden 5,5 mm Schrauben, die tief in der rechten Seite des goldfarbenen Antriebsgehäuses liegen.
-
-
-
-
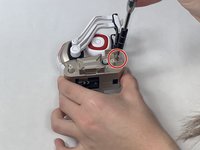
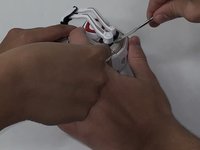
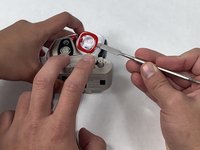
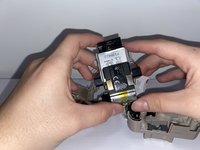
Nimm zwei Metallspatel und heble die beiden weißen Arme an der rechten und an der linken Seite des Gehäuses ab.
-
Setze die Spatel mit der Spitze zwischen das Gehäuse und die Arme ein und drücke sie vom Gehäuse weg.
Steps 9 and 10 contain errors that will lead to broken parts of the robot.
The upper arms (thin) must be pry off on both sides with metal spudgers. Then remove the white axis that connects them (what is called a spring here).
And then you need to manually rotate the lower arms to the upper position (while slightly pulling them) until the latches are aligned with the corresponding slots in the case and the arms separate from the body. No force required.
If you remove them with metal spudgers, you will leave marks on the case and break one or more of the latches.
YES this is the good method to avoid broken arm :
The upper arms (thin) must be pry off on both sides with metal spudgers. Then remove the white axis that connects them (what is called a spring here).
And then you need to manually rotate the lower arms to the upper position (while slightly pulling them) until the latches are aligned with the corresponding slots in the case and the arms separate from the body. No force required.
Madcat -
-
-
-
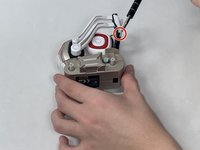
Ziehe die lange weiße Feder, die am kurzen Arm angebracht ist, mit den Fingern von der Mitte des Gerätes heraus und entferne sie.
Steps 9 and 10 contain errors that will lead to broken parts of the robot.
The upper arms (thin) must be pry off on both sides with metal spudgers. Then remove the white axis that connects them (what is called a spring here).
And then you need to manually rotate the lower arms to the upper position (while slightly pulling them) until the latches are aligned with the corresponding slots in the case and the arms separate from the body. No force required.
If you remove them with metal spudgers, you will leave marks on the case and break one or more of the latches.
-
-
-
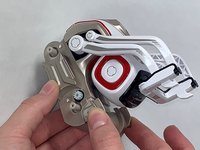
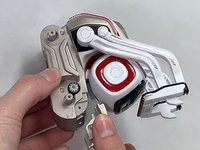
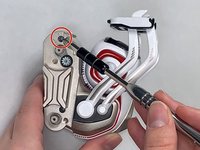
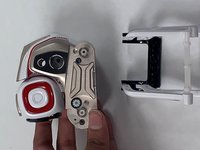
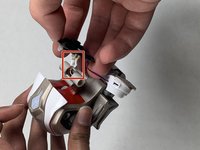
Löse die beiden roten quadratischen Blenden an beiden Seiten des weißen Kopfes mit einem Metallspatel ab.
-
-
-
Entferne die beiden 5,5 mm langen JIS-#0-Schrauben auf der rechten Seite des weißen Kopfes.
-
-
-
Ziehe die rechte Seite des weißen Kopfes mit deinen Fingern hoch und entferne sie.
-
-
-
Ziehe die schwarze Abdeckungscheibe an der linken Seite des Kopfes mit den Fingern heraus und löse sie ab.
-
-
-
Ziehe die linke Seite des weißen Kopfes zusammen mit den beiden daran befestigten kurzen weißen Federn mit den Fingern ab und entferne sie.
-
-
-
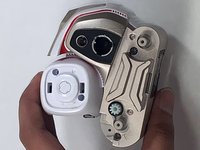
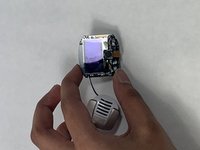
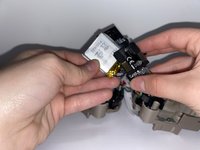
Löse den kleinen weißen Stecker in der Mitte des Körpers mit den Fingern ab und trenne die schwarze LED Kameraplatte zusammen mit dem weißen und goldenen Lautsprecher ab.
-
-
-
Entferne die zwei 5,5 mm Schrauben von dem roten Teil des Gehäuses, das hinter dem weißen Kopf war, mit einem JIS #1 Schraubendreher.
-
-
-
Ziehe den roten Teil des Gehäuses, der hinter dem weißen Kopf war, mit deinen Händen und Fingern ab.
-
-
-
Ziehe die weiß-goldene Rückseitenverkleidung, die mit dem LED-Panel verbunden ist, mit deinen Händen und Fingern ab.
-
-
-
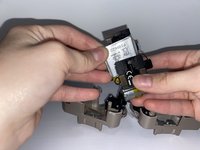
Entferne die 7,5 mm Schraube aus der Goldleiste in der Mitte des Gehäuses mit einem JIS #1 Schraubendreher.
-
-
-
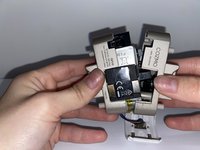
Ziehe die beiden Hälften des Goldkörpers mit deinen Händen und Fingern auseinander.
-
-
-
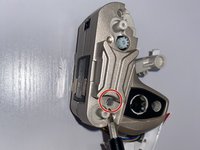
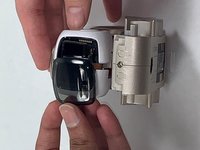
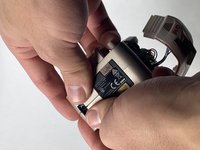
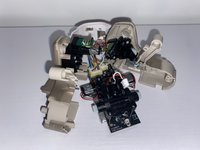
Entferne den silbernen Akku von der Unterseite des Ladegeräts und verwende deine Hände und Finger, um ihn herauszuziehen.
-


Um dein Gerät wieder zusammenzubauen, folge den Schritten in umgekehrter Reihenfolge.
Um dein Gerät wieder zusammenzubauen, folge den Schritten in umgekehrter Reihenfolge.
Rückgängig: Ich habe diese Anleitung nicht absolviert.
15 weitere Personen haben diese Anleitung absolviert.
Besonderer Dank geht an diese Übersetzer:innen:
100%


Diese Übersetzer:innen helfen uns, die Welt zu reparieren! Wie kann ich mithelfen?
Hier starten ›

Team

UMass Dartmouth, Team 4-8, Gulbrandsen Fall 2021 Mitglied von UMass Dartmouth, Team 4-8, Gulbrandsen Fall 2021
UMASSD-GULBRANDSEN-F21S4G8
3 Mitglieder
7 Anleitungen geschrieben
14 Kommentare
Step 9 should be operated while the arm is at his maximum height.
Yes, excellent tip!
ticom3 -
Step 9 is the hardest from far ! And you'll easily get hurt by your tools. Moreover, reassembling cozmo will certainly deteriorate it. You should operate the big part of the arm (the lower) while the arm is at his maximum height. To do so, disassemble the white part of the fork by prying it down. Then remove the 2 screws of the upper arms, and remove these arms. Eventually, the big arm is easy to remove (or to reassemble).
Is it necessary to disconnect the screen? I am having trouble getting the little white connector pulled off and am wondering if I can just leave it connected
Its possible to carefully allow it to hang also.
This guide doesn't even mention soldering. Is it possible to replace the battery without soldering?
no its not posseboul
sorry for the bad english
I’m pretty sure I messed mine up. It turns on and everything is good after the battery replacement. But, now when I put it on the charger, the charger and the robot continuously flash and I don’t think it is charging. I may have messed something up on the soldering. Anyone have these symptoms after replacing the battery?
By the way, these instructions for disassembling and reassembling with the notes are spot on.
If battery is soldered on correctly should the Cozmo be able to power on before being reassembled?
I cut the cables of the old battery and attached a 620mah Battery Type 503040, 3,7Volt, Bye soldering. The 503040 is almost to big to fit in. You have to compress/bend the contacts one the Battery to fit but worked well.