
Austausch des Mikroschalters der Logitech Anywhere Mouse MX

Einleitung
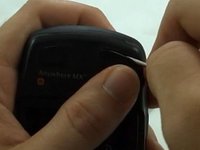
Zu Schritt 1 der AnleitungDieses Problem ist leicht zu zu lösen. Wenn du noch mehr wissen möchtest, schaue dieses Video der Demontage an.
- Nehme das Maus Gehäuse, welches von vier Schrauben gehalten wird, auseinander.
- Entlöte den Mikroschalter und ersetze ihn.
Ich habe drei verschiedene Hersteller gefunden, die Micro-Switch-Ersatzteile für die Logitech Anywhere verkaufen. Ich habe nur E-Switch ausprobiert.
- E-Switch TS20100F070S (Digi-Key | Mouser Electronic)
- * Omron D2LS (eBay | Digi-Key | Mouser Electronic)
- Kailh MI873101S01 (eBay)
- ZIPPY DA T Type (Original micro switch)
Was du brauchst


-
-
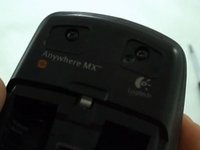
Unter den Batterieaufklebern befinden sich zwei Schrauben.
-
Zwei weitere Schrauben befinden sich unter den Gleitern an der Mausspitze.
-
-
-
Ziehe die Batterieaufkleber ab, um die zwei Schrauben zu erreichen.
-
Entferne die beiden Kreuzschlitzschrauben.
I replaced my buttons a few years ago and now the new buttons are double clicking again. Is there another source of these buttons that is more reliable? Maybe a footprint compatible better button? It seems like replacing these just kicks the can down the road. It looks like it is not one-off issue, I have 7 Anywhere MX and they all have had buttons fail after several years of use.
-
-
-
-
Heble eine Ecke der Gleiter mit einem Schraubendreher an.
-
Entferne diese Schrauben mit einem Kreuzschlitzschraubendreher.
-
-
-
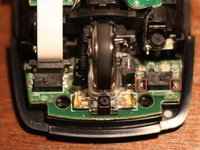
Hebe nun das obere Gehäuse von der Grundplatte herunter. Diese beiden Teile sind nicht durch Kabel verbunden.
-
-
-
Löte den Mikroschalter ab und ersetze ihn durch einen neuen E-Switch TS20100F070S. Es kann etwas knifflig sein, den Schalter abzulöten. Du kannst die Lasche eventuell abschneiden, um den Schalter zu entfernen. Sobald der Schalter entfernt ist, kannst du die Lötlasche leicht entfernen.
-
Verwende eine konische Spitze, z.B. die ST-Serie Weller ST7 0,03" x 0,79 mm, um den Mikroschalter zu entfernen und anzulöten.
-
Der Mikroschalter hat keine Polarität. Die Anschlüsse zeigen aber, auf welche Seite der Mikroschalter zeigen muss.
-
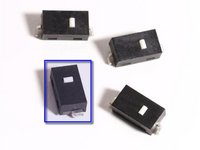
E-Switch TS20100F070S
Everything fine to this point, but I found desoldering the microswitch that it's too easy to actually pull off the pad it's soldered too, leave me a nice little square of PCB that I couldn't reconnect anything too.. which then required removing the entire PCB board (some tiny parts). I should have started at the top and worked down, but i tried to pull out the wheel without removing the top board and broke part of the anchor/swivel - not going back together now!
corrupted PCB is fixable ( i have fixed also pair on Logitech MX), and anchor-swivel depend on damage. If you are interested on repair, email me at info [at] skfree [ dot] sk. I am doing also other types of repairs on LT anywhere MX mouses and changing of microswitches also.
I found a way to remove the old switch without damaging the solder pads. I used a Hakko CHP-170 micro wire cutters to snip the switch solder leads right at the body of the switch, and remove it. Then I carefully removed the remaining solder tabs with a small sharp razor blade knife. Only thing you got to be careful of is not to scrape through the solder pad. Solder is pretty soft to cut, and it is less risk to mechanically remove the switch than apply heat unless you have the right de-soldering rig.
BTW, Digi-Key and Mouser are out of stock on the E-switch PN. I am back ordered, so will use mouse with a tail until parts arrive.
**** To avoid damaging the solder pads ****
The switch is soldered with ROHS, which has a high melting point. Before trying to actually desolder the defective switch add some good ol' non-ROHS solder to lower the melting point of the original solder. Then use a solder absorbing tape. I've fixed 4 mice so far with zero failures, first one desoldered twice.
Many many thanks to the author for providing the part numbers of the replacement switches. Couldn't have done it without those.
As opposed to directly heating the solder and pad directly use a desoldering braid and it will wick the solder away without damaging the pad. You can then easily remove the old switch clean the pads with the braid and the iron. The PCB has holes in it to locate the switch so place the new switch and add a drop of solder to your iron and just tap it where it you need it, it hardens almost immediately.
If you use the Omron D2LS switches, there are two models the D2LS-11 and D2LS-21. They both fit, but the click pressure is different on the two. If you want a firmer click go with the D2LS-11, but if you like the original feel go with the D2LS-21.
Agree to cut off the leads or use resoldering braid but why not disassemble it first? You can test out the mouse without putting the cover back on.
i am amazed you made an instruction algorithm even for this, along with the suppliers of the switch. totally impressed with u.
-


Um die Maus wieder zusammenzusetzen, folge der Anleitung in umgekehrter Reihenfolge.
Um die Maus wieder zusammenzusetzen, folge der Anleitung in umgekehrter Reihenfolge.
Rückgängig: Ich habe diese Anleitung nicht absolviert.
39 weitere Personen haben diese Anleitung absolviert.
Besonderer Dank geht an diese Übersetzer:innen:
100%
Diese Übersetzer:innen helfen uns, die Welt zu reparieren! Wie kann ich mithelfen?
Hier starten ›

25 Kommentare
Thanks, my mouse actually arrived out of the package with the double-click issue, and this fixed it. Needed pretty high-temp soldering iron to get OEM micro-switch off, and tight fit soldering the new one on the inside terminal, but otherwise pretty easy.
Got this mouse, had this problem, sent it off for an RMA. The one they sent back eventually developed this exact same issue. Here's to hoping I won't have to do this again for a while now. Thanks for the guide.
Ended up having to repeat the process for the right mouse button. This time I managed to knock off one of the solder pads. Eventually by applying a lot of pressure and heat though, I was able to get the switch to bind with whatever was left of it, although I still have no idea how long my fix will actually hold for. But, something to watch out for if you're doing this.
This is great as now i have a part number as when I pulled the original microswitch apart to fix it internally, the button flew away - never to be found.
These are great prices for little switches, however living in the UK means an expensive courier to £15 and a lounge wait. They simply do not sell these here in the GB :-(
The part with shipment is far cheaper than a brand new MX Anywhere mouse.
Thanks again for the info!
Great guide. Although I managed to repair the microswitches following this video: https://www.youtube.com/watch?v=82z-OpHd.... That guide is for a Performance MX, but the part about fixing the switches worked for me on the Anywhere MX although the switches are a different model.
Be very careful when opening the switch as it's easy to damage the cover closing mechanism, so when you put it back together it no longer snaps in place. I did that on one of them, and had to use a couple drops of loctite to hold the cover down but it worked out great still. Also when you open the switch be careful about the metal spring inside as it may easily fly out and get lost.
It was a bit fiddly, but it ultimately saved me delivery time and money for new switches, and the buttons now work perfectly again. Plus, if it fails you can always just desolder them and install new ones.
Why go through all the extra steps (and potential for problems) by desoldering the entire defective switch and replacing it with the new one? Simply open the defective switch and the new switch and take out the defective copper spring and replace it with the good copper spring from the new switch. If a piece goes flying (the white button or the spring), use the new one as a backup. Going through all this extra hassle is begging for problems. Also, don't bother trying to repair the curve on the defective spring. You'll never get it 100% perfect as new. It WILL fail again eventually. So just swap out the springs and move on with life. If you screw up the switch covers, you can use black electrical tape to seal the edges. Don't use glue.
*** Just a heads up guys - do a continuity check before ordering the tactile switch. It may be just a cold solder joint just like mine. Fixed it under a minute.
Tons of posts about the main front switches. Zero articles about the side switch and their part numbers. :(
You can find them on ebay. They sell as repair kit. If somebody is planing to open his mouse, can he/she put the mesurement on this post?
Since the described switches replacement procedure required periodically it is advised to screw back only the screws at the tail of the mouse. That is enough. And in that case you should not replace the foot gliders every time.
Nice hint, thanks!
Shinn Thanks for the ebay link. I also opened it to check. Side small buttons ( same as middle button ) measures 5.2mmx5.2mm footprint is about 2.5mm spacing in center, 4.5mm outter edge to outer edge, actuating height unpushed is 1.5mm. The ebay link doensn't provide part number but digikey has close approximations just a general description as ALPS Mini Push Button. Search shows it might be a ALPS SKQGABE010 which shows 5.2x5.2x1.5mm 160gf. I think those are it ! THANKS for the help.
Thanks for this guide! It was very insightful to check out the mouse from the inside!
Merci !!!
Super tuto! ça fonctionne!
Just got my Omron switch in, all works well now and wanted to thank you for the description and pictures.
My repair was complicated by my lack of soldering skill, I accidentally broke loose a chip of copper under the outer solder pad, and struggled a bit to scrape adjacent area down to copper trace to allow an electrical connection. In my efforts, I actually took the board out completely to see if the traces were visible on underside, that did not help. But I got to learn how ALL the tiny bits & scroll wheel get assembled. To be clear, if you break off the switch solder pad, it does not help to disassemble the mouse, just scrape to expose some copper and flow the switch leg joint solder toward that.
Afterwards, I was surprised it worked at all, as I had bunged things up pretty good, but the new switch fixed the “double click” issue and I’m happy!
Hey mate can you tell me please which exactly spot should i scrape and how?? i have same problem. Please check my link https://imgur.com/a/re0P8 its a photo of the damage. and if is possible open it with paint and draw some signs about the spots for scrape to understand and send me if you want. I'll apreciate.
Elias -
Hi Elias, please find here the link/picture to my similar problem/design: https://i.imgur.com/Ea5R6Pp.jpg
One switch came out nice and easy (the left one) but the right one refused to surrender and had to force: it came out together with the metal layer.
Fortunately, both ends (connectors) were relative easy to see:
- the 1 pin it’s a long line of copper (I managed to solder a thin metal wire) and solder the wire to the switch pin
- the 2 pin was completely under the green paint. I used a small and sharp cutter to remove the paint and put a 2mm solder drop to connect the other switch pin
Now the mouse is working great!
I user the E-Switch indicated ahead and it fitted perfectly (although the micro switch was just a little smaller than the ones in the mouse).
Hope it will help!
Thanks for excellent guide!
It is sad that top product failed in approximately 1.5 years with randomly continuous scrolling wheel stopper issues :(
My cheaper 510 still alive and fully functional after ~5 years.
@ShinnChyangChen would that work when the left button stops working for drag & drop?
My problem was the left button had no continuity, and the right button was showing some resistance. I dribbled in a volatile contact cleaner (NOT WD-40) between the buttons and the housings and pushed the buttons a couple of dozen times until there was good continuity, then turned it over to drain the cleaner and left it in the sun to dry; both buttons now have good continuity and the mouse works fine.
Thank you so much for this guide!
After I reassembled my MX Anywhere 3 mouse, when I turn on the switch, the LED at the back of the mouse wheel only blinks red. I have already tried charging it, but the red LED keeps blinking whether it is charging (with the power switch turned on or off) or not charging (with the power switch turned on). Additionally, the LED on the Bluetooth switch, which has 3 options to connect up to 3 devices, no longer turns on. Does anyone can help me?