Zum Hauptinhalt wechseln
Canon EOS Rebel T3i Top Cover Replacement

Canon EOS Rebel T3i Top Cover Replacement

Natalie Crock

Natalie Crock und 9 weitere Mitwirkende

Zuletzt aktualisiert am January 3, 2025

10 Minuten
Schwierig
Benötigt Bessere Bilder

Use this guide to replace the top cover on your Canon EOS Rebel T3i.

NOTE: On some variations of the Canon EOS Rebel T3i, the cables that connect the top cover to the DC PCB board are soldered on versus connected to it with a connector. If you are just removing the top cover to make other repairs, you can just keep those cables attached and carefully remove the top cover to get it out of the way. If you are replacing the top cover, you'd have to solder the cables (if they are soldered on).

Was du brauchst

Werkzeuge

Mehr anzeigen …

  1. Canon EOS Rebel T3i Top Cover Replacement, Battery: Schritt 1, Bild 1 von 1
    • Locate the battery compartment on the bottom of the camera.

  2. Canon EOS Rebel T3i Top Cover Replacement: Schritt 2, Bild 1 von 1
    • Hook your finger onto the compartment door latch.

    • Open the battery compartment door.

  3. Canon EOS Rebel T3i Top Cover Replacement: Schritt 3, Bild 1 von 1
    • Remove the battery from the compartment.

  4. Canon EOS Rebel T3i Top Cover Replacement, Front Cover: Schritt 4, Bild 1 von 1
    • Remove the two 3 mm JIS #000 screws.

    • Some variations of this camera may have one 3mm and one 6mm screws.

    • If the rubber eyepiece mount is still on the camera, remove it before attempting to separate the case halves.

  5. Canon EOS Rebel T3i Top Cover Replacement: Schritt 5, Bild 1 von 1
    • Remove the three 3 mm JIS #000 screws.

    • Remove the single 6 mm JIS #000 screw.

    • Some variation of this camera have two 3mm and two 6mm screws

  6. Canon EOS Rebel T3i Top Cover Replacement: Schritt 6, Bild 1 von 1
    • Peel back the grip tape with your fingernail.

    • Depending on the age of the camera, the grip tape will stick back in place with no need for extra glue.

  7. Canon EOS Rebel T3i Top Cover Replacement: Schritt 7, Bild 1 von 1
    • Remove the four 5 mm JIS #000 screws.

    • Some variation of this model may have three 5mm screws and one 6mm

  8. Canon EOS Rebel T3i Top Cover Replacement: Schritt 8, Bild 1 von 1
    • Slide off the right side of the camera.

    • Do not completely separate the body yet. There are still wires that must be disconnected. If the body is pulled apart too quickly, it may cause damage.

  9. Canon EOS Rebel T3i Top Cover Replacement: Schritt 9, Bild 1 von 1
    • Lift off the USB cover.

    • Do not completely remove the back of the camera. There are still wires that must be disconnected. Removing the back too quickly may cause damage to wires.

    • When lifting the cover, the only thing resisting your tug is the plug cover stopper. Just pull, you'll be fine.

    • When replacing it, having the covers snug on the plate will make it easier to push the whole cover on

  10. Canon EOS Rebel T3i Top Cover Replacement: Schritt 10, Bild 1 von 1
    • After separating the back, gently lift off one side of the light blue wire with the spudger until the connector is totally removed.

    • You may feel a slight resistance as you pull the top of the back cover off, it will click but that is fine.

  11. Canon EOS Rebel T3i Top Cover Replacement: Schritt 11, Bild 1 von 1
    • With the spudger, remove the orange ribbon cable leading to the circuit board from the back of the camera.

  12. Canon EOS Rebel T3i Top Cover Replacement: Schritt 12, Bild 1 von 1
    • Remove the two 6 mm JIS #000 screws.

  13. Canon EOS Rebel T3i Top Cover Replacement: Schritt 13, Bild 1 von 1
    • Remove the single 6 mm and two 3 mm JIS #000 screws.

  14. Canon EOS Rebel T3i Top Cover Replacement: Schritt 14, Bild 1 von 1
    • Use the spudger to lift the plastic under the tripod mount.

  15. Canon EOS Rebel T3i Top Cover Replacement: Schritt 15, Bild 1 von 1
    • Lift the front cover off.

  16. Canon EOS Rebel T3i Top Cover Replacement, Top Cover: Schritt 16, Bild 1 von 1
    • Remove the single 4 mm JIS #000 screw located near the strap mount.

  17. Canon EOS Rebel T3i Top Cover Replacement: Schritt 17, Bild 1 von 1
    • On the opposite end of the camera, unscrew the screw next to the power switch using the same tool.

  18. Canon EOS Rebel T3i Top Cover Replacement: Schritt 18, Bild 1 von 1
    • Remove the two 5 mm JIS #000 screws.

  19. Canon EOS Rebel T3i Top Cover Replacement: Schritt 19, Bild 1 von 1
    • Disconnect this flat cable with a spudger

  20. Canon EOS Rebel T3i Top Cover Replacement: Schritt 20, Bild 1 von 1
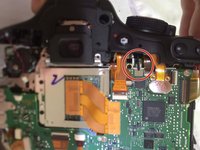
    • Disconnect this tiny plug. Make sure to only pull on the white plastic. You can use a dull single-sided razor blade to pry the white plastic connector from its base.

  21. Canon EOS Rebel T3i Top Cover Replacement: Schritt 21, Bild 1 von 1
    • Remove the single 11 mm JIS #000 screw securing the dioptric adjustment knob.

    • When replacing, make sure you do not tighten the screw too much, as the knob will be locked in position if you do.

    • Before replacing the knob/screw, make sure the grey plastic mount (screw hole area) is aligned with the outer case. If it is not, it means the lens and the knob are not lined up. With a flat screw driver, give the grey plastic a few rotations, and it should fall in place, and realign properly.

  22. Canon EOS Rebel T3i Top Cover Replacement: Schritt 22, Bild 1 von 1
    In diesem Schritt verwendetes Werkzeug:
    Tweezers
    $4.99
    • Use the tweezers to disengage the yellow and red wires from the camera body.

    • Some variations of this camera may not have unplugable wires. Make sure to take note of which cable goes where if you decide to remove the solder.

  23. Canon EOS Rebel T3i Top Cover Replacement: Schritt 23, Bild 1 von 3 Canon EOS Rebel T3i Top Cover Replacement: Schritt 23, Bild 2 von 3 Canon EOS Rebel T3i Top Cover Replacement: Schritt 23, Bild 3 von 3
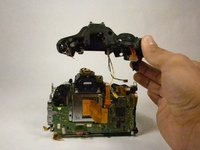
    • Lift the top casing up and away from the camera.

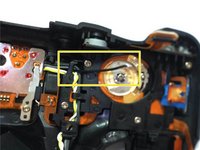
    • Make sure the black plastic cable goes into the white plastic connector, as shown on the picture. This is a fiber optic cable that the camera flash needs in order to function. The cable can simply be pushed into the connector.

    • Here is a view of the black plastic bit. It is on the underside of the top cover.

Abschluss

To reassemble your device, follow these instructions in reverse order.

12 weitere Personen haben diese Anleitung absolviert.

Natalie Crock

Mitglied seit: 08/27/15

785 Reputation

5 Anleitungen geschrieben

Team

USF Tampa, Team 5-2, Blackwell Fall 2015 Mitglied von USF Tampa, Team 5-2, Blackwell Fall 2015

USFT-BLACKWELL-F15S5G2

4 Mitglieder

10 Anleitungen geschrieben

7 Kommentare

Thanks for this guide, it was helpful. I edited it to add some details, I hope they help the next person.

My camera is also this model, but I found that there were some differences, and I'm wondering it I got a refurbished device for the price of a new one... For instance the top cable were soldered to the front of the camera, no plug in sight. I found more than 1 screw that had a different thread to the others.

All in all I managed to fix my issue which was with the viewfinder. The 550D guide for the viewfinder will work for this camera (I just used it and the viewfinder parts are exactly the same) Canon EOS Rebel T2i Eyepiece Replacement

dauffret - Antwort

There are some models of Canon Rebel cameras where the two cables which connect the top cover to the DC PCB board are soldered on instead of connected with connectors. This difference must also be found between different variations of the Canon Rebel T3i too.

As far as the screw threads go, most of the screws will be M1.7, but there will also be some places where they use M2.0 screws too. There may also be the occasional place where another thread type is used too, such as the hot shoe. It's definitely recommended to keep track of where exactly every single screw you take off goes to avoid putting any back in the wrong spot.

Zephosk -

Good guide, only comment I have is there is a cover over the viewfinder that you need to remove initially, you just pull up on it and it pops off. If you look closely at the viewfinder on the camera in the pictures you will probably see that it does not have a cover around the viewfinder that your camera does. This needs to be removed before removing the back of the camera.

For me some bolt sizes were also different, i just labeled every bolt location with a piece of tape with a number written on it, and kept track of the bolts.

Robert Story - Antwort

This briliant. I don't dare to unscrew my camera yet but if I do this will certainly help. I did do the back cover already but the top cover is serious business. Thanks a lot for the many photo's provided.

Bertho Smit - Antwort

Excelent step-by-step! I managed to fix my camera's flash mechanism without buying any part.

By the way, that small plastic that looks a cable but it's not a cable is an optic fiber, that carries a small amount of the flash light to a sensor on the board.

reginaldo.bueno - Antwort

Kommentar hinzufügen

Seitenaufrufe:

Letzte 24 Stunden: 2

Letzte 7 Tage: 29

Letzte 30 Tage: 56

Insgesamt: 13,478