Zum Hauptinhalt wechseln
Canon PowerShot G7X Motherboard Replacement

Canon PowerShot G7X Motherboard Replacement

Brandon Lacy

Brandon Lacy und 2 weitere Mitwirkende

Zuletzt aktualisiert am December 20, 2019

10 - 15 Minuten
Mittel

The motherboard functions as the central hub for all of the components in your device. If one or more components cease to function, the motherboard may be faulty. Follow the directions in this guide to replace the motherboard in your device.

Was du brauchst

Ersatzteile

Werkzeuge

  • Spudger
    Spudger
  • Phillips #000 Screwdriver
    Phillips #000 Screwdriver
  • iFixit Opening Tool
    iFixit Opening Tool

Mehr anzeigen …

  1. Canon PowerShot G7X Motherboard Replacement, Dial: Schritt 1, Bild 1 von 1
    • Remove the five 2mm Phillips #000 screws that are under the screen of the camera.

  2. Canon PowerShot G7X Motherboard Replacement: Schritt 2, Bild 1 von 1
    • Remove the two 3mm Phillips #000 screws under the AV-out digital flap.

    • Remove the two 3 mm Phillips #000 screws from the side of the camera.

  3. Canon PowerShot G7X Motherboard Replacement: Schritt 3, Bild 1 von 1
    • Remove the two 3 mm Phillips #000 screws on the side of camera with the flash toggle.

  4. Canon PowerShot G7X Motherboard Replacement: Schritt 4, Bild 1 von 1
    • Remove the four 4 mm Phillips #000 screws from the plate on the bottom of the camera.

  5. Canon PowerShot G7X Motherboard Replacement: Schritt 5, Bild 1 von 1
    • Remove the back plate.

  6. Canon PowerShot G7X Motherboard Replacement: Schritt 6, Bild 1 von 1
    • Remove the three 3 mm Phillips #000 screws around the dial.

  7. Canon PowerShot G7X Motherboard Replacement: Schritt 7, Bild 1 von 2 Canon PowerShot G7X Motherboard Replacement: Schritt 7, Bild 2 von 2
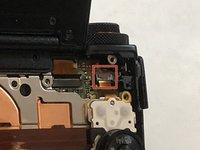
    • Using the nylon spudger, gently lift the ZIF tab.

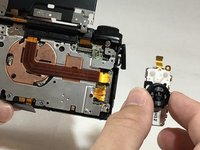
    • Disconnect the ribbon cable that connects the dial to the motherboard.

    • Remove the dial from the device.

  8. Canon PowerShot G7X Motherboard Replacement, Flash: Schritt 8, Bild 1 von 2 Canon PowerShot G7X Motherboard Replacement, Flash: Schritt 8, Bild 2 von 2
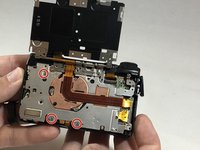
    • Remove the three, blue 5 mm Phillips screws from the back plate.

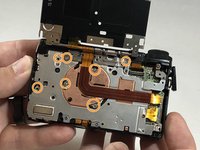
    • Remove seven 2 mm Phillips #000 screws.

  9. Canon PowerShot G7X Motherboard Replacement: Schritt 9, Bild 1 von 2 Canon PowerShot G7X Motherboard Replacement: Schritt 9, Bild 2 von 2
    • While using the plastic opening tool, gently pry the top plate off the camera.

  10. Canon PowerShot G7X Motherboard Replacement: Schritt 10, Bild 1 von 2 Canon PowerShot G7X Motherboard Replacement: Schritt 10, Bild 2 von 2
    • Using the black nylon spudger, gently lift the ribbon cable connected to the LCD screen housing until it comes out then remove the housing.

  11. Canon PowerShot G7X Motherboard Replacement: Schritt 11, Bild 1 von 2 Canon PowerShot G7X Motherboard Replacement: Schritt 11, Bild 2 von 2
    • Remove the 2 mm Phillips #000 screw underneath the top plate.

    • Remove silver plate.

  12. Canon PowerShot G7X Motherboard Replacement: Schritt 12, Bild 1 von 1
    • Take the Phillips #000 and remove the three 5 mm screws from the front plate.

  13. Canon PowerShot G7X Motherboard Replacement: Schritt 13, Bild 1 von 2 Canon PowerShot G7X Motherboard Replacement: Schritt 13, Bild 2 von 2
    • Using the spudger, gently lift the ribbon cable from underneath the front plate.

    • Remove the front plate.

  14. Canon PowerShot G7X Motherboard Replacement: Schritt 14, Bild 1 von 2 Canon PowerShot G7X Motherboard Replacement: Schritt 14, Bild 2 von 2
    • Remove flash toggle plate.

    • Remove the 2mm Phillips #000 screws under the flash toggle.

  15. Canon PowerShot G7X Motherboard Replacement: Schritt 15, Bild 1 von 2 Canon PowerShot G7X Motherboard Replacement: Schritt 15, Bild 2 von 2
    • Flash contains charged capacitor. Shock hazard.

    • Using the black nylon spudger, gently lift the ribbon cable that connects the flash to motherboard and remove the flash from the device.

  16. Canon PowerShot G7X Motherboard Replacement, Lens: Schritt 16, Bild 1 von 1
    • Remove the 5 mm Phillips #000 screw from the copper plate.

  17. Canon PowerShot G7X Motherboard Replacement: Schritt 17, Bild 1 von 1
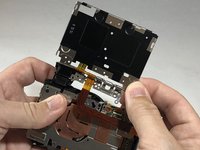
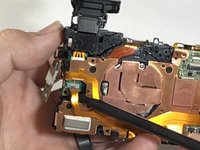
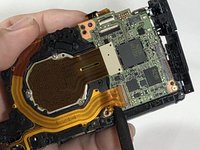
    • Using the black nylon spudger, lift the ribbon cable gently until it comes out.

  18. Canon PowerShot G7X Motherboard Replacement: Schritt 18, Bild 1 von 1
    • Remove the copper plate to reveal connections to the lens.

  19. Canon PowerShot G7X Motherboard Replacement: Schritt 19, Bild 1 von 1
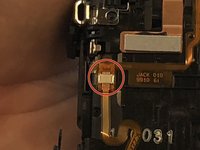
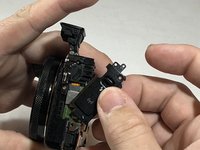
    • Using the black nylon spudger, lift gently on the pin connector until it comes off.

  20. Canon PowerShot G7X Motherboard Replacement: Schritt 20, Bild 1 von 2 Canon PowerShot G7X Motherboard Replacement: Schritt 20, Bild 2 von 2
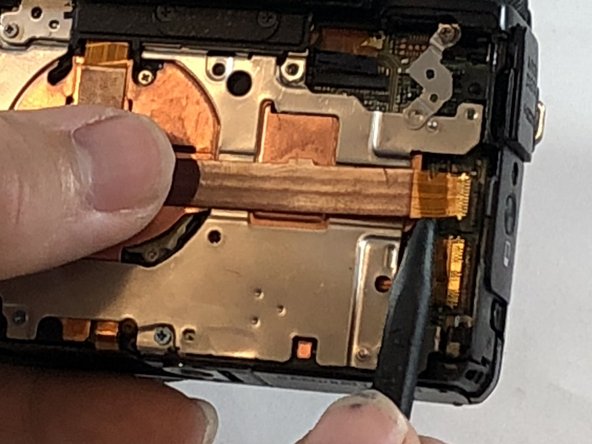
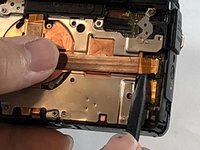
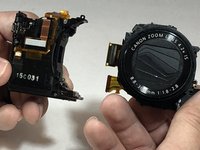
    • Using the spudger, gently lift on the ribbon cable until it comes out.

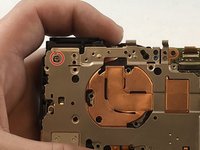
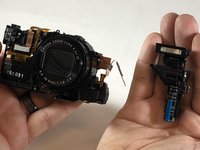
    • Separate the lens from the motherboard.

  21. Canon PowerShot G7X Motherboard Replacement, Motherboard: Schritt 21, Bild 1 von 1
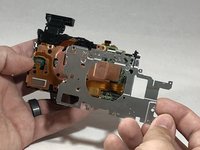
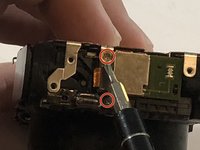
    • Remove the 5 mm Phillips #000 silver, anchor screws from the corners of the motherboard marked in the picture.

  22. Canon PowerShot G7X Motherboard Replacement: Schritt 22, Bild 1 von 1
    • Remove motherboard.

Abschluss

To reassemble your device, follow these instructions in reverse order.

Eine weitere Person hat diese Anleitung absolviert.

Team

IUPUI, Team S1-G5, Stella Fall 2019 Mitglied von IUPUI, Team S1-G5, Stella Fall 2019

IUPUI-STELLA-F19S1G5

3 Mitglieder

5 Anleitungen geschrieben

Ein Kommentar

Very Good!
I Think I Want to DIY Rep My DC

sheep free - Antwort

Kommentar hinzufügen

Seitenaufrufe:

Letzte 24 Stunden: 1

Letzte 7 Tage: 5

Letzte 30 Tage: 28

Insgesamt: 910