
Dell Inspiron 13-7370 Fan Replacement
Einleitung
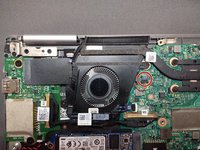
Zu Schritt 1 der AnleitungUse this guide to replace a fan on your Dell Inspiron 7370 laptop.
A working fan allows your laptop to work at higher capacity, without having to worry about overheating its components. However, it may be necessary to remove the fan, either due to it not working anymore, or to clean the fan blades and allow air to pass through it again.
For this guide, you will need a Phillips #0 screwdriver. To take the laptop case apart, a plastic pick is recommended, although you can also use you fingers and a bit of elbow grease instead.
Was du brauchst
Werkzeuge

-
-
Using a Phillips #0 screwdriver, remove the ten (10) 2.5 mm screws fastening the bottom cover.
-
-
-
Starting around the edges of the laptop, lift and remove the back cover. Apply pressure upwards, until you hear a popping noise.
-
Moving clockwise around the laptop, continue to apply pressure upwards, using your fingers or a plastic pick, until the bottom cover pops out of its locks.
-
-
-
-
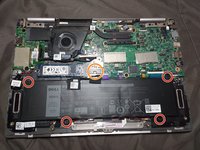
Using the Phillips #0 screwdriver, remove the four 2 mm screws.
-
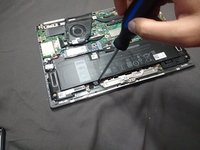
Carefully disconnect the battery from the motherboard.
-
-
-
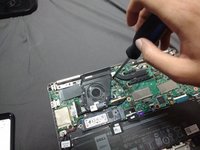
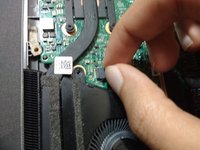
Using the Phillips #0 screwdriver, remove the two 2 mm screws holding the fan in place.
-
-
-
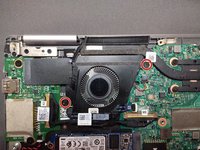
Lifting the fan, disconnect it from the laptop by grasping the connector (circled in red), and pulling out horizontally.
-


To reassemble your device, follow these instructions in reverse order.
To reassemble your device, follow these instructions in reverse order.
Rückgängig: Ich habe diese Anleitung nicht absolviert.
Eine weitere Person hat diese Anleitung absolviert.
Team

York University, Team S1-G6, Melo-Thaiss Summer 2021 Mitglied von York University, Team S1-G6, Melo-Thaiss Summer 2021
YORK-MELO-THAISS-SU21S1G6
1 Mitglied
1 Anleitung geschrieben