
Fujifilm FinePix S4800 Flashbulb Replacement

Einleitung
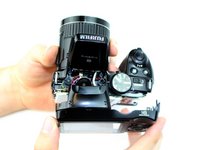
Zu Schritt 1 der AnleitungIn this guide, we will be taking apart the Fujifilm FinePix S4800 to remove and replace the flashbulb. This involves taking off the rear plastic case of the camera by removing screws and using a plastic removal tool to separate the rear case from the rest of the camera and removing the LCD screen. You will then be be able to remove and replace the flashbulb of your camera after removing a few more screw and desoldering the wires connected to the bulb.
Was du brauchst
Werkzeuge


Mehr anzeigen …
-
-
Rotate the camera so that the label on the base of the camera is facing up.
-
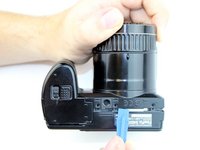
On the battery compartment door, there is a slider that says "open". Slide it down and push the door to the right to release the door.
-
-
-
Rotate the camera so that the HDMI port is facing up.
-
Remove the two 5.0 mm JIS #000 screws.
-
-
-
Rotate the camera so that the text "30x superwide 24-720mm" is facing up.
-
Remove the two 5.0 mm JIS #000 screws.
-
-
-
-
Press the pop-up button highlighted in the picture to release the flash mechanism.
-
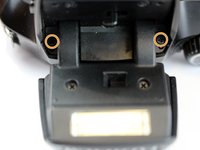
Remove the two 5.0 mm JIS #000 screws highlighted in the picture.
-
-
-
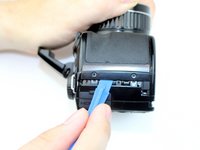
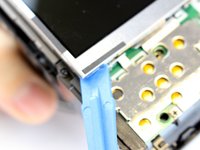
Use a plastic opening tool to separate the rear case from the camera on each of the sides until the panel is completely separated.
-
-
-
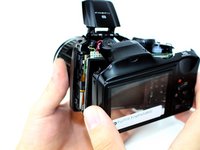
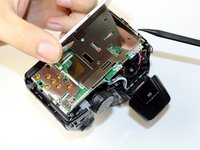
Gently tilt the LCD screen toward the bottom of the camera and use a spudger to flip the lock for the ZIF cable attached to the LCD.
-
-
-
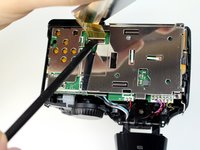
Unsolder the connections shown in the image that connect the black, pink, white and blue wires to the bulb.
-
Soldering Guide: Wie man Lötverbindungen herstellt und entlötet
-
-
In diesem Schritt verwendetes Werkzeug:Tweezers$4.99
-
Using a pair of ESD-safe tweezers, remove the flashbulb.
-


To reassemble your device, follow these instructions in reverse order.
To reassemble your device, follow these instructions in reverse order.
Rückgängig: Ich habe diese Anleitung nicht absolviert.
Eine weitere Person hat diese Anleitung absolviert.

Team

USF Tampa, Team S19-G4, Hoffman Spring 2017 Mitglied von USF Tampa, Team S19-G4, Hoffman Spring 2017
USFT-HOFFMAN-S17S19G4
4 Mitglieder
16 Anleitungen geschrieben
Ein Kommentar
If it wasn't for this manual, I don't know how I would have figured it out. I am very lucky to be here