Einleitung
Diese Anleitung wurde von iFixit-Mitarbeitern erstellt und nicht von Google unterstützt. Erfahre hier mehr zu unseren Reparaturanleitungen.
Die Anleitung zeigt dir, wie du einen beschädigten USB-C Port im Pixel 3a austauschen kannst. Er ist komplett modular und leicht zu wechseln.
Das Display des Pixel 3a ist nicht verstärkt und daher sehr empfindlich. Wenn du das Display wiederverwenden willst, dann beachte besonders unsere Warnungen beim Öffnungsverfahren.
Der kniffligste Teil der Reparatur ist das Verbinden des Steckers am Näherungssensor, das erfordert Geduld und Feingefühl.
Was du brauchst
-
-
Beachte die beiden Nähte am Smartphone:
-
Displaynaht: Diese Naht trennt das Display vom restlichen Gerät. Hier solltest du hebeln.
-
Rahmennaht: Diese Naht trennt den Plastikrahmen von der Rückabdeckung. Sie ist mit Schrauben verschlossen. Hier darfst du nicht hebeln.
-
Bevor du anfängst zu hebeln, schaue dir folgende Stellen am Display gut an:
-
Displayflachbandkabel: stecke das Werkzeug nicht tiefer ein als beschrieben, du könntest es sonst beschädigen.
-
Klebezonen am Rand: wenn du das Plektrum unter diesem schmalen Rand nicht schräg stellst, kannst du das Display beschädigen.
-
-
-
Erwärme einen iOpener und lege ihn eine Minute lang auf die rechte Kante des Displays.
My screen was cracked diagonally. Heating with iOpener helped at the top and bottom edges to weaken the adhesive.
-
-
-
Setze einen Saugheber in der Nähe der rechten Kante des Displays an.
-
Ziehe gleichmäßig und fest am Saugheber.
-
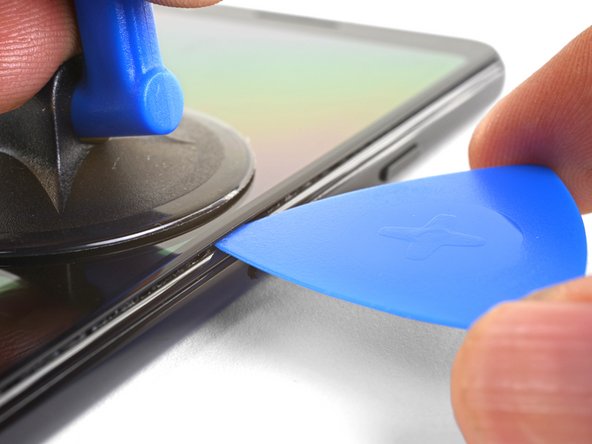
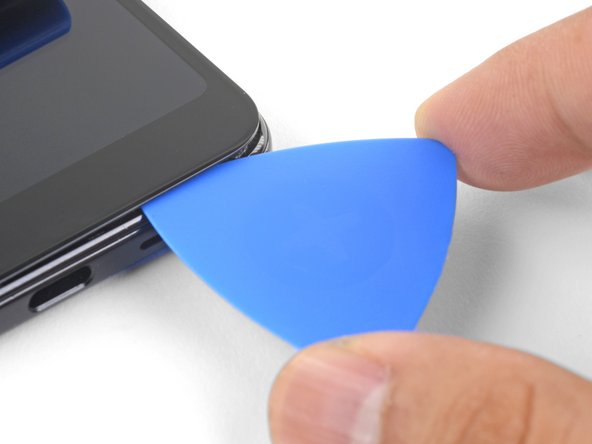
Setze ein Plektrum in den entstandenen Spalt, aber nicht tiefer als 1 mm.
-
-
-
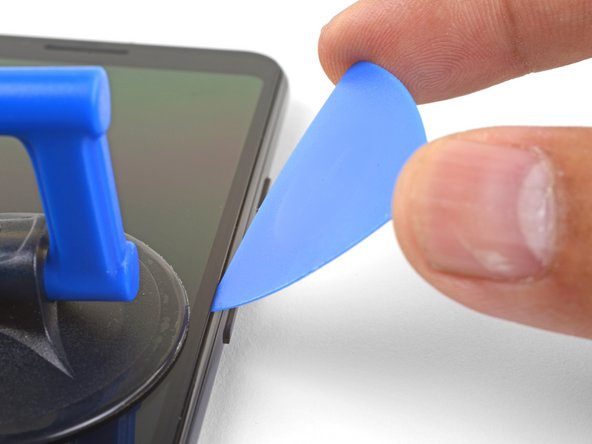
Kippe das 1 mm tief eingesetzte Plektrum steil nach oben.
-
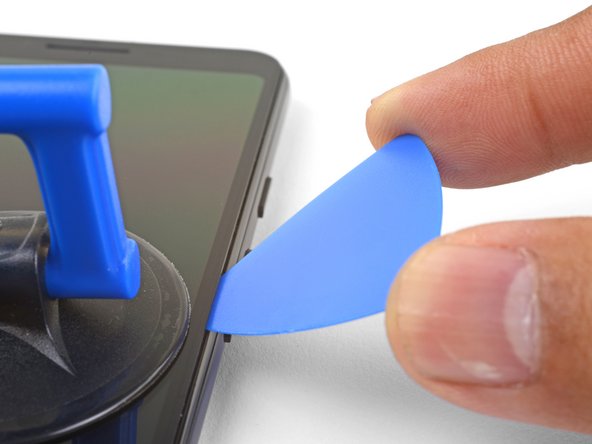
Drücke das Plektrum in steilem Winkel vorsichtig ungefähr 6 mm tief in den Spalt hinein. Das Plektrum muss unter das OLED-Panel gleiten.
-
-
-
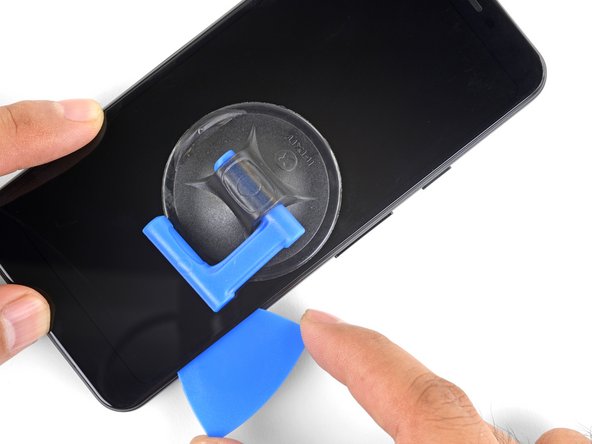
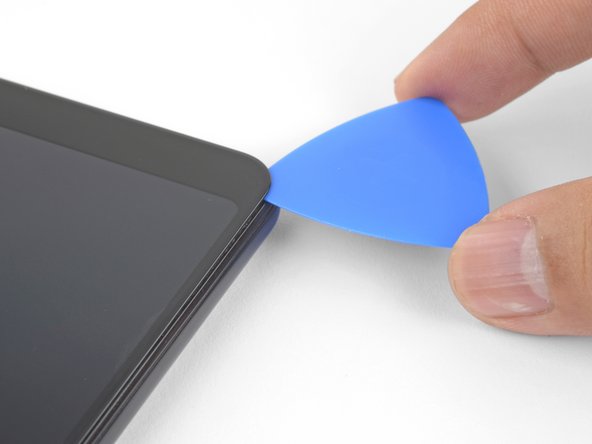
Schiebe das Plektrum die rechte Kante entlang und schneide dabei die Klebeverbindung auf.
-
Lasse das Plektrum stecken, damit der Kleber sich nicht wieder verbinden kann.
Don’t make my mistake and read ahead. 6mm may be too close for comfort! 8mm is definitely too far and caused me to damage. Also be sure to read the right manual! I have an XL and it notes 5mm.
Fortunately my old screen was beyond repair, But be super careful around the bottom I managed to sever the ribbon cable to the digitizer.
I broke my screen here. The adhesive in my case was quite strong on the top and bottom.
This is by far the hardest part of the entire replacement. I ruined my screen doing this, you might as well buy a new screen at the same time as you buy your battery. I just barely rubbed the edges of my screen and it turned the edge of my screen purple. This eventually migrated to the entire screen causing the whole thing to be purple/black.
I've repaired many iPhones, and never had any issues. The screens always remained intact. But with the Pixel, I completely destroyed the screen. The only thing it showed after booting up was a purple line... The adhesive is very strong and it's nearly impossible to separate the screen without damaging it. You should order a new screen before you attempt to change the battery, just in case.
-
-
-
Schiebe das Plektrum um die untere rechte Ecke herum und trenne die Klebeverbindung auf.
-
Schneide weiter an der Unterkante entlang und um die untere linke Ecke herum.
My screen was already cracked diagonally, so going around the corners was especially hard. Starting from each side was not so risky as I first thought because side adhesive is really thin. However top and bottom needed some more lifting force from the pick. More heating helped at the top and bottom edges.
-
-
-
Schneide an der linken Kante des Smartphones entlang, achte dabei darauf, dass das Plektrum steil genug steht, so dass es unter das OLED-Panel gelangt, aber nicht tiefer als 6 mm.
-
Um das Plektrum unter das OLED-Panel zu bringen, setze die Spudgerspitze nicht mehr als 1 mm tief ein, stelle das Plektrum steil an und schiebe es dann 6 mm tief ein.
-
-
-
-
Schneide an der Oberkante entlang, wobei du das Plektrum nicht tiefer als 8 mm einsetzen darfst.
There is a LOT more adhesive at the top than anywhere else on the phone! It’s like there’s 2 lines of adhesive, one along the edge of the case and one along the edge of the screen, and it’s filled in between them wherever the speaker camera aren’t. I needed to heat and pry several times to get the top loose. Fortunately, there’s little risk of hitting a cable near the top (look ahead to the step where you lift the screen off to see where all the cables go!)
I found that applying the iOpener across the top edge of the glass for about 30 seconds at this step helped soften the adhesive significantly. My front camera was replaced only a few months ago by uBreakiFix and the display adhesive subsequently let go on the entire right edge, bottom, and part of the left side shortly after the new front camera failed. Only the top was still securely stuck.
-
-
-
Wenn alle Kanten aufgetrennt sind, dann Klappe die rechte Kante des Displays nach oben auf.
-
Trenne eventuelle Reste der Klebeverbindung vorsichtig mit einem Plektrum auf.
-
-
-
Wenn wirklich alle Klebestellen aufgeschnitten sind, dann kannst du das noch angeschlossene Display ganz aufklappen und auf das Smartphone legen, so dass das Glas unten ist. Das Flachbandkabel des Displays sollte einen losen Bogen bilden.
Hi, could you help me with one clarification?
What does the small “metal patch” in the middle of the display ribbon do?
Does it prevent the phone from starting while disconnected?
Thank you for your time!
Hi Oliver,
I think the patch you’re referring to helps with either EM shielding or heat dissipation. It should not prevent the phone from starting.
-
-
-
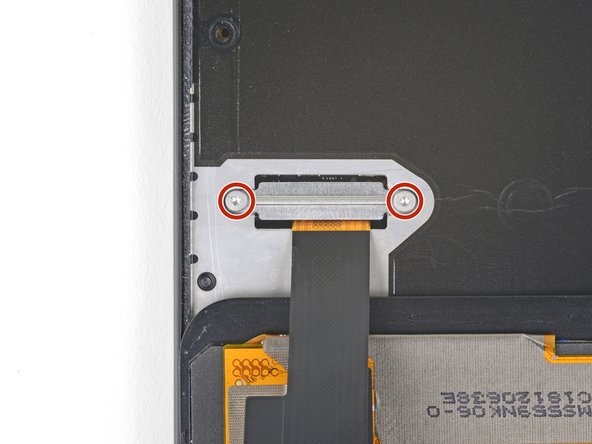
Ziehe das schwarze Klebeband zurück, welches die Halterung des Displaysteckers bedeckt.
-
Entferne die beiden 4,4 mm T3 Schrauben, mit denen die Halterung des Displaysteckers befestigt ist.
-
Entferne die Halterung des Displaysteckers.
This may be a silly question but how are you able to tell whether the tape is in good condition? Is it based off of how sticky it is after you remove it?
That is a fair question! If the tape is in one piece and is relatively sticky, it can probably be used again.
Oops! I forgot to put any tape back. Does this tape have a critical purpose, in other words should I go to the trouble to pry the screen back off and tape it?
The tape does not serve a critical purpose. If you have already re-sealed your phone, I wouldn’t worry about it.
Les vis sont des T4 et non des T3
Bonjour Gaëtan ! Merci pour la remarque. En fait, il y a toujours une certaine tolérance entre le tournevis et la tête de vis. Donc il se peut que la taille supérieure ou inférieure soit plus “confortable” au cas par cas. Bonne réparation !
Bonjour,
Pouvez-vous me conseiller un bon kit de réparation pour mon Google Pixel 3A?
J'ai peur de me faire arnaquer en achetant un mauvais écran de basse qualité .
Do you sell the 2 4.4mm t3 screws and the screen connector bracket. Or know where I can get it thanks
-
-
-
Heble das Flachbandkabel zum Display mit der Spudgerspitze hoch und trenne es ab.
I had accidentally pressed the power button and the phone was on when connecting the new screen and that broke the board! So make sure the phone is off.
hey man think I've just done the same thing :(
how did you fix it? did it need a new motherboard?
is it okay if I forgot to add the black tape on the connector area???
When reassembling, before reattaching the connector for the screen flex cable is the time to align the screen cover adhesive sheet onto the perimeter of the plastic mid-frame. Even if one is using the Tesa tape, I suspect aligning it along the edge of the mid-frame would be simpler without the screen and its flex cable obstructing your efforts.
-
-
-
Entferne das Display.
-
Vergleiche dein Ersatzdisplay mit dem Originalteil. Möglicherweise musst du weitere Bauteile (wie z.B. die Lautsprecherabdeckung) auf das Neuteil übertragen.
-
Schaue dir diese Anleitung an, wenn du vorgestanzte Klebestreifen verwendest.
-
Wenn du doppelseitiges Klebeband verwendest, wie z.B. Tesa Klebeband, schaue dir diese Anleitung an.
There is a blue plastic tape covering the digitizer and when I try to take it off it rips out something more than just the tape I think it’s pulling the magnet too
i had a little plastic piece around the camera (seems to just be a spacer) that i moved to the new screen. had to pry it up with a pick cuz it was stuck down good.
actually to clarify- i didn’t move the little camera spacer to the new screen- i placed it around the camera on the phone, where there was a little indent for it, and stuck it down with a bit of tesa strip, then applied more tesa strips around the edge of the phone before finally reconnecting and replacing the screen. the little plastic bit i encountered needs to be precisely placed around the camera so would not be a good idea to just stick it to the screen when reinstalling!
elyze -
Thanks team! I was able to replace my broken screen with no issues!
Instead of cutout adhesives or tesa tape, I used B-7000. Painless.
Appreciate the screen and instructions!
Bonjour,
Pouvez-vous me conseiller un bon kit de réparation pour mon Google Pixel 3A?
J'ai peur de me faire arnaquer en achetant un mauvais écran de basse qualité .
Hello . Can you advice me a site where i Can buy a quality screen replacement pack for my Google Pixel 3A?
There's a lot of rip off on internet and id like to get a good pack and a quality screen .
Hello! We currently sell a replacement screen. However, I’m not sure if it is available yet internationally.
I have a quick question, so I haven’t done anything yet because I only just ordered my repair kit, but is it possible to replace the battery without having to replace the display ?
Hi Braeden!
Yes, it is definitely possible to replace the battery without replacing the display. With that said, the initial entry steps can be pretty tricky. Before you begin, look very closely over the display to see if you can see any micro-fractures. If you see any, you will most likely crack the screen when you try to remove it. Take your time and apply a heated iOpener often. Good luck!
I forgot to order the tape when getting my replacement USB port, so I ended up putting the screen back on without any tape and using regular clear tape on the outside of the phone to keep the screen from falling off. It’s less waterproof, but it’ll do the job until the right part arrives.
Speaker mesh appeared to already be in place on my replacement screen, so I did not transfer this over from my old screen. That was a huge mistake, sounds were garbled above about 30% volume. Make sure you do this part!
I tried the replacement after watching this and many other videos. I purchased a working Pixel 3a and removed it to put onto my old Pixel 3a. The screen is not turning on on either devices now, old or new. The device is turning on because I can feel vibrations. What do you think the problem is?
-
-
-
Entferne die folgenden vierzehn T3 Schrauben mit folgenden Längen, mit denen der Plastikmittelrahmen befestigt ist:
-
Zwölf silberfarbene 4,3 mm Schrauben
-
Zwei schwarze 4,3 mm Schrauben
I found that a T3 bit didn’t get purchase on the screws in my Pixel 3a, but the T4 bit worked great. Not sure what’s up with that.
This is definitely possible, depending on which kit’s T3 bit you use, along with potential screw quality variances.
My Pixel 3a has been apart three times for a non-functioning front camera. The first time, it was by a Google authorized repair shop, and the camera stopped functioning again after a few months. When I took it apart the second time, I noted that many of the screws weren't seated before I removed them. The camera module had become disconnected and simply reseating the connector fixed it. I was careful to fully drive all screws and apply an appropriate amount of torque to them, thinking the repair shop failed to do so. After 9 or 10 months, my front camera stopped working again. Again, I'm noticing a lot of the screws have worked themselves loose. I'm going to try to find an appropriate thread compound that I can precisely apply to these tiny screws.
Hey Reid,
I would suggest blue Loctite or threadlocker. Dab a small drop on each screw before you install them.
-
-
-
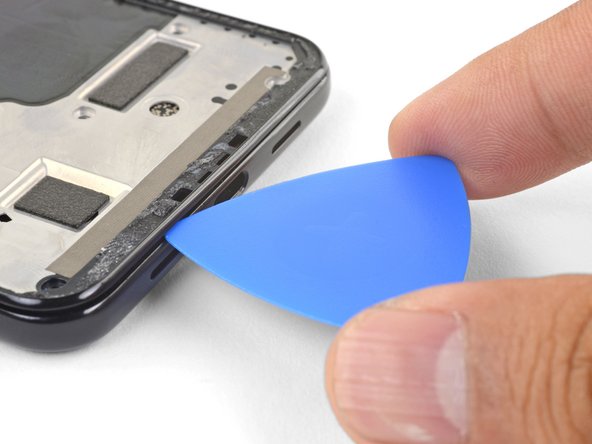
Setze ein Plektrum unten am Smartphone in die Fuge am Rahmen. Diese Fuge befindet sich zwischen dem Plastikmittelrahmen und der Rückabdeckung.
-
Schiebe das Plektrum die Fuge entlang, so dass sich die Rasten vom Plastikmittelrahmen lösen.
To remove the midframe, I was having a lot of trouble until removing the sim card tray. I think this might have to be removed before the midframe
-
-
-
Schiebe das Plektrum entlang der linken und der rechten Kante des Smartphones, um die Rasten des Mittelrahmens zu lösen.
-
Hebe die Unterkante des Mittelrahmens an, entferne den Mittelrahmen aber noch nicht. Der Mittelrahmen ist immer noch über das empfindliche Kabel des Näherungssensors mit der Oberkante verbunden.
-
-
-
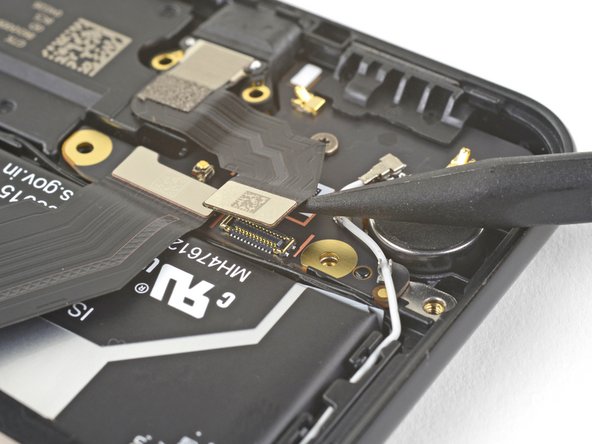
Heble vorsichtig mit der Spudgerspitze den Stecker das Näherungssensors von der Hauptplatine hoch und trenne ihn ab.
-
Entferne den Plastikmittelrahmen.
This connector is f*ckn impossible to reconnect 😭
This is the hardest part of the job. I gave up on connecting the proximity sensor while in the midframe, and found it much easier to remove the proximity sensor from the midframe, attach the connector, then thread the sensor into its home in the midframe.
-
-
-
Richte die Oberkante des Plastikmittelrahmens am Smartphone aus.
-
Richte mit der Spudgerspitze den Stecker des Näherungssensors sorgfältig an seinem Anschluss auf der Hauptplatine aus.
-
Du musst dazu geduldig und feinfühlig sein. Wenn der Stecker passend sitzt, kannst du ihn auch vorsichtig mit dem Finger im Anschluss festdrücken.
-
Heble den Näherungssensor vorsichtig mit der Spudgerspitze aus seiner Vertiefung im Mittelrahmen. Der Sensor ist leicht mit dem Mittelrahmen verklebt.
-
Entferne den Sensor vom Mittelrahmen. Stecke den Sensorstecker in seinen Anschluss auf der Hauptplatine.
-
Führe das Sensorkabel durch den Mittelrahmen und setze den Sensor wieder in seiner Vertiefung ein. Drücke den Sensor mit dem Finger nach unten, damit er wieder am Mittelrahmen festklebt.
I tried to do this for about 15 minutes before I went to the alternative. There is a tiny post to hold the sensor in position on the midframe. I pried the sensor from the midframe from the corner opposite that post and then finished this step in 2 minutes.
Plan B ok for me as well. There is a hole below the sensor in order to push it with a sim card opener.
-
-
-
Heble den Akkustecker mit der Spudgerspitze aus seinem Anschluss auf dem Motherboard hoch und trenne ihn ab.
-
Biege das Akkukabel ein Stück zurück, damit es sich nicht versehentlich wieder verbinden kann.
-
-
-
Entferne die beiden 3,3 mm Torx T3 Schrauben, mit denen der USB-C Port befestigt ist.
-
-
-
Heble den Stecker des USB-C Ports mit der Spudgerspitze hoch und trenne ihn von der Tochterplatine ab.
-
Entferne das USB-C Port Modul.
-


Um dein Gerät wieder zusammenzubauen, folge den Anweisungen in umgekehrter Reihenfolge.
Deine Reparatur hat nicht so geklappt wie geplant? Auf unserem Antwortenforum findest du Hilfe bei der Fehlersuche.
Um dein Gerät wieder zusammenzubauen, folge den Anweisungen in umgekehrter Reihenfolge.
Deine Reparatur hat nicht so geklappt wie geplant? Auf unserem Antwortenforum findest du Hilfe bei der Fehlersuche.
Rückgängig: Ich habe diese Anleitung nicht absolviert.
19 weitere Nutzer:innen haben diese Anleitung absolviert.
Besonderer Dank geht an diese Übersetzer:innen:
100%

Diese Übersetzer:innen helfen uns, die Welt zu reparieren! Wie kann ich mithelfen?
Hier starten ›


10 Kommentare
There was moister in the tip of my USB C cable when I plugged it into my phone to charge. A warning popped up on my screen to unplug. I did right away and the cord smoked…. My charging port is charged… the rest of the phone seems to work fine. The case did not feel hot afterward. Do you think my battery might be damaged too?
Hi Desmond,
It sounds like moisture may have shorted some contacts at the USB port. That normally shouldn’t damage the battery. It’s possible the charging circuitry may be damaged.
Where is the part for this? I can't find the USB C port for the 3a!
Just did this. A few notes:
* There’s a lot, like a lot, of adhesive up by the front camera. Lacking an iOpener, I used a washcloth soaked in hot water and sealed in a plastic bag to soften the adhesive.
* My ifixit kit is old and didn’t have a pick, but I used the knife to shave down the corner of an old gift card so it was thinner, and that worked fine. I found it easiest to get the screen off by placing several old gift cards under the edges to keep them from sticking down as I pried at other areas.
* I got my replacement port from an eBay listing entitled “Charging Port Flex Cable for Google Pixel 3a G020A G020E G020B 5.6” and it works fine.
* I forgot to buy extra tape for sticking the screen back on, so to keep it from falling off while the tape is in the mail, I’ve applied clear cellophane tape around the outside edges of the screen and back where there are no ports or buttons. It works ok.
* I found that the T4 bit worked better than the T3 for all of the screws involved in this process.
Fantastic guide. Really helpful. Yes, tons of adhesive up front and on the bottom. Dealing with adhesive (clearing it out while opening the case, completely removing it while the case is open, and re-applying tesa tape before finishing) is by far the most time consuming part of this process. Overall, it took me 1.5 hrs from start to finish.
Two comments:
- I want to remark the initial warning "The Pixel 3a’s unreinforced display panel is fragile". I cracked a corner of my screen, so be sure to apply some heat to remove the glue. I applied heat, but it seems it wasn't enough. Sides were very easy to remove, top and bottom a bit trickier, especially around the corners.
- Step 18, reconnecting the proximity sensor, was probably the part that required more time. After solid 20 minutes trying to reconnect it with a pointy spudger, I tried using Halberd spudger (the one with a hook end), and I managed to connect it at first try. The main issue here was to press the connector due to the bigger piece besides it. I mean the one that looks like a square with a corner removed just for the connector. The trick with the spudger is to rest it on top of that piece (cut-off corner), and rotate it so it pushes down the connector with the hook itself. Here's a link to a picture I took.
Really nice guide! thank you! I damaged the black tape on the midframe (step 14) while replacing my diplay and usb port. I was wondering if i need to worry about it? Or can i replace it with any electrical tape. Behind the black tape, i can see silver sheet. Thank you!
Hi Lokesh!
The black tape is a graphite thermal sheet. It helps the phone spread and dissipate heat. As long as the sheet is relatively intact, it will still perform its job. Electrical tape won't work in this case, since it has different properties.
As a complete newbie to removing glass screens via heat/suction, the only thing unclear to me from this guide was whether I would need to buy extra adhesive if I wasn't replacing the screen. The answer is: yes. Tesa tape is on the way now. :) (Seems obvious in hindsight, but, like I said: total newbie.) This also doubles as a review for the iOpener which is now my new favorite tool.
Overall the guide worked absolutely fantastic. I agree that the hardest part is getting the screen off, once you crack the adhesive the interior of the phone is no trouble at all to work on. This guide makes the delicate process of removing the screen less intimidating--the instructions were very clear and easy to follow--and my extremely simple port replacement went very well. Thanks for this!
(I also used a T4 screwdriver, FWIW--I didn't look at that particular part of the instructions but now that I do/look at other comments, I will also just note that I had the best luck with it as well.)
Great guide, I took me more time being careful with the display.
About "the tricky part" with proximity, first I did the patient way, but second I took the alternative method which is much simpler.
I'd leave some note in the conclusion after "follow these instructions in reverse order." to watch to attach the adhesives before proceeding to step 12 (The first time I followed the instructions carefully, but the second time I got myself into trouble :) )
Power is off, but does the battery need to be disconnect to safely do this replacement?
mplishka - Antwort
Da ich keinen iopener ( dachte das wäre alles dabei wie auf der bstellvorschau!!!) habe ich eine Wärmflasche auf das Handy gelegt ..behutsam und nicht zu heiß. Besonders an Kopf und fußende war das Display ziemlich fest...befolgt man die Anweisungen genau ist es eigentlich kein Problem das Display vom Rahmen zu lösen, jedoch bin ich der Meinung, dass hier schon ein gewisses Maß an motorischer Vertrautheit mit der Materie bestehen sollte, da wie gesagt oben und unten doch ein tieferes eingreifen in den Rahmen unter das Display nötig ist...
Ralph S. aus Neumünster
Ralph S - Antwort
You definitely want to use the iOpener on all sides as you make your way around the screen. The adhesive on my device was quite strong!
My screen was cracked in the corner and it was a real pain in the neck to get the little bits and pieces out of the corner. I don't know if this step is easier with an intact screen, but it was definitely the most difficult step on the repair for me.
Simon Stone - Antwort