
HP Pavilion x360 14m-cd0003dx Battery Replacement

Einleitung
Zu Schritt 1 der AnleitungIf your HP Pavilion x360/HP Pavilion Convertible Laptop (model 14m-cd0003dx) experiences unexpected shut-downs despite a full charge, rapid battery drainage, or dependency on a power adapter, turn to this guide for a clear walkthrough on replacing your device’s battery.
A functional battery ensures uninterrupted power and portability, providing seamless performance and mobility for a convertible laptop. A device with a faulty battery will show symptoms of heat build-up during regular use or charge, a fluctuating battery percentage, quick battery depletion, and visible swelling of the battery case.
Before proceeding with this guide, inspect the charging port and cables for signs of wear or damage to rule out other potential causes and confirm that the battery is the source of the issue with your HP Pavilion x360. If the problem is with the battery, take the following precautions: ensure that swollen batteries are handled carefully to prevent fire risks, use ESD-safe tools to avoid static damage to device components, and avoid exposing the battery to extreme temperatures.
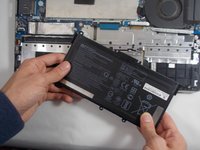
After safely removing the faulty 14m-cd0003dx battery, make sure to dispose of it in compliance with local regulations to minimize environmental impact. Click here to view additional information on battery safety and proper disposal.
Power off the device entirely and remove any external connections before starting the replacement.
For a visual tutorial, view HP Pavilion X360 Convertible 14m-cd0003dx Complete Disassembly and follow the demonstration up to 3:50 for battery removal steps. If you're dealing with a swollen battery, click here for guidance on proper disposal.
Was du brauchst


-
-
Turn off the computer.
-
Disconnect the power cord and any external devices connected to the computer.
-
-
-
-
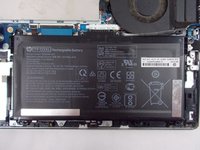
Flip the device so that the back plate of the laptop is up.
-
Use a Phillips #0 screwdriver to remove the four 6 mm Phillips screws from the bottom cover.
-
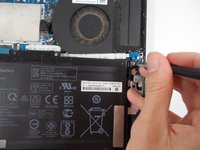
Pry off the back cover with the spudger tool.
-


To reassemble your device, follow these instructions in reverse order. Take your e-waste to an R2 or e-Stewards certified recycler.
To reassemble your device, follow these instructions in reverse order. Take your e-waste to an R2 or e-Stewards certified recycler.
Rückgängig: Ich habe diese Anleitung nicht absolviert.
4 weitere Personen haben diese Anleitung absolviert.

Team

UMass Dartmouth, Team 7-4, Sinclaire Spring 2022 Mitglied von UMass Dartmouth, Team 7-4, Sinclaire Spring 2022
UMASSD-SINCLAIRE-S22S7G4
6 Mitglieder
6 Anleitungen geschrieben
Ein Kommentar
Hallo
vielen Dank für diese coole Anleitung
als Ergänzung
beim Model 14-cd0101ng gibt es lediglich die beiden unteren Schrauben (siehe schritt, zwei 6mm schrauben) nicht.
Ansonsten konnte ich keine unterschiede feststellen!
Eng:
For Model 14-cd0101ng it is the same way, without the two 6mm Phillips screws underneath!