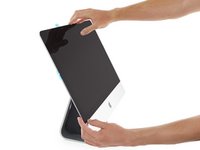
Einleitung
Das Entfernen des Bildschirmes erfordert, die Klebestreifen rund um das Display durchzuschneiden. Nachdem der Kleber durchgeschnitten ist, kann er nicht verwendet werden, um das Display wieder zu versiegeln, so dass du einen neuen Satz Klebestreifen verwenden musst.
Was du brauchst
-
-
Wenn du dein altes Display weiter verwenden willst, dann musst du auch die Klebstoffreste von der Rückseite des Displays entfernen.
-
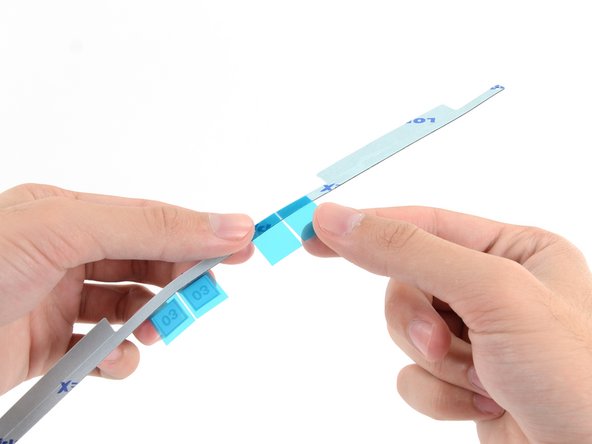
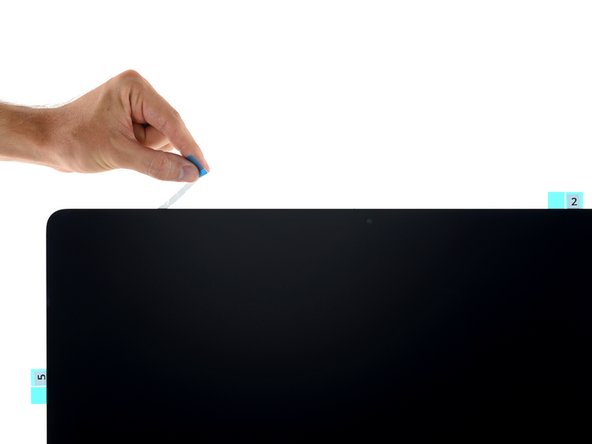
Ziehe die alten Klebestreifen mit einer Pinzette oder deinen Fingern ab. Fange unten an und ziehe sie nach oben zur Oberkante des Gerätes hin.
Depending on what adhesive you are removing, I find that using something like Goo Gone Goop adhesive remover is very helpful.
If it is the original foam based adhesive, then that can usually be taken off without the adhesive remover, but with these after market glue strips, the adhesive remover is best.
Safer to stick with alcohol as recommended in the guide—a lot of adhesive removers can leave oils behind, which prevents the new adhesive from bonding properly. Weeks or months later, the whole screen falls out. If the adhesive is really stubborn and you must use something like Goo Gone, wipe it down thoroughly with alcohol afterward.
Welcome to the club!
I recommend using a white colored cloth and/or wearing gloves with the alcohol. My hand was all black after using a black cloth, not to mention dried out.
-
-
-
Beginne mit dem mit 3 (oder 03) markierten Streifen. Er verläuft an der rechten senkrechten Seite des hinteren Gehäuses.
-
Ziehe das kurze Stück Schutzfolie von der Rückseite des Streifens ab.
-
-
-
Setze die Spudgerspitze in das Loch am Ende des Streifen, und zwar von der Seite aus, die noch eine Schutzfolie hat.
-
-
-
Drücke die Spudgerspitze in die entsprechende Vertiefung im Rahmen des iMac, wobei die Spitze immer noch im Loch auf dem Streifen steckt.
-
Mit Hilfe vom Spudger in der Vertiefung als Anker, kannst du nun den Streifen an der rechten Kante bündig auflegen und leicht daran ziehen, um sicher zu stellen, dass der Klebestreifen gestrafft ist, und ihn so am Rahmen festkleben.
Don’t pull too hard at all at this or any step similar. The adhesive can stretch, and it will no longer align at the other hole. The goal is just to make sure it isn’t wrinkled.
-
-
-
Wenn du die untere Hälfte des Streifens gut ausgerichtet hast kannst du das längere Stück der Schutzfolie von der Rückseite abziehen.
-
-
-
Setze die obere Hälfte des Klebestreifens bündig zum rechten Rand des Rückgehäuses und klebe ihn fest.
-
-
-
Lege den Streifen 3 entlang der rechten Kante und glätte ihn mit dem Finger. Achte darauf, dass er bündig mit der rechten Kante des Rahmens liegt und faltenfrei ist.
-
-
-
-
Arbeite dich weiter um den Rand des iMacs herum, und füge in gleicher Weise drei weitere Klebestreifen hinzu.
-
Arbeite gegen den Uhrzeigersinn von Streifen 3 ausgehend und positioniere die Streifen folgendermaßen:
-
Streifen 2 oben rechts
-
Streifen 1 oben links
-
Streifen 5 links senkrecht
Please update this pic with newer model 2017, where you can see the wholes for the mic!!! These must not be covered! I hope the set of tapes 4R considering this issue, otherwise the mic will not work, as I used to have it!
-
-
-
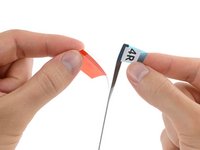
Fasse die rote Zuglasche am Streifen 4R an und ziehe damit die Schutzfolie ab.
-
Lege den Streifen entlang der Unterkante des Rückgehäuses, unmittelbar rechts von der mittleren Schraube an dieser Kante.
-
Lasse den Finger den Klebestreifen entlang laufen, damit er glatt und faltenfrei verklebt. Drücke ihn dabei auf dem iMac fest.
when i pull the red tab at least one of the bottom strips always has the wrong side peel off. Poor design.
Yes, all of the other strips go on without problem, but every strip kit I’ve ordered has the 4L and 4R strips reversed (like in the picture). And pulling the red tab usually doesn’t work at all. Why aren’t they just made like the rest of the strips?
Very important in case of iMac 2017 - 4R strip covers the microphone holes. With the kit provided you have to split 4R strip into two pieces, cut out part of it to leave space where the mic is - slightly on the right from the apple logo (you can see there very small holes) . If not, you will cover whole area and mic will not work properly. I was freaking out during the re-assembling my iMac as I thought I have demaged the mic’s gentle cable. Apparently I haven’t it was just the stripe.
This is true, and that’s why there are different instructions for the 2017 model.
The two bottom strips are perfectly simmetrical. Just invert their place (L to R, R to L) and leave the white part on top like all the others. This works especially well if you follow drgallo's alternate procedure at step 21.
NOTE: As said in other comments, the 2017 and newer iMacs need you to cut a section out of 4L, otherwise it will block the microphone hole and you will get no sound from the Mic. It’s easy enough to do but if you don’t know to do it, you’ll need a whole new set of adhesives to do this process all over again.
I now have spotlighting along the entire bottom of the screen after opening and re-sealing (21.5 2017 4k). Anyone have any suggestions?
-
-
-
Wiederhole den vorherigen Schritt für den Streifen 4L, indem du ihn an der linken Hälfte der Unterkante des iMac platzierst.
Unless my iMac was assembled incorrectly, the 4L and 4R strips are mislabeled and should be reversed . The right angles of the strips should be towards the outer bottom edges of the display. I have photos but not sure how to get them in here.
-
-
-
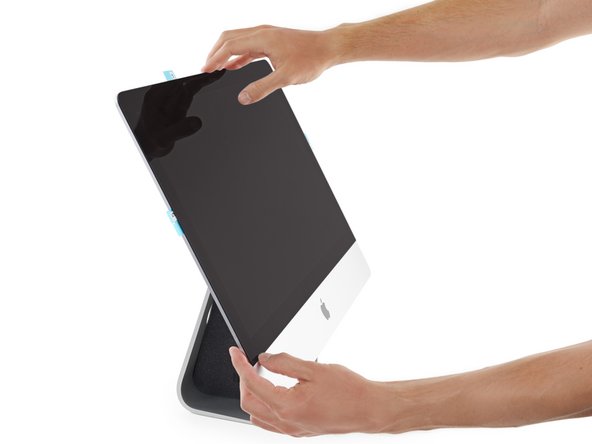
Lege das Display vorsichtig auf seinen Platz auf dem iMac und richte es ringsum bündig aus.
-
-
-
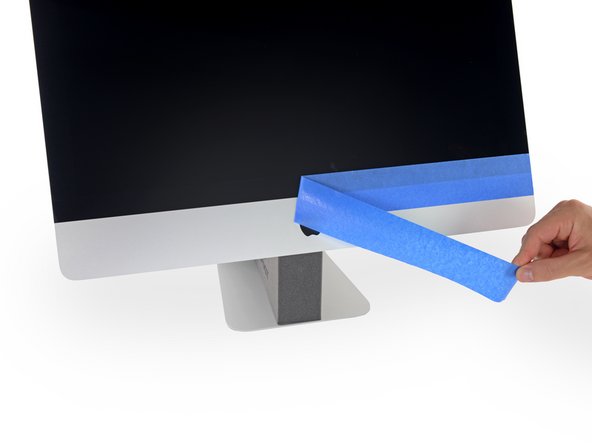
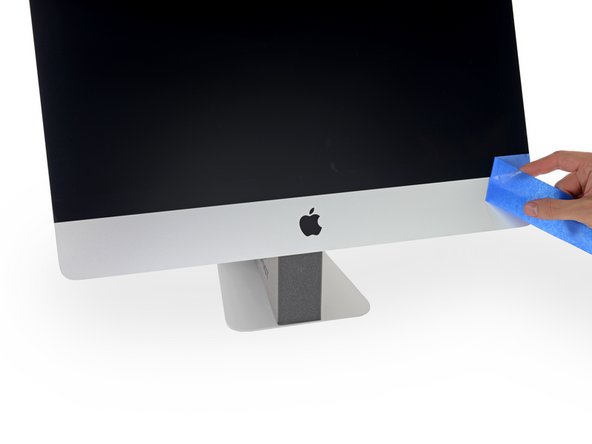
Klebe den unteren Rand des Displays vorläufig mit Klebeband am Gehäuse des iMacs fest.
Elastoplast also works
-
-
-
Wenn du deinen iMac schon getestet hast und sicher bist, dass alles funktioniert , dann kannst du zu Schritt 17 übergehen.
-
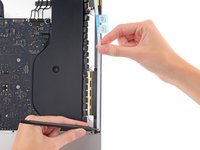
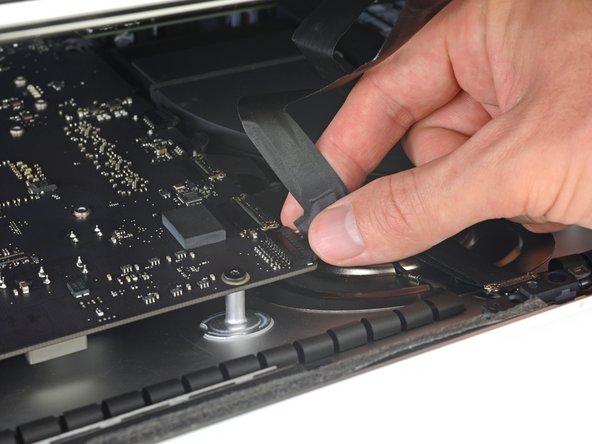
Setze den Stecker der Stromversorgungskabels des Displays in seinen Sockel auf dem Logic Board.
If replacing of the adhesive is part of a larger job, where you had to replace the RAM for instance, please make sure that you can plug in the peripherals into the USB, Thunderbolt and the Ethernet. It’s late when you seal the iMac and discover that you can’t plug anything into the USB, because the logic-board has moved 1mm! Also verify that your iSight camera, speakers, wireless, IR and Bluetooth work before sealing.
If you’re doing this as part of a SSD upgrade, don’t forget you have to erase it in Disk Utility before installing or restoring macOS. Don’t panic like I did and almost tear it all down again.
-
-
-
Stecke den Stecker des Displaydatenkabels vorsichtig mit der anderen Hand oder einer Pinzette in seinen Anschluss auf dem Logic Board.
-
Klappe den metallischen Sicherungsbügel des Displaydatenkabels in Richtung Logic Board herunter.
0. Put a loupe or magnifying glass on the list of tools and supplies.
1. It would be good to show an enlarged picture of the data cable connector to see how it works.
2. In my case, the metal retaining bracket did not hold the connector securely enough, so the connector kept popping out.
Click on any image if you need to see the high-res version. Most of these are 40+ megapixel photos, so you can blow them up to almost any level of detail you could possibly want.
-
-
-
Nachdem du alle Funktionen des iMac getestet hast, kannst du die Displaykabel wieder lösen und das Display vorsichtig nach vorne kippen.
-
Entferne den Schutzfilm vom Streifen 4R, indem du von oben hineingreifst und die Lasche gerade von der Unterkante des Displays wegziehst.
It’s not a good idea to remove insert these two cables twice, when it can be done only once:
BEFORE reattaching the cables, open the screen up to 90 degrees to the machine, and carefully peel off the two bottom strips 4L & 4R.
Being careful not to close the machine any more than is necessary to be able to insert the cables, with the machine wedged & on its stand, wrap a large double loop of low-tack masking tape entirely around both machine & screen, effectively making two “straps” to retain the screen with about a 5” gap at the top enough to access the cables easily. Insert the cables, not forgetting the latch, then test. The two straps of masking tape can then be cut and peeled back out of the way, whilst supporting the screen, before peeling off the remaining plastic strips & closing up the machine. Much easier to get at 4L/4R this way, and you have only done the cable thing 1 time.
At this point, attach a sheet of paper to the screen reminding “Don't forget to connect the data and power cables to the screen!”. It's good for the distracted.
-
-
-
Verbinde zu letzten Mal die Versorgungs - und Datenkabel vom Display.
Be careful with these cables, they are very very fragile and not at all designed for multiple disconnection / connection. be assured that they are correctly plugged in, the margin is fine. We can believe that it is well connected but the surpise can be very unpleasant once the screen back in place and glued! Thank you Apple with your glue !
Same here. Put it together before removing the tape cover and it wasn’t plugged in. Opened it up and realized the data cable wasn’t all the way in. I then noticed the cover isn’t just a cover; it’s a hook that flips over the other side of the connector to be sure they are all the way in, and won’t come apart - I was simply flipping it over the top as if it was just a simple flap to lay on top.
Now I know : )
-
-
-
Stütze das Display mit einer Hand ab, während du die Schutzfolien in den folgenden Schritten entfernst, oder lehne es leicht gegen das Gehäuse des iMac.
At this step, make sure that the camera is correctly positioned in front of the opening of the window. Indeed, you may notice that the camera, although attached to the chassis, has a flexible mount and can move slightly from left to right and from top to bottom. This mounting allows, I guess, to properly wedge the camera when we plate the screen on the chassis.
In my case, although the screen was perfectly aligned at the bottom left and right corners, the camera had to be positioned incorrectly because the screen did not fit snugly on the chassis. It is almost invisible to the naked eye, but it does not plate perfectly.
Be sure to check this point before removing the protections from the adhesives by playing on the mounting bracket of the camera mount.
Excellent tutorial;))
If you're replacing the display, don’t forget to take out the pink film protecting the camera opening. I did, and I came out pink. I had to this all over again since I missed the pink film.
If this happened to you, and you don’t want to redo or just waiting for new adhesive strips to come to your mailbox, try using a CTO blue gel flash filter to counteract and balance the color, which actually worked great for me, unless you want to use a green screen, which I did, then CTO filters won’t work.
-
-
-
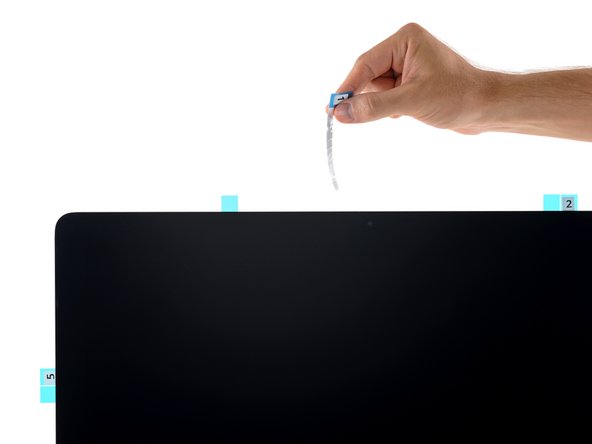
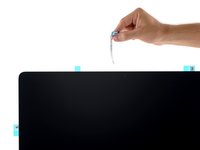
Entferne den Schutzfilm von Streifen 1, indem du ihn gerade an seiner Lasche herausziehst.
-
Der Schutzstreifen kann zerreißen, wenn du zu stark daran ziehst. Sei sorgfältig und achte darauf, dass kein Druck auf dem Display liegt, und dass es nicht die Streifen einklemmt.
It is MUCH easier to just align the bottom edge, then use painters tape to attach the glass at the bottom. Flip the screen forward so that you can see both tabs 4L and 4R. Carefully expose the adhesive at the bottom. Connect the two top cables, clean the webcam. Finally peel tabs 5 and 3 from the bottom up. Lastly while you can see everything, peel both sides of tabs 1 & 2. Then just press everything down squarely. (The biggest issue is that the tabs do not come off easily and removing the tabs while you can see them is the key here.)
I did what drgallo suggested. Perfect.
Dr. Gallo is spot on. I actually just peeled 5, 3, 1, and 2 at the same time. So much easier. I can’t even wrap my head around how 1 and 2 can come before 3 and 5. So, just do 5&3 and then 1&2 or do all four simultaneously. Just make sure not to skip steps 19 and 20.
-
-
-
Ziehe genauso den Schutzfilm von dem Klebestreifen, der mit Streifen 1 gepaart ist, ab.
-
-
-
Wiederhole die beiden vorherigen Schritte, um den Schutzfilm von den restlichen Klebestreifen zu entfernen (gekennzeichnet mit 2, 3 und 5).
-
-
-
Entferne das Klebeband, mit dem das Display am Rückgehäuse festgeklebt ist.
-
Um eine gute Haftung zu gewährleisten, kippe den iMac flach auf die Rückseite (mit dem Bildschirm nach oben) und drücke alle vier Kanten des Displays vorsichtig aber dennoch nachdrücklich fest.
-


Rückgängig: Ich habe diese Anleitung nicht absolviert.
314 weitere Personen haben diese Anleitung absolviert.
Besonderer Dank geht an diese Übersetzer:innen:
100%

Diese Übersetzer:innen helfen uns, die Welt zu reparieren! Wie kann ich mithelfen?
Hier starten ›


33 Kommentare
Good Lord, why does Apple have to make it so difficult to upgrade or repair? There comes a point where design aesthetic just isn't worth it. Magnets, like I believe older iMacs use to attach the front glass, would have made it much easier. I'll take the extra bulk any day.
Have you actually done the replacement? It's actually pretty easy. Apple did everything they could to make it as painless as possible: the old adhesive separates without *any* residue, it doesn't rip apart, it doesn't make a mess. Things align like magic.
True, it could be easier. Like with the old color iMac SD. But since I don't take my iMac apart every day, doing this once or maybe twice in my computer's lifetime is a small price to pay for a *really* slim and good looking device.
I had some issues with steps 21, 22 and 23 ... the tabs would rip off. After the third one I used the plastic card to gently create some space for the strip to escape.
Thank you for this fantastic guide, and all of the iFixit guides! Just finished this replacement using the iFixit Adhesive Strips/iMac Opener tool combo--everything worked very well, except that the iMac Opener tool did not particularly like the broken glass area of the display, which bent the plastic of the "pizza cutter" wheel a little.
.
One bit of helpful advice is to use extreme care when placing the replacement display back into the iMac. Make sure that you do not put the display back in at too great of an angle, or there will be a very noticeable gap at the bottom, between the display glass and the iMac frame. Adhesive strips are not forgiving, and rarely give multiple chances!
We've revised the guide procedure and it makes positioning the screen very easy. You can drop it into place and fine-tune the position to your heart's content. :)
Place some sticky tape along the lower edge of the iMac either side of Apple logo. Position screen carefully onto the lower ledge and then use the tape to hold. Tape then acts as a hinge allowing you to raise or lower screen while in the right position. I did this and also used some tape at the top so I could reconnect screen and test HDD install. Then you can hinge screen down to remove the adhesive tape backing strips in order to close up the screen for good!!
Thanks for the tip! We've added it to the guide.
Somewhere between steps 2 and 3 you might want to add, that you also need to remove the old adhesive from the rear of the screen assembly
Good call! Done and done. Thanks!
Just successfully upgraded one of these to an SSD using the instructions, tools and adhesive strips from iFixit. The instructions are excellent, and the iMac opener tool does a good job of cutting the adhesive to get it open.The adhesive strips in the kit are excellent - don’t even think about trying to make your own - just buy these and make your life MUCH easier. The final part of using masking tape to position the display before final sealing is very important, and works brilliantly.
I found that for steps 10 & 11, it is better to attach 4R and 4L to the glass directly by removing the blue side of the adhesive strips and placing where they fit correctly onto the glass. Then remove the red tabs just before placing the glass onto the Mac. The right-angle ends of the tape align with the corners on the glass back.
Of course monitor won't turn on after putting it back in. Any hint?
Joao, I had the same problem just last week. In my case, it seems I hadn’t fully inserted the video cable. I opened it up again, reset the cables, and yes, the video still works. So, open it up, order some new adhesive strips, and be *extra* careful the second time you do it.
David -
This was the toughest part of the HD>>SSD upgrade.Removing all the gunk, and aligning the new strips took more than an hour. The rest half that! But all good now, Thanks Sam.
Thank you for this easy to use guide. Only read, look the pictures and do exactly what to do and the iMac looks like before
Tolle Anleitung, vielen Dank. Ich bin sehr frog, dass es eure Seite gibt. Die Klebestreifen habe ich bei euch gekauft und sie sind sehr gut.
This guide is accurate and works just fine. I also have had problems with the tabs pulling off the backing making it difficult to continue. I had problems with 4L & 4R on a previous install and today with the short end of 2. I find that after 4L & 4R removal and mating the bottom, pulling all the strips off keeping the screen spaced 2” or so at the top with one hand, removing all the strips, and then setting the entire screen works best for me.
Hi
Your description does not meet reality.
FIRST
There is another thing to my kit : Number 5 was too long. About 5 mm !!! Did I get the right one ?
Then let’s start with step TWO.
When lifting up the tape from the back of the screen, on the upper side the result was not like on the sides. The tape that came off from the top was almost 10mm wide !! After cleaning I realized that there is a second black tape on the back of the monitor. On the top it is gone now, on the sides it’s still there. What do I do ?
Step THREE
My kit had transparent tape on those tips. Had I everything the wrong way round ?
Let’s go to step ELEVEN
It’s about the second photo with the final image after putting the tapes in place. Why are they all black now ? Whatever is the reason for that, one feels pretty uncertain of the whole procedure. Are both the 4-tapes really the other way round ? On my kit, the red handle would take of the thick paperlike side… ???
So. What do I do with those tapies on the back of the screen. I take them off, right ?
You want to remove the foam adhesive, as shown in the photos, and nothing else. The wide black mylar layer you’re describing is part of the display itself and should not be removed. If it peels up by accident, carefully smooth it out and stick it back down. Yes, the 4R and 4L strips should be placed exactly as shown in the guide.
The same thing happened to me except I throw away the large tape (10mm wide) from the LCD before I realized I should have kept it in place.
Nevertheless, I completed the installation and everything works great except :
1) the LCD is slightly recessed in the enclosure (no big deal)
2) there is a section on the upper left of the screen where there is a gap between the enclosure and the LCD because the adhesive did not stick well there
May the removal of the large LCD tape (10mm wide) be causing the adhesive problem on the upper left of the screen ?
If I want to redo the job to get rid of the two problems I mentioned, what would you suggest me to do ?
AVOID SHOCK… just wanted to add - Even with the power cable removed during the process there is still a very strong chance of getting a belt off of the power board… These boards can hold charge for a long time. Do NOT touch the board with tweezers or your fingers when removing the 4L & 4R strips.
Brilliant guide btw.
However came across a major issue which I think you should update the guide with a note warning other people.
In newer IMacs apple has repositioned the microphone to the bottom bar where the 4r &4l strips are placed. The instructions in your guides don’t mention this and the adhesive strips will cover the microphone hole resulting in a muffled microphone input. Just be careful guys.
Great guide, kudos! Upgraded an old iMac 21.5 late-2012 (EMC 2544).
The stripes (bought with the “pizza-cutter” tool) were of the right length and shape.
One little remark on “Step 4” - “Insert the tip of a spudger into the hole …” : the hole is obstructed by clear film on both sides of the tape; the spudger can’t help with the alignment as suggested, although the film is clear and you can locate the reference hole/notch by looking-thru the clear film. Same holds true for strips 2, 1 and 5.
I found strips 4L and 4R (steps 10, 11) to be the challenging ones: start from the sides of the central screw, lay down in place the (partially peeled) portion of the tape and, while progressing, gently peel-off the portion of the tape to stick next. The lower edge of the tape almost sits on the ledge of the aluminum front part of the chassis. Never pull the tape as the peeled part is easy to stretch along its length.
On step 13, securing the bottom side of the screen with masking tape was a brilliant idea.
Many thanks!!
I have a difficult time removing the display. The adhesive seems to be sticking to much and I am afraid of damaging the display. I have damaged 3 tools and cannot get it to move a bit. Any thoughts?
Hello, did it thank you.
For the most part the guide was pretty accurate.
I don’t understand why I couldn’t see it translated (in french) although I know the translation exists
Hello! I’m glad you had a successful repair. We updated this guide recently and the updated guide has not been translated yet—it will soon!
Dear Sam and iFixit contributors,
So many thanks for you for this tutorial !
Everything worked fine for me. I replaced my hard disk and mounted back the screen. It took me three hours but I have been patient and I spent some time contemplating the computer’s inside. The ifixit replacement kit was OK.
Cheers !
An excellent guide. I was nervous before attempting this, but the steps were extremely clear and I completed this without any issue. ?
Great guide! I used the apple replacement part kit that comes with both the 04 and 4L & 4R stripes . I will highly suggest to use the 04 on those iMac with microphone on the top and not the center of the bottom adhesive stripe just like mine 21.5" late 2013.
If you use the 4L and 4R you are going to have both ends of the stripe hanging in the air.
I removed the screen in order to upgrade the HDD to an SSD. I found the old adhesive was very difficult to remove from the back of the display panel even with liberal lashings of 100% isopropyl alcohol. Some of the black (paint or tape, or whatever it is) coating on the back of the sides of the screen parted company with the glass thanks to the extended rubbing. Next time I might let it soak for a while and hopefully that will be more successful.
IT Helper's point (May 11 2015) is a good one and I wish I had read that before refitting the screen. If I had done so the result would've been neater.
The opener tool worked a treat.
Done!! Thank you all. Fantastic Guide.
I have learnt something really important when using your guides, spend sometime reading other users comments. It will save you time & money.
Mine --> iMac Retina 4K 21.5-inch 2017
Display removed and set again - 0 problems.
Well done team!!
2 Kitchen Paper Towel Rolls do the same job as the Wedge just fine .. :)
Stef999 - Antwort