
JBL Charge 3 Tastenmatte austauschen
Einleitung
Zu Schritt 1 der AnleitungDie Tastenmatte an deinen Charge 3 kann sich abnutzen oder verschmutzt werden, so dass die Tasten nicht mehr funktionieren. Zum Glück kann das leicht in Ordnung gebracht werden.
Was du brauchst


-
-
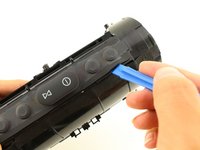
Lege dein Gerät mit der Unterseite nach oben und setze ein Plastiköffnungswerkzeug vertikal in den Schlitz in der Frontabdeckung ein.
-
Ziehe das Werkzeug langsam nach außen und löse die Rasten, mit denen die Abdeckung befestigt ist.
-
Wiederhole dieses Verfahren an allen vier Kanten der Frontabdeckung.
-
-
-
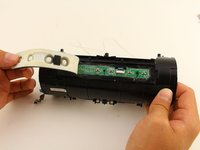
Ziehe die Abdeckung auf beiden Seiten vorsichtig auseinander und entferne sie vom Gehäuse.
@KanGoon Yes, on mine it took the removal of 6 (reasonably obvious) screws to remove that. I’ll try to insert a photo when I reassemble…
Very good guide! Pics and descriptions make this easy!
There is a step missing here. How do you remove the rubber cover that covers the port?
Gibt es eine Möglichkeit diese wieder wasserdicht zu bekommen?
Well, broke off the cover tabs. Have to remove 2 screws first. Might add that to the instructions.🤔
Me too. Saw the screws after I'd popped it off.
It doesn't look fixable. Can't get the cover to stay on anymore. Ideas?
-
-
-
-
Heble mit dem Plastiköffnungswerkzeug um die Tastenmatte herum, bis sich die Klebeverbindung löst.
-
Wenn du sie mit der Hand anfassen kannst, dann ziehe die Tastenmatte ab.
-
-
In diesem Schritt verwendetes Werkzeug:Tweezers$4.99
-
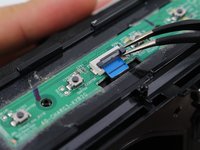
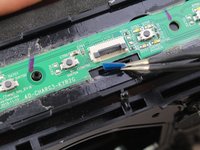
Klappe den Sicherungsbügel am ZIF Verbinder hoch.
-
Ziehe das Flachbandkabel vorsichtig mit der Pinzette heraus.
What is the purpose of pulling out the ZIF connector cable with tweezers? What do you do after you you've pulled it out?
-


Um dein Gerät wieder zusammenzusetzen, folge den Schritten in umgekehrter Reihenfolge.
Um dein Gerät wieder zusammenzusetzen, folge den Schritten in umgekehrter Reihenfolge.
Rückgängig: Ich habe diese Anleitung nicht absolviert.
15 weitere Personen haben diese Anleitung absolviert.
Besonderer Dank geht an diese Übersetzer:innen:
100%
VauWeh hilft uns, die Welt in Ordnung zu bringen! Wie kann ich mithelfen?
Hier starten ›
Team

Cal Poly, Team S13-G1, White Fall 2018 Mitglied von Cal Poly, Team S13-G1, White Fall 2018
CPSU-WHITE-F18S13G1
3 Mitglieder
26 Anleitungen geschrieben
4 Kommentare
Where do i buy new buttons?
Could you please provide info about where to get the green board?
Next steps are missing.
5.) What happens after the disconnecting the ZIF?
6.) a.) How do you remove the button board? Is that what needs to then be replaced?)
6.) b) Or do I need soldiering skills and learn to attach new buttons to the existing board.
Happy to learn - hoping to be pointed in the right direction...
Sometimes disassemblers forget that the first time they disassembled the item it didn’t want to give up easily: I didn’t like the forces I was having to apply at all, so I switched to two plastic prying tools per “corner” and one in-between them (total 5, you could use plectrums…) before I was happy the the forces were low enough not to break anything.
Frank Puranik - Antwort
the front grill is supposed to be first not the back the back has longer while the front has shorter clip
Water Bass Tester (Water BT) - Antwort
There are two Phillips head screws to remove before prying the cover off
jason - Antwort
Where in south Africa can I buy jbl charge3 port bay replacement
Donovan Fransman - Antwort
There appears to be different versions of the Charge 3. If you find it difficult to pry open a second side the two small screws mentioned by Jason will need to be removed but it also indicates that there will be some additional changes to this tear down that I will try to convey in the comments as well.
john Ramirez - Antwort
Sadly I damaged the latches on my charge 3. There was more to it than just prying the front cover up. First, there is a small latch on both sides that you need to push down before pulling the front cover towards you that release the clips holding the front cover in place. Pull only slightly forward because… Second, in the front cover there are 6 circular notches connected to the front cover in tue four corners including the middle corners, you need to squeeze the front cover a little bit gently removing the notches so they dont break (like mine did).
ralphkeneth_gomz - Antwort
Definitely had to watch about 10 videos and still couldn’t get it to pop out easily.. Took a look at the first picture in the next step and really took note of where the little hole that lets you through to push down the tab is. Once I took a look at that and combined the techniques I’d seen in some of the videos it finally popped off easily. https://www.youtube.com/watch?v=u7i0_nD9... I only watched the first minute of this video but it helped a good bit if anyone else is having trouble.
Rowan Darko - Antwort
How do you know if the speakers or one of them is burned or broken.. i notice that one speaker is playing much less hard then the other one.. I wonder now if maybe there is another problem with my device.. Battery problem?
Bukowski101 - Antwort