Kindle Paperwhite (2. Generation) Akku tauschen
Einleitung
Zu Schritt 1 der AnleitungDie Demontage eines Tablets erfordert oft ein leichtes Abhebeln des Rahmens. Sei bei diesen ersten Schritten (Demontage) vorsichtig und verliere deine Schrauben nicht! Das Paperwhite ist ein robustes Tablet, das in wenige Bestandteile zerlegt werden kann. Diese Anleitung zeigt dir in nur fünf kurzen Schritten, wie du einen defekten Akku austauschen kannst.
Was du brauchst
Ersatzteile
Werkzeuge
Mehr anzeigen …
-
-
Setze das Kunststofföffnungswerkzeug in die Ecken des Paperwhite ein und schiebe es um den Rand herum, um die Displayeinfassung zu entfernen.
-
-
-
Entferne mit einem Schraubendreher die elf 3,2 mm Kreuzschlitzschrauben 000 von den Ecken des Mittelrahmens und hinter dem schwarzen Streifen wie abgebildet.
I only found eight screws on my missus’ Kindle. Serial number 9062 xxxx xxxx xxxx
But I also found it was a 3G model, which I didn’t know!
Le tournevis qui convient est le Phillips 00, le 000 ne convient pas.
A l'origine le monteur a freiné les 11 vis avec le frein pour filets Loctite 243, après démontage il en reste assez pour un usage personnel; par contre en cas d'usage militaire il vaut mieux en rajouter une micro dose.
-
-
-
-
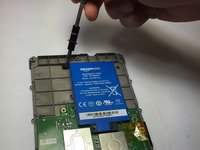
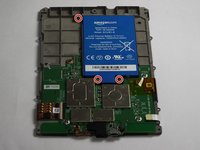
Entferne mit einem Schraubendreher die drei 3,0 mm Kreuzschlitzschrauben 000, mit denen der Akku wie abgebildet befestigt ist.
-
Um dein Gerät wieder zusammenzubauen, folge der Anleitung in umgekehrter Reihenfolge.
Um dein Gerät wieder zusammenzubauen, folge der Anleitung in umgekehrter Reihenfolge.
Rückgängig: Ich habe diese Anleitung nicht absolviert.
28 weitere Personen haben diese Anleitung absolviert.
Besonderer Dank geht an diese Übersetzer:innen:
100%
Diese Übersetzer:innen helfen uns, die Welt zu reparieren! Wie kann ich mithelfen?
Hier starten ›
7 Kommentare zur Anleitung
Do you have a source for the battery itself? Thank you.
I’ve done this on two different Kindles with the same result: dead kindle. No matter how long it stays on the charger, the light stays amber. Screen will not change. Hard reset seems to do nothing; the light flashes, but no change. One Paperwhite even got a new motherboard. This is crazy! Is it possible to fix one, do I have to just buy another!?
I'm probably 7 years too late but this was the case with one I got from Goodwill and plugging it into a higher amperage charger (2.4A) seemed to do the trick. When you plug it in it charges until there is enough power for it to boot up and when that happens it ends up draining the little bit that was there so it just gets stuck in a loop. You just have to give it more power to work with.
Hi Adam,
I have the same issue, the light is orange but the Kindle won’t turn on. I ordered the battery at www.batteryupgrade.com. But they have some misleading info on their website so they sent me the wrong battery even if it states that it supports Kindle Paperwhite 2012. Check the connections on original and on the new battery. In my case the battery looks the same, but the connections doesn’t. Now I’m waiting for the new one …
Regards.
Did replacement of battery help you to resolve problem?
I know I’m replying to a 3-year-old message, but Andrej Mihelic wrote “they sent me the wrong battery even if it states that it supports Kindle Paperwhite 2012“on a page about the 2nd generation Paperwhite, that is a 2013 model, not 2012. So, people, be careful about the battery you purchase.
kautame -


I broke an LED light and slightly pulled up the layer protecting the screen leaving some bubbles I can’t really get rid of. This guide has no warning whatsoever about being careful with the spudger and making sure you don’t go too deep. The sticky bezel you pry off can be really sticky and difficult to come off (like mine was). If this guide had a simple warning and explanation to be careful about depth of spudger/plastic tools around LEDs and the middle of the screen I would not have ruined a perfectly good kindle and new battery!
Albert Einstein - Antwort
I noticed that the screen protector film was starting to lift with the outer bezel. Luckily I stopped at this point as it would have ruined the Kindle. It would seem some paperwhite 2s have a bonded screen film which makes battery replacement impossible. Perhaps you should mention this before owners buy a battery?
Anna Lien - Antwort
My first attempt started at a bottom corner— while reading I wouldn’t have to stare at any scratches I made. But the bottom bezel has a ton of glue, and is difficult to separate even when you do it last. What worked for me was to start from a top corner, and separate in both directions, using picks and other tools to keep the side bezels separated. Then I worked the bottom bezel free from both corners.
Matt D - Antwort
Agreed that the information in the instructions is lacking. I wish I had known that the bezel is only glued on and not locked in to the backplate in any way. I think the warning to focus on the outer edges is misleading and definitely steered me way closer to the screen separation issues than I would have otherwise. I wish I had read these comments before starting.
Dan M - Antwort
Warning: There is a Wi-Fi antenna along the top. I damaged mine (only half of the dipole, so not too bad). It is a flex PCB stuck down and adhered to the bezel.
F. Mort - Antwort