Zum Hauptinhalt wechseln
Philips Norelco 5801XL Battery Replacement

Philips Norelco 5801XL Battery Replacement

Ben Gibbs

Ben Gibbs und 4 weitere Mitwirkende

Zuletzt aktualisiert am July 15, 2024

10 - 25 Minuten
Mittel
Fehlende Schritte

Use this guide to replace the rechargeable battery in the Philips Norelco 5801XL. The steps should be followed exactly as listed in the guide. Some soldering skills are required. Be sure to handle with care. For help with soldering: click here.

Was du brauchst

Ersatzteile

Werkzeuge

Mehr anzeigen …

  1. Philips Norelco 5801XL Battery Replacement, Battery: Schritt 1, Bild 1 von 2 Philips Norelco 5801XL Battery Replacement, Battery: Schritt 1, Bild 2 von 2
    • Using a T8 torx screwdriver, remove both 2mm T8 screws.

  2. Philips Norelco 5801XL Battery Replacement: Schritt 2, Bild 1 von 2 Philips Norelco 5801XL Battery Replacement: Schritt 2, Bild 2 von 2
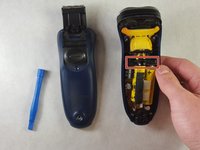
    • Using a plastic opening tool, separate the front housing from the back housing.

    • Carefully pull the housing apart.

  3. Philips Norelco 5801XL Battery Replacement: Schritt 3, Bild 1 von 3 Philips Norelco 5801XL Battery Replacement: Schritt 3, Bild 2 von 3 Philips Norelco 5801XL Battery Replacement: Schritt 3, Bild 3 von 3
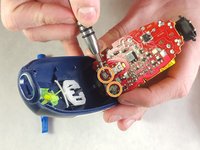
    • Remove the plastic bracket using a plastic opening tool.

    • Pry from the inside of the bracket towards the outside of the housing to remove it.

  4. Philips Norelco 5801XL Battery Replacement: Schritt 4, Bild 1 von 1
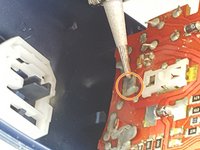
    • Remove the two T8 2mm Philips screws holding onto the bracket over the charge port.

    • Remove the bracket. It will pull straight out.

  5. Philips Norelco 5801XL Battery Replacement: Schritt 5, Bild 1 von 1
    • Push in the charge port using the plastic opening tool.

  6. Philips Norelco 5801XL Battery Replacement: Schritt 6, Bild 1 von 1
    • Lift the circuit board upwards and fold it towards the head of the razor.

    • Do not break the contacts connecting the board to the motor.

  7. Philips Norelco 5801XL Battery Replacement: Schritt 7, Bild 1 von 3 Philips Norelco 5801XL Battery Replacement: Schritt 7, Bild 2 von 3 Philips Norelco 5801XL Battery Replacement: Schritt 7, Bild 3 von 3
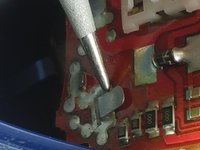
    • Desolder the contacts where the battery connects to the circuit board.

    • Straighten the battery contacts and pull them through the opposite side of the circuit board.

Abschluss

To reassemble your device, follow these instructions in reverse order.

3 weitere Personen haben diese Anleitung absolviert.

Ben Gibbs

Mitglied seit: 02/16/16

361 Reputation

3 Anleitungen geschrieben

Team

IUPUI, Team 3-2, Harley Spring 2016 Mitglied von IUPUI, Team 3-2, Harley Spring 2016

IUPUI-HARLEY-S16S3G2

4 Mitglieder

6 Anleitungen geschrieben

3 Kommentare

The replacement battery I bought had contact strips that were too long and too wide for the slots on the circuit board, so I had to trim off about half the length and 1.5 mm of the width on each strip, but after that alteration, it worked fine.

Tom Hess - Antwort

What size is the Rechargeable Battery in the Norelco 5801XL .

Dave - Antwort

Kommentar hinzufügen

Seitenaufrufe:

Letzte 24 Stunden: 0

Letzte 7 Tage: 4

Letzte 30 Tage: 24

Insgesamt: 4,369