Zum Hauptinhalt wechseln

Sony Cyber-Shot DSC-TX9 Card Reader Replacement

Was du brauchst

  1. Sony Cyber-Shot DSC-TX9 Card Reader Replacement, Prerequisites Only: Schritt 1, Bild 1 von 3 Sony Cyber-Shot DSC-TX9 Card Reader Replacement, Prerequisites Only: Schritt 1, Bild 2 von 3 Sony Cyber-Shot DSC-TX9 Card Reader Replacement, Prerequisites Only: Schritt 1, Bild 3 von 3
    • Use a Phillips #0 screwdriver to unscrew the six 2mm screws on the outer case of the camera.

    • If there is a battery or SD card inside remove before beginning the process.

  2. Sony Cyber-Shot DSC-TX9 Card Reader Replacement: Schritt 2, Bild 1 von 2 Sony Cyber-Shot DSC-TX9 Card Reader Replacement: Schritt 2, Bild 2 von 2
    • Use your hands or a Spudger to Pull off the front cover of the camera.

    • If the casing is not coming apart easily, do not force it.

  3. Sony Cyber-Shot DSC-TX9 Card Reader Replacement: Schritt 3, Bild 1 von 1
    • Remove the protective black cover layer with your hands and set it aside.

    • The use of tweezers may be necessary if the cover is difficult to remove.

  4. Sony Cyber-Shot DSC-TX9 Card Reader Replacement: Schritt 4, Bild 1 von 2 Sony Cyber-Shot DSC-TX9 Card Reader Replacement: Schritt 4, Bild 2 von 2
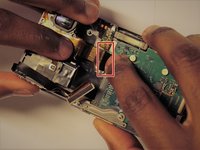
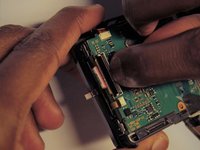
    • The ZIF connector can be removed by flipping the small black holder into the upright position and then sliding the ribbon cable out carefully.

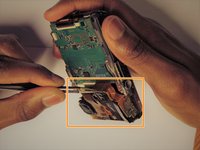
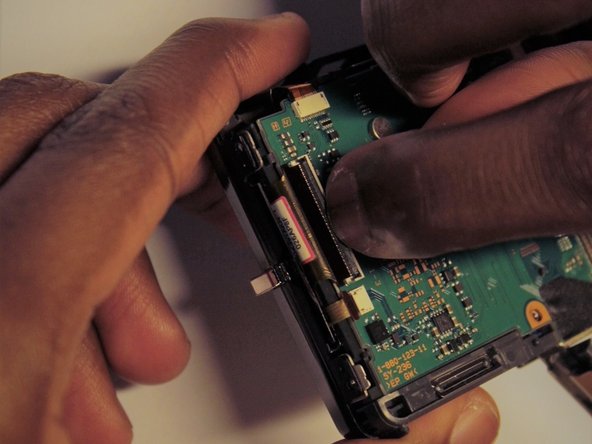
    • Once this has been done, use tweezers to unplug the flat topped connector for the lens’ circuit board from the motherboard.

    • DO NOT force the ribbon cables or they will rip.

    • Refer to the (Erkennen und Trennen von Kabelverbindern) page for assistance.

  5. Sony Cyber-Shot DSC-TX9 Card Reader Replacement, Card Reader: Schritt 5, Bild 1 von 3 Sony Cyber-Shot DSC-TX9 Card Reader Replacement, Card Reader: Schritt 5, Bild 2 von 3 Sony Cyber-Shot DSC-TX9 Card Reader Replacement, Card Reader: Schritt 5, Bild 3 von 3
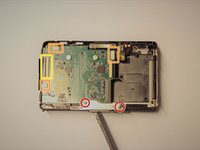
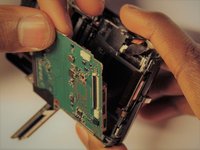
    • Using a Phillips head screw driver, remove the two screws for the metal plate on the bottom.

    • Detach the smaller ribbon cables by sliding them out.

    • Detach the large ribbon cable by flipping the small black holder in an upright position and then sliding the cable out carefully.

    • Detach the ribbon cables slowly and carefully or they will rip.

  6. Sony Cyber-Shot DSC-TX9 Card Reader Replacement: Schritt 6, Bild 1 von 2 Sony Cyber-Shot DSC-TX9 Card Reader Replacement: Schritt 6, Bild 2 von 2
    • Carefully remove the Memory card circuit board.

    • The circuit board should come out with little force. If it does not, make sure all connections are disconnected.

Abschluss

To reassemble your device, follow these instructions in reverse order.

Yegor Shea

Mitglied seit: 03/26/17

301 Reputation

3 Anleitungen geschrieben

Team

UMass Dartmouth, Team S4-G3, Julie Spring 2017 Mitglied von UMass Dartmouth, Team S4-G3, Julie Spring 2017

UMASSD-JULIE-S17S4G3

5 Mitglieder

8 Anleitungen geschrieben

0 Kommentare

Kommentar hinzufügen

Seitenaufrufe:

Letzte 24 Stunden: 0

Letzte 7 Tage: 2

Letzte 30 Tage: 6

Insgesamt: 368