ZTE Maven Loud Speaker Replacement

Einleitung
Zu Schritt 1 der AnleitungIf your ZTE Maven isn’t producing audio—distorted, intermittent, or no sound—throughout the device, the loudspeaker will likely need to be replaced. Follow this guide to replace the loudspeaker in a safe and efficient manner.
The loudspeaker is a small sound driver used to transmit audio to the speakers, earpiece, and external devices, such as headphones. A faulty or blown loudspeaker will transmit distorted audio or no audio at all.
Before using this guide, check the headphone port and earpiece speaker for any debris that may be interfering with the sound quality. Typically, a small accumulation of dust can be removed using a small dust blower. If the audio is only distorted through the headphones, be sure to also test various sets of headphones or auxiliary cords with your device to confirm that the faulty part is the ZTE Maven loudspeaker.
Step 2 requires you to remove eight 2mm OEM screws from the device to get to the loudspeaker on the back of the second covering. Be sure to turn off the phone and disconnect from any external power sources before removing or replacing any parts of the phone.
Was du brauchst
Ersatzteile
Werkzeuge


Mehr anzeigen …

-
In diesem Schritt verwendetes Werkzeug:Tweezers$4.99
-
Remove the SIM card from the right side of the device using a pair of tweezers.
-
-
-
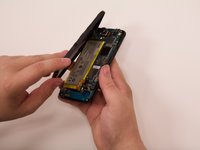
Remove the seven 2mm Phillips #00 screws from the midframe of the device.
-
-
-
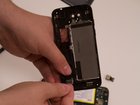
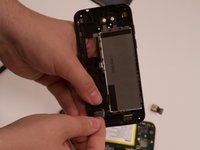
Use an opening tool or fingers to separate the midframe covering the rest of the device starting at the top corner.
-
-
-
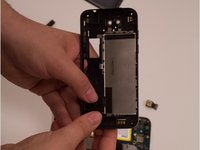
Remove the loudspeaker from the cover using either your fingers or a spudger.
-


To reassemble your device, follow these instructions in reverse order.
To reassemble your device, follow these instructions in reverse order.
Rüste dich für deine nächste Reparatur
Alle in den Warenkorb legen


Team

Grand Valley State University, Team S1-G4, DeVasto Fall 2019 Mitglied von Grand Valley State University, Team S1-G4, DeVasto Fall 2019
GVSU-DEVASTO-F19S1G4
4 Mitglieder
10 Anleitungen geschrieben