Einführungsvideo
-
-
如果你的手机显示屏碎了,请避免屏幕碎裂更加严重,可以通过使用透明胶粘贴屏幕来避免屏幕的主体损坏。
-
把透明胶带贴在iPhone手机显示屏上,尽可能的覆盖整个屏幕。
-
-
-
不论你使用什么工具,你需要确保你把整个屏幕拉起来了。
-
如果如图一所示,玻璃开始和塑料分离,在塑料框和金属机身之间插入一个撬棒,撬开后屏幕的卡扣。
-
-
-
一只手固定好iPhone机身,另一只手轻轻地把机身从前面板底端的home键上分离。
-
当你左手使用吸盘拉动的时候,右手用塑料撬棒在后机壳边缘处,轻轻地撬动,使屏幕和机身分离。
-
-
-
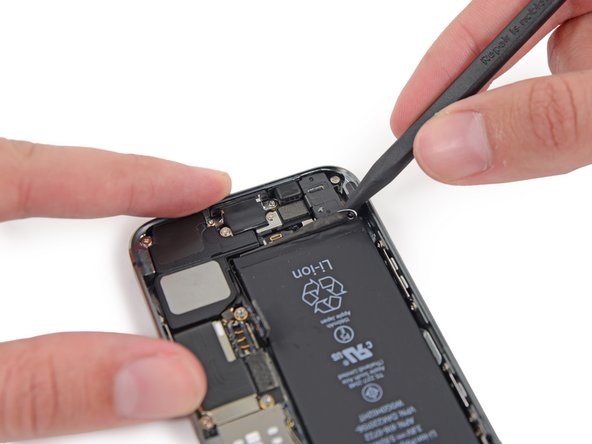
稍微打开屏幕,可以看到盖住home键电线的挡板铁片就可以了。
-
只有手机原装的Home键组件才能使用Touch ID功能。如果你扯断这根电线,装上新的home键只能恢复home键功能,而将失去Touch ID功能。
-
使用手机撬棒推动松下铁片,再用镊子取下来。
-
-
-
-
一旦连接器被撬开了后,把home键底端从机身上拉起,把手机顶端当做一个转动支点。
-
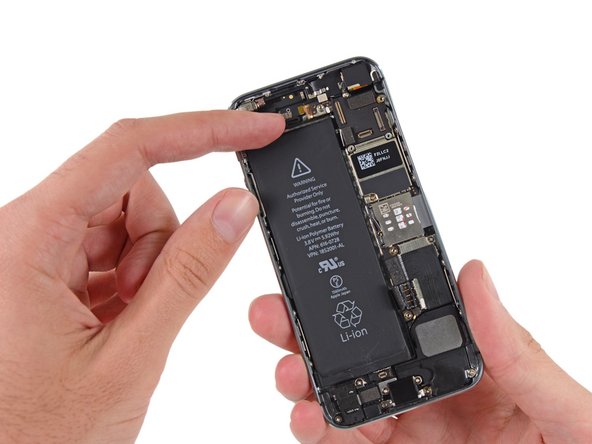
把显示屏立起来,保持跟机身成90度角。在你维修手机的过程中一直保持这个状态。
-
用橡皮筋把显示屏如图三所示固定住。这会避免在维修过程中显示屏电缆的损坏。
-
-
-
移除以下螺丝,这些螺丝把前面板组件上的挡板贴片固定到逻辑主板:
-
一个1.7 mm 菲利普斯(十字) #000号螺丝
-
一个1.2 mm 菲利普斯(十字) #000号螺丝
-
一个1.3 mm 菲利普斯(十字) #000号螺丝
-
又一个1.7 mm菲利普斯(十字) #000号螺丝
-
-
-
慢慢的向着iphone底部方向将其中一个粘合条拉离电池。尽可能拉出粘合条的白色部分,黑色标签可能会脱落。
-
在将粘合条从电池与后盖之间拉离时,保持持续平稳的拉力。最好在拉粘合条时保持60度或稍小的角度。
-
注意别让粘合条粘到iphone内部的其他部件
-
-
-
对第二根粘合条重复以上操作。
-
如果你成功的移去了两根粘合条,请跳过下一步。
-
等待大约一分钟,让酒精溶液削弱粘合剂。 使用撬棒扁平的一端轻轻提起电池。
-
避免撬动靠近音量控制的左上角,否则可能会损坏音量按钮带状电缆。
-
-
-
如果电池仍然粘在后壳上,请准备一个 iOpener 或使用吹风机直接加热电池后面的iPhone后盖。
-
在电池顶部与后盖之间穿入一条牙线或者弦,首尾放在一起,然后用折叠的布料包起来,均匀地拉动。
-


将新的更换部件与原始部件进行比较 —— 在安装之前,你可能需要转移剩余配件或从新配件上移除粘合剂背衬。
要重新组装你的设备,请按逆序执行上述步骤。
将你的电子垃圾带到R2或e-Stewards认证的回收商。
修理没有按计划进行?查看我们的问答社区以获取故障排除帮助。
将新的更换部件与原始部件进行比较 —— 在安装之前,你可能需要转移剩余配件或从新配件上移除粘合剂背衬。
要重新组装你的设备,请按逆序执行上述步骤。
将你的电子垃圾带到R2或e-Stewards认证的回收商。
修理没有按计划进行?查看我们的问答社区以获取故障排除帮助。
Rückgängig: Ich habe diese Anleitung nicht absolviert.
2077 weitere Nutzer:innen haben diese Anleitung absolviert.
Besonderer Dank geht an diese Übersetzer:innen:
100%


Diese Übersetzer:innen helfen uns, die Welt zu reparieren! Wie kann ich mithelfen?
Hier starten ›


224 Kommentare
If the adhesive breaks without releasing, and you need to use a spudger or similiar to remove the battery, be VERY careful not to damage the Upper Component Cable.
This should've been included in the repair guide, as the adhesive tabs seemed designed to break. My phone is now in worse shape than it was and I'm facing what seems to be an extremely difficult repair, which I will probably not undertake.
A couple of additional pointers might be helpful...
1: I did not get all of the adhesive out from under the battery. As a result, I bent the heck out of the battery & ordered a new one, not trusting a bent one. A mention of whether it would be safe would be nice.
2: I found it impossible to get the clip from step 7 back on. I left it off. If there's a trick to this, it would be nice to have that extra instruction with the reassembly instructions, rather than "reverse order."
3: While this is always a good idea, in the process of trying to get something done, it's easy to forget that you need to remember which screws go back where, especially the 3 different-sized screws from step 10. What an evil thing Apple did there! I laid the bracket upside-down on a piece of tape, and oriented the screws around it so I'd know where they go back upon reassembly a week later. A suggestion of doing something like this might be helpful.
4: I love my iFixit toolkits! But including a pair of tweezers in it would be helpful.
2. I found this piece "snapped" into place reasonably easily, but I was careful to get the orientation correct & make sure the edge against the battery pull was "in under" (for lack of a better term) and not trying to squash the battery pull down.
Hope this helps.
Dave -
1. With regards to the bent battery, you were right to replace it. LiOn Batteries are very dangerous when the cells inside are compromised. Even though the good ones have circuit breakers built in to prevent fire, they can fail. A LiOn battery - even a small one in an iPhone - can go "high order" and cause a fire that is next to impossible to extinguish. A brief search on YouTube for Lithium Ion Battery fires will quickly convince even the skeptical.
2. The way I keep track of screws... Get a complete set of all colors of Sharpie pens. When disassembling, I touch the screw head with the same color pen as the circle in the iFixit Guide. Then when reassembling I know where the green, orange, red, & blue screws go!
Pete H -