Einleitung
Folge dieser Anleitung, um die Komponenteneinheit bestehend aus Frontkamera und Sensorkabel zu ersetzen.
Was du brauchst
-
-
Schalte dein iPhone ab, bevor du mit der Demontage beginnst.
-
Entferne die beiden 3,6 mm P2 Pentalobe Schrauben neben dem Lightning Connector.
-
-
In diesem Schritt verwendetes Werkzeug:Clampy - Anti-Clamp$24.95
-
Ziehe den blauen Griff nach hinten, um die Arme der Anti-Clamp zu entriegeln.
-
Schiebe die Arme entweder über die linke oder rechte Kante deines iPhones.
-
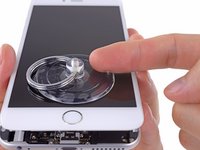
Positioniere die Saugheber nahe an der Unterkante des iPhones direkt über dem Home Button - einen auf der Vorderseite und einen auf der Rückseite.
-
Drücke die Saugheber zusammen, um sie auf der gewünschten Stelle zu befestigen.
-
-
-
Ziehe den blauen Griff nach vorne, um die Arme zu verriegeln.
-
Drehe den Griff im Uhrzeigersinn um 360 Grad oder bis die Suagheber anfangen, sich zu dehnen.
-
Setze ein Plektrum oder ein Öffnungswerkzeug unter das Display ein, wenn die Anti-Klemme einen ausreichend großen Spalt erzeugt hat.
-
Überspringe die nächsten drei Schritte.
Use clear nontextured tape place that over the phone screen. Refer to any guide that addresses replacing a shattered screen
-
-
-
Benutze einen einzelnen Saugheber, um die Display-Einheit anzuheben:
-
Drücke einen Saugheber auf das Display, direkt über (aber nicht auf) den Home Button.
Avec la ventouse, l’ouverture est brutale, tout s’est déclipsé d’un seul coup. Faire attention.
English Please!
With the sucker, the opening is brutal, everything was cleared at once. Pay attention. (Paul’s comment translated by Google)
May need to burp the sticker before it sticks. Need to let the air out. Once Idid that, no problem. Except it was still hard to get the cover to start up.
Don’t waste your time with the suction cup - it doesn’t work! insert the blade of a box cutter just below the lower screen edge below the home button and gently pry just enough to start cracking the seal.
-
-
-
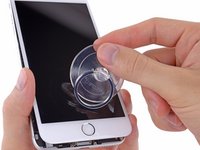
Ziehe an dem Saugnapf während du das iPhone mit der anderen Hand festhältst, um die Displayeinheit etwas von der Rückseite anzuheben.
-
Benutze ein Plastik Opening Tool, um vorsichtig die Rückseite nach unten zu drücken, weg von der Display Einheit, während du das Display weiter mit dem Saugnapf nach oben ziehst.
watch out for the left side of the phone the adhesive bunches up around the inner clips, i didn’t realize it and the upper left of my screen cracked pretty bad. But this guide is awesome follow every direction to the letter
Note: this comment is written for the iPhone 6 Plus, but may also apply to other models of iPhone.
Disassembly:
The clips in the rear case attach to small slotted shapes under the edges of the display assembly, and these attachment points alternate from one side to the other. Moving from bottom to top, gently pulling the rear case away at these points will help to separate the two halves without using too much force.
Reassembly:
Ensure that the plastic clips along the top edge of the front panel (shown in step 8) are fitted properly inside the rear case, then gently press the display assembly into the rear case at these points, moving from top to bottom. There may be a small click sound as the clips in the rear case engage with the slots on the display assembly, and the rear case should fit flush with the edges of the display assembly.
This was challenging. For me, the suction cup could only create a tiny bit of motion and at first, no actual gap at all. You might have to pull the suction cup away from the base a few times just to loosen things up a tiny bit. Eventually, I got my fingernail in, and then after a few minutes got the plastic tool in.
Also, use the plastic tool to gently pry along the sides of the phone once there’s light there. I was afraid of using too much leverage and breaking the screen as per the other comments, but starting at the bottom and then going around the sides slowly worked for me.
-
-
-
Ziehe an der Plastiknoppe, um das Vakuum des Saugnapfes zu lösen.
-
Entferne den Saugnapf von der Display Einheit.
There is an adhesive strip all along the edge between the top and bottom of the phone. Is that just adhesive or is it wire of some sort?
@lingerling The adhesive strip was introduced on the iPhone 6s and 6s Plus (one model year later than what’s shown on this page). Guides specific to each model can be found here—be sure to use the correct one for your particular phone. And yes, just adhesive, no wires. ;)
-
-
-
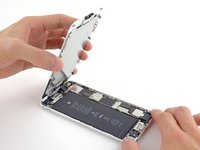
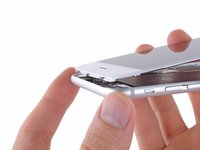
Nutze die Spitze des iPhones wie ein Scharnier und nimm das Displayende mit dem Home Button von der Rückseite ab.
-
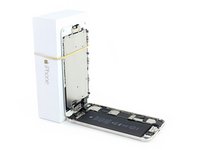
Öffne das Display bis zu einem 90°-Winkel und lehne es gegen einen festen Gegenstand, um es beim Arbeiten in dieser Position zu halten.
-
Ein Gummiband könnte hilfreich sein, um es in dieser Position zu halten und sicherzustellen, dass die Displaykabel nicht beschädigt werden.
Be careful If we leave the screen connected and set it to 90 degrees, the speaker / sensor flex may break. With an opening of 60 degrees it is convenient to completely disconnect the screen. The headset's flex is short, and if we put it at 90º, it can break. Guiding me from the images of iFixit, I have broken two cables.
Español:
Cuidado. Si dejamos la pantalla conectada y lo ponemos a 90 grados, el flex del altavoz/sensor puede romperse. Con una abertura de 60 grados es conveniente desconectar enteramente la pantalla. El flex del auricular es corto, y si lo ponemos en 90º , se puede romper. Guiándome de las imágenes de iFixit, se me han roto dos cables.
At 60º the display will block access to all the screws and the phone would be practically unserviceable, so I’m having trouble making sense of this comment. The cables on a factory original display are pretty tough and designed with enough slack that a 90º angle is no problem. Same with any decent aftermarket display.
If you look at the enlarged image, you can see how the flex cable from the camera / speaker is in tension. This is my opinion. Sorry for my bad English
Si usted se fija en la imagen ampliada, puede ver cómo el flex cable de la cámara/altavoz está en tensión. Esta es mi opinión.
Perdón por mi mal inglés
your English isn’t the issue, it’s the proposed 60 degree opening space that doesn’t allow for the removal of the screws of the mounting plate where the connectors connect to the main pcb…
if can make a recommendation here; it helps if the can is full and not refrigerated, the weight helps in keeping the phone where it should stay without adding additional tension to the ‘flex’ ribbon cable. it’s called flex for a reason people, if your breaking these the phones already been overheated too much, the cables become brittle and should also be replaced. i replaced my battery without disconnecting the screen, at 90 degrees with a rubber band around an empty beer can. pierced the orig. battery and caused sparks. albeit, i wasn’t in a hurry and it took me a good 30+ minutes, removal of the battery and stickers is by far the most challenging, especially when NOT disconnecting the screen…
it’s not a race, take your time. move slowly but precisely with forethought and persistent force…
Werkt dit ook voor iPhone 7(plus)?
Werkt dit hetzelfde voor iPhone 7 (plus)?
-
-
I would recommend protecting the screen once the display is free and the suction cup has been removed. This will help avoid any possibility of accidental scratching of the display crystal while the remaining steps are being performed. I used an inexpensive screen protector then removed it after reassembling and testing are complete.
-
-
Entferne die folgenden Kreuzschlitz-Schrauben von der Abdeckung des Akkuanschlusses:
-
Eine 2,3 mm #00 Kreuzschlitz-Schraube
-
Eine 3,1 mm #00 Kreuzschlitz-Schraube
for the iPhone 6 Plus, all screws were Phillips #000
I had difficulty removing the 3.1mm (iPhone 6 Plus / Phillips #000); had to give it significant downward pressure to get it started.
stripped the 2.3mm screw attempting to remove, had to use excessive force to successfully remove
The Phillips bits provided in the kit would not engage the Phillips heads enough to loosen them. Luckily I had my own small screwdriver set that worked like a charm.
Agree with above comments regarding the supplied Phillips bit. It is not the correct size.
Use a Phillips #000.
Phillips #000 is what’s included in the kit. As others mentioned above, firm downward pressure is key. The phone is not that delicate; just press hard and crank it.
@asianay0129 Yes, disconnecting the battery is necessary. You can sometimes get away with skipping it, at the risk of destroying something important and potentially bricking your phone. Not a wise gamble for the sake of skipping two screws.
-
-
-
-
Entferne die Akkuverbindungsklemme aus Metall von dem iPhone.
Was not able to remove the battery connector bracket as one of the cable connectors was glued/stuck to the underside. Instead moved the bracket out of the way to disconnect the battery. Care should be taken not to over bend/stretch the ribbon cable.
That may be just the foam connector adhering to the bracket. If you pull up gently and twist slightly it should separate.
-
-
-
Heble den Akkustecker vorsichtig aus seinem Anschluss auf dem Logic Board. Das kannst du entweder mit einem sauberen Fingernagel oder mit einem Öffnungswerkzeug aus Kunststoff machen.
you may consider placing a thin non-conductive item between the connector and the socket like a bit of rubber band to prevent any power flowing during this procedure
J’ai pris une loupe pour bien observer l’endroit où placer l’outil.
Magnification is key for many tasks and this is certainly one.
I couldn’t use the iFixit blue opening tool to pry that battery connector. I used the top of the black spudger near the hole where the 3.1mm screw was in step 9-10 to easily pry it open!
The blue plastic board breaker can easily cause damage here. Professionals would recommend using the human fingernail as the ideal tool for this job.
-
-
-
Entferne die folgenden fünf Kreuzschlitz-Schrauben, mit denen die Kabelabdeckung der Display Einheit befestigt ist:
-
Drei 1,2 mm Schrauben
-
Eine 1,5 mm Schraube
-
Eine 2,9 mm Schraube
Sounds like you have an iPhone 6s Plus, rather than a 6 Plus. Be sure to use the correct guide! And make sure you’ve ordered the correct part, as they’re not cross-compatible.
I _love_ the color coding of screws. I know this is a little OCD, but it would be incredibly useful if there were an 8.5 X 11 you could print with indicated homes for where to drop items from each step of disassembly. That is, in the box for step 9, little colored circles for where to place each screw type. As long as you don't jostle the paper, it would make it a lot easier to know exactly where you are in reassembly.
I have done the exact same thing. Created a sheet where each screw goes.
Actually you don’t need to do steps 12 to 18 if you attach the display panel to the iPhone box as shown in step 7 and handle your iPhone with care during the replacement. I didn’t disconnect the display panel mainly because the more you work on the interior of your phone the higher is the chance you break something.
Since this guide is for DISPLAY replacement, I don’t see how you can skip the steps for disconnecting and removing the DISPLAY.
That's what I was thinking.
I skipped this series of steps too. I was very careful when removing the battery and never had an issue with the screen leaning back against the box that this battery shipped in. I even broke half of the third strip of adhesive but used a plastic card to slide under the battery and it slowly lifted out without applying heat.
which screws are which sizes cause i ordered new ones and cant figure it out
I also did not see the need to remove the display assembly for this repair. However I did place a can of corn against the vertically positioned display and then secured the display to the can with a rubber band.
I recommend removing the display assembly, I didn’t and somehow damaged the home button cable. At least remove the cover to ease the tension on the cables.
I played around with different screwdrivers to get certain screws out. I made sure I wasn’t applying heavy pressure so I wouldn’t strip the head. Apple is crazy for doing this to us lol.
Anyways invest in a magnetized mat to organize your screws. It was really difficult to keep things organized and still, especially with these tiny screws…
what happens if i forgot to put the ribbon cable shield back on? the phone is now working but i forgot to put the shield back on and i am missing 2 screws. can i leave the shield off?
@ticoman12 It’ll work without the shield, but the connectors may pop out unexpectedly.
Just be really careful remembering which screw is which. I drew a quick sketch of the bracket, then put the screws in the relevant places. There’s no way I would have been able to figure them out otherwise - my eyes can’t see the difference between a 1.2 and 1.5mm screw!
I also skipped steps 12-18 as Danny had suggested. It made this repair quite easy, so thank you and others for suggesting this. I was also very careful to allow the battery to discharge before starting the process.
I question whether Steps 12-18 (separating the display from the case) is actually necessary? The battery can be removed/replaced with the display connected (but standing upright, as displayed in Step 7.
Leaving the display attached obviates the most difficult steps (re-connecting the various control ribbons — 3/4 of ‘em!
I followed this manual completely and the repair was successful. But if I had this to do over, I’d leave the display connected.
I skipped the steps 12-18 as well and thank goodness I did so I won’t have to worry about issues with any of the cables.
my panel is different from what is pictured anyway ‘cause I have one screw in the middle like what Herbert said on the first comment.
I realized too late just how handy the magnetic mat is that they have in their shop. So I organized the screws with a piece of clear packing tape. On the smooth side, use a sharpie to draw spacious circles with “R” “O” and “Y” inside each circle to represent the color coded screws and then use the sticky side to keep the screws in place. I found that using the tweezers to take them off the screwdriver helps you stick them head first to the tape better.
-
-
-
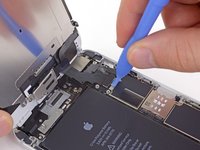
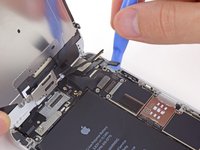
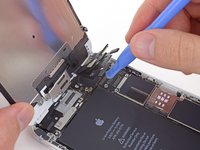
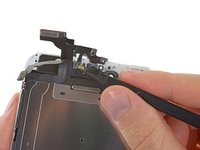
Halte die Display Einheit immer noch im 90°-Winkel, um die Frontkamera und das Sensorkabel zu lösen. Dazu kannst du deinen Fingernagel nutzen oder ein Öffnungswerkzeug aus Kunststoff.
Why does the screen need to come off?
Because the cables are delicate, and following steps are easier if phone halves are not flopping around together, especially for amateurs.
I don't know if anyone will see this but here it goes: for the life of me I can't get the front-facing camera and earpiece speaker connector to seat. Everything else went back together fine but this one connector will not go in. Sometimes it seems like it's in even though it doesn't really pop in and it'll kinda sit there for a sec and then it pops out.
Any insight would be greatly appreciated, thank you
-
-
-
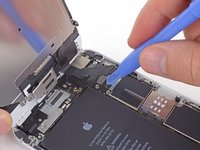
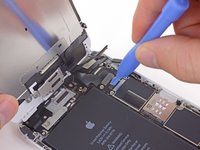
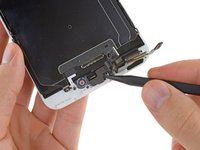
Nutze ein Öffnungswerkzeug aus Kunststoff, um das Touchscreen-Kabel zu lösen.
The piece of advice about power cycling the phone by disconnecting and reconnecting the battery proved crucial to the success of my repair (camera and lens replacement). At first when charging the phone after closing it, I got a dark, blank screen with an intermittent buzzing noise. After re-opening the phone and making sure all cables had been properly reconnected, I ignored the advice to power cycle the phone. Still all I got was a dark, blank screen (and intermittent buzzing if charging t). Then I opened it a third time (leaving the screen connected and attached at a 90 degree angle) and I only disconnected and reconnected the battery. Voila! When I closed the phone and powered it up, I got the screen to light up!
how did you disconnect and reconnect the battery?
If you’ve been following the guide, you already disconnected it in this step. To reconnect it, just line up the connector and press it into place.
After replacing the battery, the phone seems dead. I thought it just needed recharging so I left it charging all night. Still dead in the morning. Now I think it might be because the display data cable is off, and I should open the phone and check it. But the battery might be on full power in that case, and they don’t advice to open the phone when battery if full. What can I do?
The advice aims at avoiding battery fire. Just be careful.
-
-
-
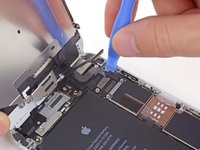
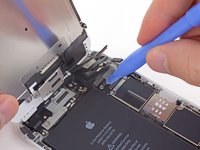
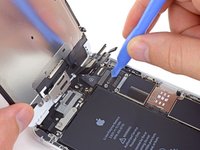
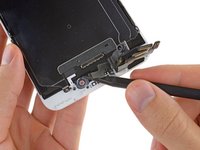
Zum Schluss musst du nur noch den Anschluss des Touchscreen-Kabels lösen.
some images and guidance regarding reassembly would be helpful. You don't need to use the spudger to get them back on: fingers are better because there's a really subtle click you feel when you get them seated properly.
When you're reassembling, a note that this is the step where you should test for proper screen function would be really useful. First time I reassembled, I didn't seat something properly, got all the screws back together and then realized the screen wasn't functioning properly. Had to disassemble back down to step 14 and then re-reassemble.
I am having this issues right now! I have unplugged and plugged in these cables at least 20 times and each time I get white lines. I finally have it to where there are only 4 white lines and I am almost willing to live with it. Any suggestions?
Clean the screen connectors incase they are not making a clean connection
I'm having nightmares with the digitizer connector. Simply can't get it to work unless I'm applying some pressure on the connectors. Everything seems almost microscopically clean. Any suggestions friends?
Henry A -
To ++mattmay002++ Did you power cycle the phone? Check out the comments on the previous step for a how to.
I had issues with it too. When connecting this cable, make sure to rock finger side to side after connecting. It’s a wide connector so try to listen for 2 clicks on this one connector. That’s how I fixed mine
Re-attaching this cable is the only tricky part to replacing the battery on my 6+. It had a bow on the middle that I had to flatten out before pressing the connector on with finger first on one edge and then on the other. I had white tire tracks on the screen and no touch screen until I connected it correctly. The front has to rest in just the right place on the back while attaching this thing so the cables aren’t strained the front doesn’t fall down. Small fingers would be a plus at this step.
Reseating these connectors on reassembly is definitely the most difficult part of this repair. It took me several attempts before the lowermost connector would seat properly and I did accidentally bend it slightly in the process. Fortunately I was able to get it straight again and get it to click in. The other three went in fine though and no lasting damage seems to have been done.
Another thing - These cables can become overlapped in the wrong way and make you think they are in a different order than they should be. Eg. it’s easy to mix up the ones from step 15 and 17. You can actually unravel the cables and re-layer them on top of each other in any order, so remember this! They look like they’re one solid mass but they’re not.
I never removed the last digitizer connctor. I removed the first three connectors, left the screen propped at 90 deg tied to a box and removed the battery, there is minimal movement. In fact when I reattached the connectors, only the first and maybe second connector feels taut, so it’s necessary to only remove the first connector if you can be gentle with it. Less headache. And my guess why so many people had issues is that micro dust gets into the connectors and cause connection loss. You be surprised how little dust can cause havoc.
I haven’t removed my screen in past battery replacements, I found it easier. However, this time I followed the instructions because my old battery was very stuck, and I needed the screen gone to get the battery out…
When I replaced the screen, at first it wouldn’t even boot/start up. (Yes, I inserted my own testing step, as someone here suggested, before final reassembly).
The screen would just show a fuzzy image, and the board that all the cables attach to would heat up, then it would turn itself off. I tried reconnecting them carefully 3 times, and even made sure to get a little “click”, all to no avail.
The final try, I used my fingernail to really press down on the back side of the digitizer cable. I heard more clicking, though I thought I might be tearing the cable too. With nothing left to lose, I continued across the back, and heard several more clicking/tearing sounds.
This worked, and it booted after that. It still had white lines, but those faded away overnight.
About the digitizer connector: its flat cable is so short that the when I attempted to seat the next connector, its flat cable pressed on the digitizer cable, which can pull on the connector and dislodge it. That happened several times for me before success.
Robert Bernard 27 Nov 19
Nous n’apercevons pas bien les nappes et l’ordre dans lesquelles elles doivent être replacer
-
-
-
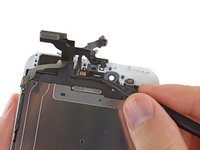
Nimm die Display Einheit von der Rückseite ab.
Never remove the screen without disconnecting the battery. It's possible the back light can be blown and that's a even more difficult repair. Always, ALWAYS, disconnect battery before repairing items. (Unless it's not possible.)
How do you disconnect the battery from the screen?
The Step 11 disconnects the battery :)
I think you mean Step 8 :)
And what? I tried it once and here’s a million dollars?
Oh I get it… they got him! :(
domarius -
When disassembling the iphone at this point note the cables, and there placement/orientation.
Be really careful with the step after this. Do not commence until you have read all the comments. You need to get a good hold of the plastic strips preferably before they double over on themselves. You have to avoid puncturing the battery at all costs. Slowness and caution here will save you a lot of long term pain.
-
-
-
Entferne folgende Kreuzschlitzschrauben, die die Halterung der oberen Komponenten befestigt:
-
Eine 1,5 mm Schraube
-
Zwei 2,3 mm Schrauben
Attempted this repair and my touch screen completely stopped working. Great walkthrough, but not sure what I did wrong in the repair to cause my issue.
Hi I've had exactly the same problem, what was your solution to this? would be very helpful!
Iona -
I had the same issue. My screen quit working and I could feel heat coming through my phone at the earpiece. I took the phone apart again and realized that the data cable for the screen had come loose. When I reattached the data cable and starting working steps 12-18 backwards to replace the shield, as noted in the very last step, I see that youhave to keep the screen at an inclinewhen replacing the shield over the cables. Otherwise, you stretch the display data cable and it can come loose. My screen works fine now and there is no heat coming from my earpiece.
Just completed this repair. My front facing microphone next to the ear piece had gone bad causing siri to not hear me and front facing videos had no sound. Definitely reccomend getting replacement parts from ifixit. Have had good experiences with all their parts unlike many other suppliers on the internet. Hate to admit it (don't want them to raise prices) but even though you pay a little bit more, you save frustration not getting DOA parts from cheaper sources. All of ifixit's parts are top quality and they even pack them in anti-static packaging. That says alot. Thanks ifixit!
Great instructions save the later steps. The ear speaker piece having to bend 180 degrees for the installation needs more clarification.
After this repair, my screen quit working and I could feel heat coming through my phone at the earpiece. I took the phone apart again and realized that the data cable for the screen had come loose. When I reattached the data cable and starting working steps 12-18 backwards to replace the shield, as noted in the very last step, I see that you have to keep the screen at an incline when replacing the shield over the cables. Otherwise, you stretch the display data cable and it can come loose. My screen works fine now and there is no heat coming from my earpiece.
The middle screw, listed as a 2.3mm was actually a 2.9mm in my iPhone 6 Plus
-
-
-
Löse mit dem flachen Ende eines Spudgers die Kabel der Frontkamera und des Displays, und drücke sie leicht zur Seite.
-
-
-
Greife mit einer Pinzette den Ohrhörer-Lautsprecher und entferne ihn von der Display Einheit.
-
-
-
Heble vorsichtig mit der Spitze eines Spudgers die Sensorkabel-Einheit aus ihrer Vertiefung in der Displayeinheit.
Use a hair dryer to pre-heat and soften the adhesive. Otherwise, damage to the flex cable can occur.
-
-
-
Löse den Mikrofonteil der Komponenteneinheit aus Frontkamera und Sensorkabeln von der Displayeinheit.
-
-
-
Entferne die Komponenteneinheit mit der Frontkamera und dem Sensorkabel von der Display Einheit.
-
Ersatzeinheiten werden manchmal mit, manchmal ohne Lautsprechergitter ausgeliefert. Wenn es nicht dabei ist, musst du das alte aufheben und wiederverwenden. Du kannst es mit einem Haartrockner erwärmen und vorsichtig mit einer Pinzette ablösen.
-


Arbeite die Schritte in umgekehrter Reihenfolge ab, um dein Gerät wieder zusammenzubauen.
Arbeite die Schritte in umgekehrter Reihenfolge ab, um dein Gerät wieder zusammenzubauen.
Rückgängig: Ich habe diese Anleitung nicht absolviert.
126 weitere Personen haben diese Anleitung absolviert.
Besonderer Dank geht an diese Übersetzer:innen:
100%


Diese Übersetzer:innen helfen uns, die Welt zu reparieren! Wie kann ich mithelfen?
Hier starten ›

13 Kommentare
My front microphone had completely stopped working exactly a week out of warranty. I replaced the front assembly with a new one from Fixit and afterwards it still did not work. Then I realized the microphone did pick up very soft sound if I shouted directly into it. I eventually repeated the entire disassembly and found a very thin yellow film glued to the microphone grill which had been muffling 97% of the sound. After peeling this off my microphone is working perfectly! I did not notice this on the microphone the first time and assume it was the backing for the self adhesive. Make sure you remove this - it is not obvious to spot!
Fantastic instructions! fixed my problem first time. Just be patient and try not to touch anything to roughly. Thanks for the tip from a previous comment saying to remove the yellow piece of film over the microphone. This saved me a lot of hassle. Thanks
Glad to have siri, dictation, sound in videos and hansfree calls back :)
Is the picture quality the same
I have followed the directions. However, my screen now has vertical lines all through it. Did I ruin a sensor or did I not connect something right. The touch screen doesn't seem to work anymore either.
You should probably start by disconnecting the battery and re-seating all the display cable connectors (disconnect them and then carefully re-connect them, making sure they snap fully into place). Re-connect the battery and try again. If that doesn't do the trick, post your question in our help forum—you'll get much quicker/better responses there!
Hi everyone, is there any way to disassemble/separate the front facing camera from the sensor (without damaging it)?
Hi everyone. I need help on an iPhone 6 Plus front facing camera not working. But when I take the screen out and put to another iPhone 6 Plus it work. So that mean the not working phone has the logic board problem with front facing camera connector???? I guarantee the facing camera on the screen is worked
Works like a charm. Thanks for the detailed and very clear step-by-step guide. This was my first DIY iPhone repair experience. Took me about 1.5h from start to finish, and I found it essential to have a good lighting.
Step 24 was the trickiest: the microphone portion is strongly glued to the front grill, and one should be careful not to destroy the adhesive, as it will be needed to hold in place the replacement microphone (and, I'm guessing, also to maintain moisture protection after the repair).
Could you make a guide on how to fix the back camera and flash of the iPhone 6 plus
Pentalobe P2
Enea Del Lama - Antwort
I prefer to remove the SIM card as the very first step since it's safer to do so while the phone is fully assembled.
estebanfallasf - Antwort
I stripped one of the two screws - at a dead stop.
Margaret Patterson - Antwort
Before you even start: get the iOpener or hairdryer out. You’ll need it
GPZ - Antwort
If a lightning connector won’t provide a charge or needs to be wiggled carefully to provide a charge, power off the device, then try using precision tweezers to scrape the innermost wall of the lightning jack in a pinching motion to check for lint buildup. Pocket lint or other debris can accumulate inside the jack, compacting each time a cable is inserted. This can prevent a lightning cable from seating fully. Clearing the lint may restore functionality without replacing the part.
Andrew Dolan - Antwort
A few hints:
* heating up the phone works great. I used a heating pad that you put in the microwave to heat sports injuries.
* also, I made a sheet to help you keep track of the screws as you remove them. Print out the page, then place double sided tape below each color-coded listing of screws, and stick the screws to the tape as you disassemble. This helps prevent losing the screws and keeps track of what screws are what for easier reassembly. https://drive.google.com/file/d/1pLSvKvB...
Paul Faul - Antwort
Additional hints, for anyone who needs them:
* stick the screws to the tape in the same positions as they are shown in the guide. This will make it easier to identify them during reassembly.
* if the screws get mixed together, the ‘mm’ (millimetre, millimeter) measurements given in the guide can be used to identify them. Compare the lengths of the threaded shafts to each other to determine which screw is which.
Friendly Advice -