
iPod Touch 6. Generation Akku tauschen

Einleitung
Zu Schritt 1 der AnleitungWenn der Akku des iPod Touch 6 nicht mehr richtig funktioniert, folge der Anleitung.
Was du brauchst
Ersatzteile

Werkzeuge


Mehr anzeigen …
-
-
Drücke und halte den An/Aus-Knopf für etwa 4 oder 5 Sekunden.
-
Mit einem Wisch nach rechts ausschalten.
-
-
-
-
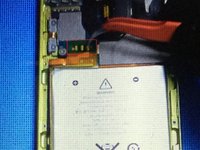
Entferne das Klebeband über den Batterieanschlüssen mit einer Pinzette
-


Um dien Gerät wieder zusammenzubauen, folge den Schritten dieser Anleitung in der umgekehrten Reihenfolge.
Um dien Gerät wieder zusammenzubauen, folge den Schritten dieser Anleitung in der umgekehrten Reihenfolge.
Rückgängig: Ich habe diese Anleitung nicht absolviert.
17 weitere Personen haben diese Anleitung absolviert.
Besonderer Dank geht an diese Übersetzer:innen:
100%

Diese Übersetzer:innen helfen uns, die Welt zu reparieren! Wie kann ich mithelfen?
Hier starten ›

Team

Aiden's Tech Repairs Mitglied von Aiden's Tech Repairs
Business
1 Mitglied
6 Anleitungen geschrieben
10 Kommentare
PRO TIP: ad a little bit of flux to all 3 pads. Then ad some solder to your soldering iron tip and build up the solder on the 3 contacts. Be careful to not damage the flex cable/ board by letting your soldering iron stay on the pads for too long (2-3 seconds each). My iron temp is set at 350F. Once that is complete, set your hot air gun on 350F and speed about half. Slowly wedge a spudger between the board and the battery flex. DO NOT PRY. You will damage the pads. Just let it sit there and hang out while you apply hot air, the soldier you added will liquify and the battery flex cable will pull itself up. When that occurs, you can remove the battery connector and replace with a new one. Make sure to ad a bit of flux to the pads on the board for attachment. For re-attachment: line up the 3 pads and use your soldering iron to put them down. Gently press down on the gold pad of the flex cable, and you will see the solder from the board liquify and come though the 2 holes. Repeat for the next 2 and YOUR DONE!
I found this comment most helpful. Adding solder first helps. My only problem with this repair was accidentally letting the soldering iron touch the black plastic covering the back of the screen. This melted thru the screen backing. This is a reflective backing to the screen. The damaged area is very small and not as bright as the rest of the screen and is a little annoying when looking at picture on the screen now!
Extremely helpful, would that be a micro pall worth of flux? Or some other Rosman repair measurement?