
Acer Chromebook R11 CB5-132T-C1LK Motherboard Replacement
Einleitung
Zu Schritt 1 der AnleitungReplacing a motherboard is usually a last resort option as the motherboard is where all the data and files are in a Chromebook. Only replace a Chromebook motherboard if you are certain it is a motherboard that is malfunctioning.
Was du brauchst


-
-
Using a Phillips screwdriver, remove all eleven 7.0 mm screws from the bottom of the Chromebook.
-
-
-
Find the seam along the edge of the device.
-
Wedge a finger into the groove and separate the panel from the device. If necessary, use a spudger.
-
-
-
Remove the two 4.5 mm Phillips screws located at the sides of the battery.
-
-
-
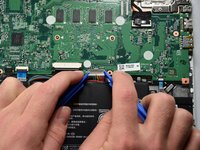
Grip the battery connection using two plastic opening tools.
-
Carefully but firmly, pry the connector from its socket by pulling it towards the battery.
-
-
-
-
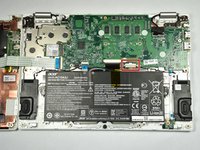
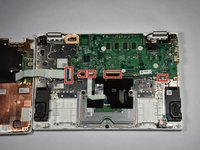
Orient the laptop so the motherboard side is further away from you in a landscape position.
-
Use the flat end of the spudger to lift the the ZIF connector retaining flaps securing the three small ribbon cables.
-
-
-
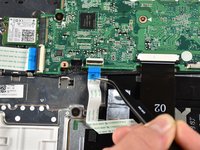
Pull out the locking mechanism of the touchpad ZIF connector with the narrow end of the spudger.
-
-
In diesem Schritt verwendetes Werkzeug:Tweezers$4.99
-
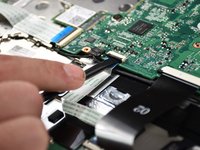
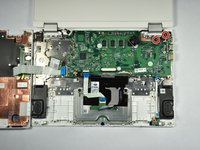
Using tweezers, pull the five ribbon cables near the bottom of the motherboard from their sockets.
-
Using tweezers, pull the single cable near the top left of the motherboard from its socket.
-
-
-
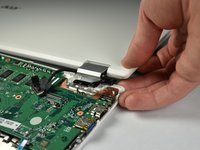
Remove the screen connector from the motherboard by pulling directly upward on the black tabs.
-
-
-
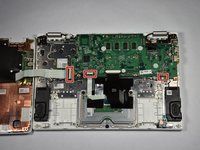
Remove the two 4.5 mm screws and a 2.0 mm screw from the middle of the motherboard.
-
-
-
Unscrew the two 4.5 mm screws from the top right metal tab connected to the motherboard.
-
Lift the right corner upward to remove the metal tabs from the motherboard
-


To reassemble your device, follow these instructions in reverse order.
To reassemble your device, follow these instructions in reverse order.
Rückgängig: Ich habe diese Anleitung nicht absolviert.
9 weitere Personen haben diese Anleitung absolviert.
Team

Cal Poly, Team S23-G2, Livingston Spring 2017 Mitglied von Cal Poly, Team S23-G2, Livingston Spring 2017
CPSU-LIVINGSTON-S17S23G2
4 Mitglieder
12 Anleitungen geschrieben