Zum Hauptinhalt wechseln
Cricut Maker 3 Blade Housing Replacement

Cricut Maker 3 Blade Housing Replacement

Spencer Pennington

Spencer Pennington

Zuletzt aktualisiert am October 7, 2024

5 Minuten
Sehr einfach

Follow this guide to replace the blade housing in your Cricut Maker 3.

If you want to use certain kinds of specialty blades, or if you blade is not rotating freely in the housing, you may need to replace the blade housing.

  1. Cricut Maker 3 Blade Housing Replacement, Prepare your Cricut for disassembly: Schritt 1, Bild 1 von 3 Cricut Maker 3 Blade Housing Replacement, Prepare your Cricut for disassembly: Schritt 1, Bild 2 von 3 Cricut Maker 3 Blade Housing Replacement, Prepare your Cricut for disassembly: Schritt 1, Bild 3 von 3
    • Be very careful not to cut yourself when working near the Cricut's small, sharp blade, located in the tool holder within the Cricut.

    • Power off the Cricut and unplug all cables.

  2. Cricut Maker 3 Blade Housing Replacement, Open the Cricut: Schritt 2, Bild 1 von 2 Cricut Maker 3 Blade Housing Replacement, Open the Cricut: Schritt 2, Bild 2 von 2
    • Open the Cricut by lifting the top silver lid. The front tray will also open.

  3. Cricut Maker 3 Blade Housing Replacement, Open the clamp: Schritt 3, Bild 1 von 2 Cricut Maker 3 Blade Housing Replacement, Open the clamp: Schritt 3, Bild 2 von 2
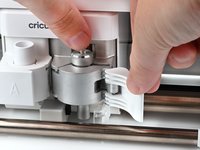
    • Partially open clamp B on the tool holder by pulling the plastic latch away from the tool holder.

  4. Cricut Maker 3 Blade Housing Replacement: Schritt 4, Bild 1 von 2 Cricut Maker 3 Blade Housing Replacement: Schritt 4, Bild 2 von 2
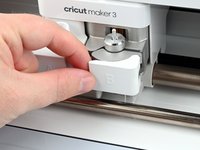
    • While holding the blade housing in the tool holder, fully open clamp B by pulling the plastic latch to the right.

  5. Cricut Maker 3 Blade Housing Replacement, Remove the blade housing: Schritt 5, Bild 1 von 2 Cricut Maker 3 Blade Housing Replacement, Remove the blade housing: Schritt 5, Bild 2 von 2
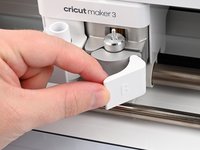
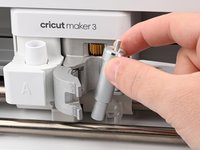
    • Grab the blade housing by the top and remove it from the tool holder.

Abschluss

To reassemble your device, follow these instructions in reverse order.

Repair didn’t go as planned? Try some basic troubleshooting, or ask our Answers community for help.

Spencer Pennington

Mitglied seit: 09/09/23

17.049 Reputation

113 Anleitungen geschrieben

Team

iFixit Mitglied von iFixit

Staff

118 Mitglieder

19.457 Anleitungen geschrieben

0 Kommentare

Kommentar hinzufügen

Seitenaufrufe:

Letzte 24 Stunden: 0

Letzte 7 Tage: 2

Letzte 30 Tage: 11

Insgesamt: 101