
Dell Inspiron 15 (N5010) RAM, CD/DVD drive or Keyboard Replacement

Einleitung
Zu Schritt 1 der AnleitungThe RAM and CD/DVD drive are very easy to replace. There is no need to suffer a damaged or unreliable keyboard as this is quite easy to replace too.
Was du brauchst


-
-
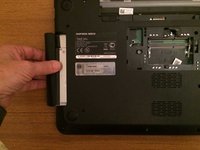
Turn the laptop over and unlock the battery by sliding the two locking tabs away from each other. The one on the left is spring loaded. Slide the battery out.
-
Simply slide the battery out in the direction shown.
-
-
-
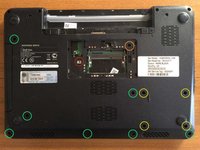
Undo the locking screw on RAM cover, then prise open the cover.
-
Release the RAM module or modules by pushing the metal clips outwards. Put the modules aside.
-
-
-
-
Remove a 5mm screw to the left of the RAM sockets, then pull out the CD/DVD drive. (Not necessary if you are only replacing the keyboard.)
-
Remove a 5mm screw to the right and the rear of the RAM sockets.
-
If you are going to remove the hard disk, motherboard or fan, remove 4 3mm screws.
-
Remove 7 5mm screws. (There are 6 more at the rear which should be left.)
-
-
-
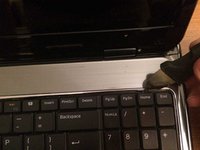
With a thin metal spudger you should now be able to release 4 clips along the top of the keyboard in order to lift it out.
-
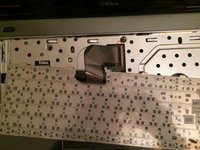
Lift the keyboard slightly from the back, disengaging its tabs along the front panel at the front. Turn it over towards you, taking care not to strain the ribbon.
-
Gently lift the locking bar on the ribbon socket and withdraw the ribbon. Put the keyboard aside.
-


To reassemble your device, follow these instructions in reverse order.
To reassemble your device, follow these instructions in reverse order.

Team

Restart Project Mitglied von Restart Project
Local Repair Groups
23 Mitglieder
661 Anleitungen geschrieben