
JBL Flip 4 USB Anschluss auswechseln
Einleitung
Zu Schritt 1 der AnleitungWenn bei deiner Box Probleme beim Laden auftreten oder der USB-Anschluss locker erscheint, sind möglicherweise die elektrischen Anschlüsse für die Stromversorgung beschädigt. Möglicherweise ist ein Austausch des USB-Anschlusses erforderlich. In dieser Anleitung erfährst du, wie du den USB-Anschluss auswechseln kannst.
Was du brauchst


-
-
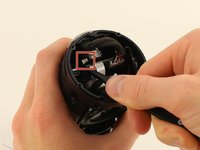
Führe das Öffnungswerkzeug in den Spalt zwischen der Abdeckung und dem Gummiboden ein. Achte darauf das die Box so steht, das die Akku-LED's links neben dem An/Aus Knopf sind (wie auf dem Bild).
-
Heble die Abdeckung ab. Beginne an der Seite, wo nicht die Lautstärkeregler sind.
-
Heble sehr vorsichtig, damit die Clips nicht beschädigt werden.
-
Ziehe die Abdeckung mit den Daumen ab.
-
-
-
Entferne die vier 13mm JIS #0 Schrauben, mit denen die Gummiränder an den beiden Seiten befestigt sind.
-
Löse mit dem Öffnungswerkzeug die Clips, die den mittleren Teil des Gummirückens halten.
-
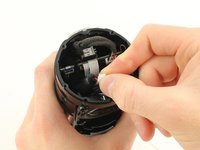
Heble einen Gummirand mit den Daumen weg, bis er sich löst. (Wie auf dem Bild).
Note or precaution: Place a piece of cardboard over the speaker or use a plastic/rubber/nonmetalic handled screwdriver when loosening/removing the 13 mm screws. The speaker magnets are so powerful that the end of my metal jewelers phillips screwdriver was pulled into the speaker, tearing the plastic/rubber cone. I destroyed two speakers in the process of replacing the battery. Had to buy the speakers from JBL ($16 each).
I have 2 Flip 4's bought approx. a year apart. The older speaker was exactly as described here. The newer speaker does not have the 5 end screws, instead it has a twist to lock end plate. Make sure the top screws that secured the rubber end are removed, as these will prevent end cap twisting. I used rubber gloves to get a grip and twist end cap counter-clockwise to unlock. I found that if you grip end cap too tight it makes it even harder to twist off. Someone may find a better solution, like prising the tags around circumference, but be warned these look flimsy.
Great guide. Only problem is that the battery on mine was in a neoprene sheath and had swollen. It was a bit of a problem to get out. There didn’t seem to be room to fit something to push it out without damaging wires or the motherboard. At the risk of a fire, I worked it back and forth and pulled with a pair of needle nose pliers. Yes there were sparks and some smoke. I did it outside and knew I was risking the whole thing catching on fire. Luckily it went ok.
Great guide! I have a model with the twist-off caps (not 5 screws) with helpful, though subtle, lock/unlock icons on the plastic. Only other problem was replacing the white neoprene battery retainer cover (2 screws). One screw slipped off my screwdriver and fell into the unit - probably stuck to a speaker magnet now. But it doesn't seem to be affecting the sound. iFixit is the best!!
Una duda tienen la tapa que lleva al principio la bici en la parte de afuera
on the version w/o the five screws: Make sure that you push the lid at the cap where it says “R”to the outside far enough to be able to turn off the cap.
-
-
-
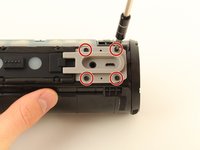
Entferne die vier 9mm Kreuzschlitzschrauben #1 die den grauen USB-Anschluss befestigen.
-
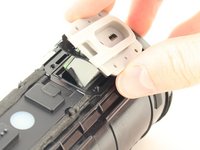
Löse das graue Gehäuse der USB-Abdeckung mit der Hand ab.
Minor point: the colour of the USB port and casing is whatever colour the speaker is. Mine was red so never had a gray USB port or casing.
-
-
-
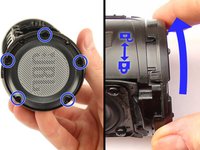
Bei neueren Geräten: Drehe die Endkappe ab. Bei älteren Modellen: Entferne die fünf 9mm Kreuzschlitzschrauben #1 um die Endkappe mit dem JBL-Ausrufezeichen zu entfernen.
-
-
-
-
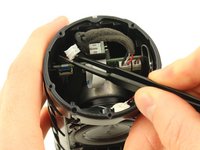
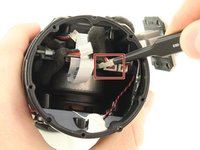
Ziehe den mit dunkelgrauem Schaum beschichteten Draht aus dem Bereich, in dem er verstaut ist, und schiebe ihn aus dem Weg (Wie auf dem Bild).
-
-
In diesem Schritt verwendetes Werkzeug:Tweezers$4.99
-
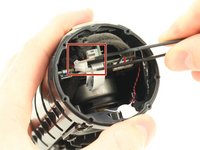
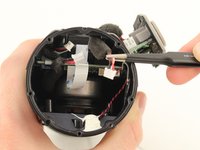
Löse den weißen Stecker, der an der kleinen Platine des grauen Micro-USB-Gehäuses befestigt ist (Wie auf dem Bild), mit der ESD sicheren stumpfen Pinzette.
-
Ziehe den Stecker durch den Spalt in der großen Leiterplatte, damit du an den nächsten Stecker hinter ihm gelangen kannst.
JBL has upped their “security” I see. On mine, this plug is glued in place and the ribbon cable nearby is completely covered in tape so I can’t unhook it.
-
-
-
Hake den anderen kleineren weißen Stecker hinter dem vorherigen Stecker von der gleichen Leiterplatte mit der Pinzette aus.
-
-
-
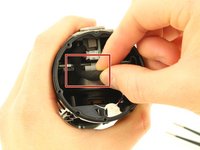
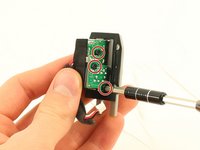
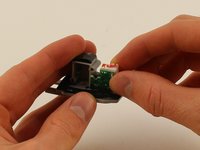
Löse den kleinen weißen Stecker, der an der Hauptplatine angebracht ist, die den USB-Anschluss am Lautsprecher hält (Wie auf dem Bild).
-
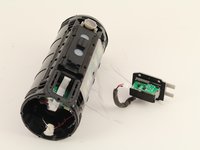
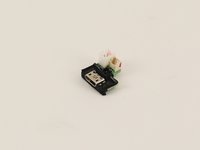
Entferne die USB-Anschlusskomponente aus dem Lautsprecher.
-
-
-
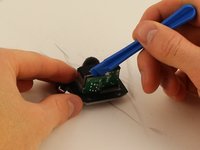
Entferne die drei 9mm Kreuzschlitzschrauben #1, mit denen die beiden kleinen Leiterplatten an der USB-Anschlusskomponente befestigt sind.
-
Heble die obere kleine Platine mit dem Öffnungswerkzeug ab (Wie auf dem Bild).
-
-
-
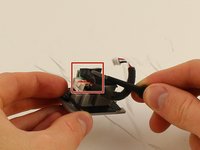
Ziehe den schwarzen Klebestreifen auf der Unterseite des Bauteils mit der Pinzette ab und entferne die Kabel darunter.
-
Entferne die erste kleine Platine und die angeschlossenen Drähte.
-
-
-
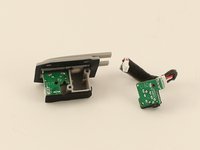
Ziehe die zweite Platine mit den Händen heraus und entferne sie.
Well presented. Needed. Wire pin descriptions. Thanks
https://www.google.com/url?sa=i&url=http...
Is this what you need ?
-


Folge den Anweisungen in umgekehrter Reihenfolge, um die Box wieder zusammenzubauen.
Folge den Anweisungen in umgekehrter Reihenfolge, um die Box wieder zusammenzubauen.
Rückgängig: Ich habe diese Anleitung nicht absolviert.
27 weitere Personen haben diese Anleitung absolviert.
Besonderer Dank geht an diese Übersetzer:innen:
100%

Diese Übersetzer:innen helfen uns, die Welt zu reparieren! Wie kann ich mithelfen?
Hier starten ›
Team

Cal Poly, Team S4-G3, White Fall 2018 Mitglied von Cal Poly, Team S4-G3, White Fall 2018
CPSU-WHITE-F18S4G3
4 Mitglieder
37 Anleitungen geschrieben
12 Kommentare
Hi, I need to replace this circuit board where the charging port mounts.
While trying to remove damaged micro usb port, I damaged the tiny wires from the circuit board.
I tried to find this online but no luck so far.
Do you know the code for this PCB?
Thank you,
hi, where can i buy new circuit board for micro usb charging port?
please i need 1… thank you.
I have a question on the small circuit board (charge port), one of the female port on it is for power (+5v), but what is another one? Is it D+, D- ?
P.S. I’ve measure that port with micro usb connected to power source, turns out there has no voltage measured, but the bigger one does has 5v measured.
Thanks!
https://www.ebay.com/itm/184156589848
Just ordered one of these. Told it’ll be delivered by August 1st.
Would be so great if you could tell us where we could obtain a replacement USB port that INCLUDES the little circuit board. All replacement parts I have found are the port itself and not the port including the little circuit board and plugs.
Hi I discovered water on the inside of the on button rubber layer how do I access it?
Thanks. Brought this speaker back to life. Reconnecting the wires was a little bit of a challenge but got it done in the end.
Hello, great guide thanks! Although I am not quite sure what to buy as a connector. I found two different part available the TL and GG on Aliexpress for instance, does anyone know the difference? Does it matter?
Me pasa que al conectar el poder este se va a 0 y no carga el altavoz a que se debe, me paso despues de actualizar la version del flip 4
Important suggested edit to these instructions - make sure to pry off clips/ridges from BOTH sides before attempting removal of the cover.
I interpreted these instructions as saying you only needed to pry clips from one side - then peel off cover. Doing this broke a clip from the other side. Bummer. I'd like others to avoid that.
k9612 - Antwort
If you do break a clip - save it. They are relatively easy to glue back into the cover.
k9612 -
My Flip4 had a single long clip on the non-button side that ran the entire length of the rubber spine. The other side (with play/ vol buttons) had three seperate clips (middle and both sides) as mentioned above.
takentrashout - Antwort
What if my speaker battery dies very fast and makes weird crackling noise, is it counted as faulty battery?
Jayden Koh - Antwort
Yes. I first thought one of the drivers was defective.
Paul Sommer -
What was the fix in the end ?
Jack Mulcahy -
I used the flared edge of a metal measuring spoon handle since I didn’t have an opening tool. Worked great! Replacement battery from iFixit is on order. Thanks for the guide!
Greg - Antwort
My battery was glued. Tried it anyway to remove. Battery exploded!!!!
Don't go on if the battery is glued.
darthvader007 - Antwort