Zum Hauptinhalt wechseln
Lenovo ThinkPad X1 Carbon 9th Gen Battery Replacement

Lenovo ThinkPad X1 Carbon 9th Gen Battery Replacement

Clay Eickemeyer

Clay Eickemeyer und eine weitere beteiligte Person

Zuletzt aktualisiert am March 20, 2024

10 - 20 Minuten
Leicht

This guide will walk you through the process of removing the battery from your Lenovo ThinkPad X1 Carbon. This is an important step before performing any repairs or replacements in your laptop.

Was du brauchst

Ersatzteile

Werkzeuge

Mehr anzeigen …

  1. Lenovo ThinkPad X1 Carbon 9th Gen Battery Replacement, Unfasten the back cover: Schritt 1, Bild 1 von 2 Lenovo ThinkPad X1 Carbon 9th Gen Battery Replacement, Unfasten the back cover: Schritt 1, Bild 2 von 2
    • For your safety, discharge the battery below 25% and power down your device before disassembly.

    • Use a Phillips #1 screwdriver to loosen the five captive screws holding the back cover.

  2. Lenovo ThinkPad X1 Carbon 9th Gen Battery Replacement, Release the corner clips: Schritt 2, Bild 1 von 2 Lenovo ThinkPad X1 Carbon 9th Gen Battery Replacement, Release the corner clips: Schritt 2, Bild 2 von 2
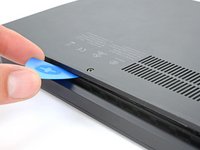
    • Insert an opening pick between a corner of the back cover and the chassis, near a hinge.

    • Pry upward to release the retaining clips.

    • Listen for a click sound when clips release.

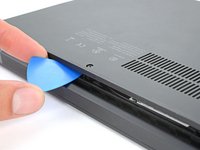
    • Repeat this process for the opposite corner.

  3. Lenovo ThinkPad X1 Carbon 9th Gen Battery Replacement, Release the edge clips: Schritt 3, Bild 1 von 2 Lenovo ThinkPad X1 Carbon 9th Gen Battery Replacement, Release the edge clips: Schritt 3, Bild 2 von 2
    • Insert the opening pick between the cover and the body.

    • Pry upward and release all of the retaining clips.

  4. Lenovo ThinkPad X1 Carbon 9th Gen Battery Replacement, Remove the back cover: Schritt 4, Bild 1 von 2 Lenovo ThinkPad X1 Carbon 9th Gen Battery Replacement, Remove the back cover: Schritt 4, Bild 2 von 2
    • Lift the back cover off the chassis and remove it.

    • If the cover feels stuck to the chassis, use an opening pick to release any remaining clips around the perimeter of the back cover.

  5. Lenovo ThinkPad X1 Carbon 9th Gen Battery Replacement, Unfasten the battery: Schritt 5, Bild 1 von 2 Lenovo ThinkPad X1 Carbon 9th Gen Battery Replacement, Unfasten the battery: Schritt 5, Bild 2 von 2
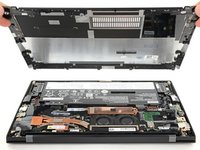
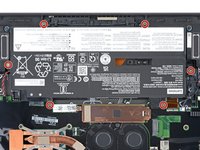
    • Use a Phillips #1 screwdriver to remove the six 4.9 mm screws securing the battery to the laptop chassis.

  6. Lenovo ThinkPad X1 Carbon 9th Gen Battery Replacement, Remove the battery: Schritt 6, Bild 1 von 3 Lenovo ThinkPad X1 Carbon 9th Gen Battery Replacement, Remove the battery: Schritt 6, Bild 2 von 3 Lenovo ThinkPad X1 Carbon 9th Gen Battery Replacement, Remove the battery: Schritt 6, Bild 3 von 3
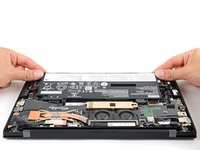
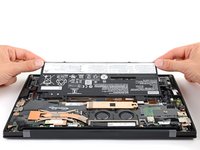
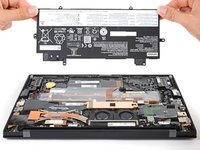
    • Grip the corners of the battery.

    • Pull and lift the battery of its recess and remove it.

    • Be delicate when pulling the battery out at first. The small pins on its connector are easy to bend.

    • There is no cable for the battery. It disconnects when removed from its recess.

Abschluss

To reassemble your device, follow these instructions in reverse order.

Take your e-waste to an R2 or e-Stewards certified recycler.

Repair didn’t go as planned? Try some basic troubleshooting, or ask our Lenovo ThinkPad X1 Carbon community for help.

3 weitere Personen haben diese Anleitung absolviert.

Clay Eickemeyer

Mitglied seit: 09/19/22

82.264 Reputation

455 Anleitungen geschrieben

Team

Guide Team Mitglied von Guide Team

Staff

9 Mitglieder

11.490 Anleitungen geschrieben

0 Kommentare zur Anleitung

Kommentar hinzufügen

Seitenaufrufe:

Letzte 24 Stunden: 13

Letzte 7 Tage: 69

Letzte 30 Tage: 408

Insgesamt: 9,007