Einleitung
Diese Anleitung zeigt dir, wie du die SSD deines MacBook Air 13" Anfang 2015 aufrüsten oder austauschen kannst. Dieses MacBook Air benutzt proprietäre Stecker am Speichermedium und ist deshalb ohne Adapter nicht kompatibel zu gewöhnlichen M.2 Laufwerken.
Führe, wenn irgend möglich, vor der Reparatur ein Backup deiner SSD durch. Mache dich dann vertraut mit der Wiederherstellung über das Internet, oder erzeuge ein bootfähiges externes Laufwerk, so dass du macOS auf dein neues Laufwerk installieren und deine Daten auf die neue SSD übertragen kannst.
Wir empfehlen sehr die Installation von macOS 10.13 High Sierra (oder eine neuere Version), bevor du die originale SSD deines MacBook Air austauschst. Die meisten neueren SSD erfordern neuere Laufwerkstreiber, die es in macOS Versionen vor HighSierra noch nicht gibt.
Was du brauchst
Einführungsvideo
-
In diesem Schritt verwendetes Werkzeug:P5 Pentalobe Screwdriver Retina MacBook Pro and Air$5.99
-
Benutze einen P5 Pentalobe-Schraubendreher, um folgende zehn Schrauben zu entfernen, mit denen das untere Gehäuse befestigt ist:
-
Zwei 9 mm Schrauben
-
Acht 2,6 mm Schrauben
-
-
-
Löse das hintere Gehäuse vom Air, indem du mit den Fingerspitzen zwischen Display und Gehäuse gehst und es nach oben ziehst.
-
Entferne das hintere Gehäuse und lege es beiseite.
There is a nub on the inside of the case which is attached to the battery. When you try to pull it open, it appears to be attached to the plastic casing of the battery, which sometimes splits. I gently unhooked the nub from the battery before removing the case fully. This seems to happen if the battery has suffered some drop damage (plastic parts broken around screws and parts of plastic frame split). Just an FYI in case your lower case doesn't pull away easily.
To add - the slim 1cm tab “nub” is on the centre of the back cover & fits into a hole in the battery frame. I ran my fingers around the whole of the cover to eventually here it click out.
nijafe -
So this is a legit back cover for MacBook Air?
I bought the part and tools from iFixit and followed the directions. The mechanical part went smoothly - maybe 10 minutes to disassemble/replace/reassemble.
Getting Catalina (the current MacOS) to install was not working until I used Cmd-Opt-R (as noted in the OWC paper sheet that came in the box) which brought up the proper installer - I believe from a pre-prepared bootable SD card but it’s hard to say. From there the install succeeded taking ~1.5 hours.
Beware that (a) the install requires a working internet connection for verification and updates, and (b) the system must have been running at least macOs 10.13 (High Sierra) before the install in order to have an EFI BIOS that recognizes the SSD.
Thanks for the detailed photos. When repairing equipment, I don’t really like to disassemble plastic parts, they can be damaged, but your screenshots help a lot. For my studies, I am writing an essay comparing the reliability of laptops from various manufacturers and the complexity of their repair, maybe it will be useful for someone to check the essay for plagiarism here essay checker, when comparing different manufacturers, I understood why people love Apple so much. The minimum number of failures. Of course, repairing it in an official service is not cheap, but with the help of such detailed instructions, you can do it yourself and save a lot.
The screwdriver bit to use on these case screws is not named, but I found that my "CR-V 1.2" did the job nicely.
The driver for the screws inside the case are named, as "T5".
-
-
-
-
Ziehe die durchsichtige Kunststofflasche, die am Akkustecker angebracht ist, parallel zur Oberfläche der Leiterplatte in Richtung Vorderkante des Air.
how does a person put the battery connector back in?- that is the only thing i’m afraid of touching after putting new fan in.
I found it was possible to put the battery connector back in as the last step, however having gone through that and found it to be a little challenging, I would actually recommend attaching the battery connector before screwing back in the bracket. That way you’ll put a lot less stress on the connector cable.
When you are plugging the connector back in, make sure to give it some extra pressure to make sure it is all the way in. It may look like it’s in but needs to be pushed harder!
After disconnecting the power, you may skip directly to step 18. I don’t know why someone would think it necessary to disconnect all the other stuff. There is no need whatsoever to do so. The more things you disconnect, the more things you risk damaging. Many of the parts in steps 4 through 17 are quite delicate, and easy damaged.
The screw in step 18 is easily accessed without removing even the rubber gasket. Regarding step 18, only remove the screw. (This screw is rather long, with long threads.)
It’s helpful to take photographs of this area before removing the screw, so you’ll know what it’s supposed to look like when you put it back together.
There are only 16 steps in this repair process. I wonder whether you are commenting on a different repair.
Gyandev -
What if your battery doesn’t have that clear tab?
Yep, exactly the issue that I have
Unscrew the battery first, then let the cable flex out a little. Use a spudger or small pick to push the connector out from the board.
Nathan -
Where can i buy the battery connector?
Macbook air 2015 battery connector where can I purchase?
-
-
-
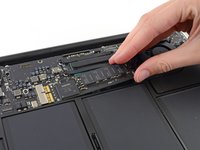
Entferne die einzelne 2,9 mm Torx T5 Schraube, mit der die SSD auf dem Logic Board befestigt wird.
I'm using a T5 Torx screwdriver to remove the SSD retaining screw but it's simply not working, the screwdriver seems slightly too big and I even tried plyers to grab the ends of the screw and turn it but that didn't budge. Are the screws super tight or something? I can't figure out what I'm doing wrong
I would also like to know that, i have the same problem tried using a standard T5 Torx and the Pentalobe P5 screwdriver, but the both dont work/fit
I ended up using the T5 with a rubber band in between. I wish I would have done this earlier. I stripped a little bit of the screw. You live you learn.
After reassembly, press and hold cmd-opt-R immediately after hitting power button
T4 worked for me.
2013-2017 A1466 Airs only have one screw retaining the SSD so not sure why this shows two
-
-
-
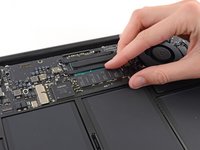
Hebe die SSD vorsichtig an einem Ende ungefähr 1,3 cm hoch und ziehe sie gerade aus ihrem Anschluss auf dem Logic Board.
Am I able to upgrade my Macbook Air early 2015 from 128Mb SSD to the SSD Samsung 960 (EVO or Pro) 1TB or 2TB?
If so, do a need special adapters?
Is there an adaptor cable or external housing that allows me to transfer the information on my SSD to my other laptop that has a SATA drive?
There are several available at Other World Computing.
I really don’t recommend using M.2 SSD’s!
As someone who services Mac’s I tend to see the failures and I’l warn you I see a lot of these M.2 drives with adapter with problems. As one of the first diagnostic processes I pop in my custom Apple Samsung SSD to see if the system works with it. If it does I recommend the power to replace the SSD.
Dan -
If I’m ordering a 1TB ssd what exactly should I be asking for ?
i looked up a replacement for my 2015 Air and the ssd they sent had the slot in the wrong place. Will I need an adapter?
why did they suggest it would be compatible (it’s an m2)?
Seems cheap isn’t good
Is the same procedure suitable for a macbook 13” early 2014?
RvS
Hey robert, the procedure is exactly the same for the 2014 MBA! You can check out our MacBook Air 2014 SSD replacement guide to check for yourself.
Shouldn’t you disconnect the battery before removing the old SSD? Guide lacks instructions for this so not sure if necessary/ recommended. I recall HDD upgrade guide for my old MBP 2010 included disconnecting the battery, surely same for MBA?
Yes, always disconnect the battery first before removing other components.
(Edit: I only skimmed, looking for chat about adapters and such. It’s there.. Step 3. At least, it is now. Maybe it was added after your comment) :)
Ashlar -
My mid-2013 Air has crashed to the point of being unrecoverable - I get the folder with a question mark upon startup and there is no disk to recover from when I finally get to disk utility. After a couple phone calls with Apple, they determined they couldn’t do anything. I’m wondering if I can remove my SSD from the laptop, if I can use an adapter cable to make the files accessible via a cable (preferably to USB C) on my new MacBook Air mid-2020. I appreciate the help, thank you.
is there any software updates that need to be done to configure this to work properly or is it a plug and play type of thing?
as long as your on a modern OS version Catalina or higher its plug and play
Dan -
I swapped out a larger (non-OEM) SSD in my MacBook Air. Everything works fine except now when I wake my computer from sleep, I’m just given a black screen and the logon screen doesn’t load. I usually have to force shutdown and restart whenever waking from sleep, kind of annoying. Any hints as to what may be the issue?
Tutorial looks great! My worries are what to do once I have put the laptop back together again. If I swop my 500 GB to a 1 TB SSD (w/o adaptor), can I just start it up with my Time Machine Backup? Or do I need to reinstall Mac OS?
I have a MacBook Air Early 2015, running High Sierra 10.13.6.
Where can I get the adaptor for the ssd. Also if I am taking the ssd from the 2017 air and just trying to read the info on it on a 21 14" mb pro. Is there anything I should know. The 2017 air has got a firmware lock on it. I bought it used for my what's now ,ex. I don't know if she put the firmware password on it or the og owner who I have no way of getting back in touch. His account is no longer active on fb. So im kind of screwed. The only thing I could think of was to remove the ssd and put it in an we enclosure and see if I can read the info on the drive. My ex refuses to give me the pw so it has me curious. I figured I woukd take a look before I wipe it.
-


Um dein Gerät wieder zusammenzusetzen, folge den Schritten in umgekehrter Reihenfolge.
Entsorge deinen Elektromüll fachgerecht.
Lief die Reparatur nicht wie geplant? Versuche zuerst einige grundsätzliche Lösungen, wenn das nicht hilft, dann kannst du in unserem Forum Antworten finden.
Um dein Gerät wieder zusammenzusetzen, folge den Schritten in umgekehrter Reihenfolge.
Entsorge deinen Elektromüll fachgerecht.
Lief die Reparatur nicht wie geplant? Versuche zuerst einige grundsätzliche Lösungen, wenn das nicht hilft, dann kannst du in unserem Forum Antworten finden.
Rückgängig: Ich habe diese Anleitung nicht absolviert.
211 weitere Personen haben diese Anleitung absolviert.
Besonderer Dank geht an diese Übersetzer:innen:
100%

Diese Übersetzer:innen helfen uns, die Welt zu reparieren! Wie kann ich mithelfen?
Hier starten ›


51 Kommentare
yes) and prompt and appropriate model that was not inferior in speed built.
Thank!
Dave, I am sure these are M.2 SSD. I am not sure what apple uses but at least you have somewhere you can start for research
klacorum -
That’s indeed an M.2 SSD but you’ll need an adapter as the one that came with the Macbook uses a proprietary connector.
OWC has SSDs for specifically for MacBook Air. You can get them here: http://eshop.macsales.com/shop/ssd/owc/m...
I upgraded my MacBook Pro Retina with an OWC SSD and it worked a treat. I went for a kit that included an external chassis for the drive I swapped out. It makes an incredibly fast and portable external drive.
NOTE: Changing the drive voids the warranty, but if you swap your existing mac drive back in when it goes for repair everything is fine. I know because I have also had to have my Pro serviced.
the maximum memory for ssd ?
Since there is a not much of a difference between the MacBook Air Mid 2017 and this one, would it be possible to move my 128 GB SSD from my old MacBook Pro 2015 into the MacBook Air 2017 same way ? Konsidering keeping the data how would i handle the os configuration differences ? Thanks in advance.
If I want to take an SSD from a damaged macbook air (SSD is not damaged) and put it into a model with a smaller capacity SSD will it turn on and work from the SSD I put in? I am wondering if there are additional steps to get one macbook air to boot from a hard drive from another.
As of June 2017, OSX High Sierra has added nvme support for booting. I can confirm that the samsung 960 evo works with a m.2 adpater in my macbook air 2015. This gave me a 250 GB ssd that runs roughly 1300MB/s write and 1300MB/s read for about $150 usd.
what adapter?
onwar33 -
I have an adata sx6000 m.s 2280 pcie and adaptor for my macbook air early 2015. The macbook does not at all recognize the drive. its as if its not installed. i tried the drive on a pc and know it works.
What Is the largest SSd upgrade you do on a MacBook Air 13.3 mid 2015
OWC offers a 1TB kit
you can also go up to 2 tb
Additional info: you can use normal m2 ssds in your macbook using an Adapter. You can find Infos with campatible ssd types on this site: https://macandegg.de/upkeep/macbook-air-...
sorry for this Website being German but you can see that e.g. for a macbook 7,2 you can use nvme ssds with Adapter. There are also examples for ssds to use but u dont Need exactly the ones linked there, also some ssds similar to those will work just as fine. have fun
Hi, i have one mac air mid 2011 upgrade 64 gb to 256 gb and now buy macbook air mid2017 ssd 128 , what is the best way to re-use ssd 256 GB transcend on the new macbook air mid 2017?
I can remove ssd of mac old and install on new mac air without problens?
Can i use this SSD model on mac air 2017?
SSD ADATA XPG GAMMIX S10 512GB PCIe Gen3x4 M.2 2280
and how do i know which SSDs are compatible with my mac air 2017?
Review this guide The Ultimate Guide to Apple’s Proprietary SSDs
Dan -
Is the default ssd installed on this mac sata or nvme?
do i need to prep the new SSD? or do I just swap them out?
Just did mine, create a mojave bootable usb drive and swap them. No other work needed
Dan -
thats great!
I need to transfer the data to Mobile drive 1TB (because my Mac won’t work any more, it needs the logic board to be changed).. so my question is:
which adaptor do i need to read the data off the Macbook Air 13 (early 2014) ?
thanks in advance
is it compatible with "MacBookAir7,2" 2017?
Hi, I have this 2015 model which won’t turn on. Is there an USB external ssd card reader on the market so I can recover the data on my ssd card, once it is removed?
Yep, there sure is! Right here.
Do I need make some boot to instal the Mac OS in the new ssd?
If you are using a Apple blade SSD you don’t. Some 3rd party drives may need it.
Dan -
Can I use SSD from older Macbook Air Early 2015 on my Macbook Air 2017? Is there any compatibility or performance issues?
Yes! Apple used the same interface (SSD) across both.
Here’s a great reference The Ultimate Guide to Apple’s Proprietary SSDs
Dan -
Is this the same process I can use on my Macbook Air 2017 13”?
Here’s the 2017 guide: MacBook Air (13 Zoll, Anfang 2017) Display tauschen
Dan -
Thank you very much for the guide! I have one question: I installed a Sabrent Rocket Q 2TB NVMe. All works well, but I’d like to put a thermal pad on. I’m thinking a pad that connects the SSD to the lower case. (I’m thinking SSD->pad->copper->pad->aluminum case.
My question is: what is that black stuff on the inside of the lower case? Is it thermal padding? Should I remove it and then put a thermal pad there?
Is not needed! SSD’s don’t produce enough heat.
Dan -
Thanks for the answer. NVMe SSDs do get quite hot. The usually come with a thermal pad and are installed with heat sinks. And I can feel the heat coming off it when there is a lot of disk activity.
But I just want to know what the black stuff is…
lachmann -
Not that simple! The amount of data being moved is the factor of how much heat your SSD will produce.
Even still the SSD has internal sensors which will dial back the throughput if needed. Unlike HDD’s which when they get hot can distort the patters, SSD’s don’t have such limiting factors.
I have a 2013 MacPro which came with a heat sink on its original SSD as at the time the SSD technology was still new and Apple wanted to be safe. With newer generations of Apple blade SSD’s Apple realized a heat sink was not required. Just look at the current MacPro MacPro SSD Here Apple only has a metal EMI shield around the chips no heat sink!
The key is having enough air flow getting to the drive, a heat sink needs a way to off load the heat, Your idea doesn’t really improve things.
BTW: I run my system very hard when I’m working on ultra-large images and my 4TB internal SSD gets warm it is not getting to the point of melting ;-}
I doubt your MacBook Air is able to sustain the level of performance my MacPro is able to run at, Maybe you should look at getting a bigger SSD as a drive which is running hot tends to be fighting its self trying to move data on the drive around for wear leveling. I’ve seen that often! As the drive is too full.
Dan -
Thanks. I’m mainly worried about SSD lifetime. But what you say makes sense. I’ll try without a thermal pad for now.
lachmann -
Can i upgrade my MacBook Air 2015 13" from 512gb to 2tb with OWC Aura Pro X2 SSD? Does the firmware support the 2tb owc ssd? Will OWC 2.0TB ssd behave on sleep like Apple proprietary 512gb ssd?
There is nothing to stop you within MacOS, even still the MacBook Air is a more limited system between the CPU & RAM resources as well as it’s battery. I wouldn’t recommend doing this as I’m suspecting your workflows for so much data is likely to heavy for this system.
If your question could it be done, yes, just not wise.
Dan -
Does the SSD come with Mac OS installed? if not how does one install it?
The OS is not installed, you need to install it either via internet recovery or what I find is easier is to first create a bootable OS installer thumb drive. If you are planning on using a NVMe drive your system needs to be running High Sierra or newer as these drives need a updated driver to support APFS
Download the OS from here How to download macOS and follow this Create a bootable installer for macOS
Dan -
Hi hallo guten Tag
habe das alles versucht
Mit einem kurzen und langen Adapter und crucial P1 und auch crucial P3, werden aber nicht erkannt
Was mach ich falsch ?
Oder funktioniert nur ein bestimmter M.2 ?
Oder muss in der Firmware was upgedated werden ?
Auf dem Original M.2 läuft Monterey.
Viele Grüße
Andreas
First off you need to create a bootable USB thumb drive with the version of macOS your system supports (here Monterey Monterey is fine). Then with the SSD mounted internally, boot up under the thumb drive and then run the OS installer to format the SSD drive and install the OS. If that fails then the SSD or the adapter is bad.
Frankly, I really don't like using these adapters trying to force fit an M.2 SSD into Mac's. Yes, I get the why, as Apple couldn't stick with the M.2 standard which I agree was a mistake! The M.2 SSD's are mostly good its' the adapter interface and Apples additional control lines the adapter and M.2 SSD fail to interface with which kills us.
First off you need to create a bootable USB thumb drive with the version of macOS your system supports (here Monterey Monterey is fine). Then with the SSD mounted internally, boot up under the thumb drive and then run the OS installer to format the SSD drive and install the OS. If that fails then the SSD or the adapter is bad
Dan -
Zunächst müssen Sie einen bootfähigen USB-Stick mit der Version von macOS erstellen, die Ihr System unterstützt (hier ist Monterey Monterey in Ordnung). Starten Sie dann mit intern installierter SSD unter dem USB-Stick und führen Sie dann das Installationsprogramm des Betriebssystems aus, um das SSD-Laufwerk zu formatieren und das Betriebssystem zu installieren. Wenn das fehlschlägt, ist die SSD oder der Adapter defekt.
Ehrlich gesagt mag ich es wirklich nicht, diese Adapter zu verwenden, um eine M.2-SSD in Macs einzubauen. Ja, ich verstehe den Grund, da Apple sich nicht an den M.2-Standard halten konnte, was meiner Meinung nach ein Fehler war! Die M.2-SSDs sind meistens gut, da die Adapterschnittstelle und Apples zusätzliche Steuerleitungen der Adapter und die M.2-SSD nicht funktionieren, was uns umbringt.
Dan -
Pulling the fan cable out was terrifying but you actually just pull on the cable itself. No way to get any leverage at the connector to dislodge it. Did come out easily but like I said, scared me!
allison - Antwort
Draai de schroefjes voorzichtig los en leg ze op een stabiele plek neer en let erop dat de schroefje een verschillende lengte hebben.
bwgvanderveer - Antwort
I thought I could replace my 256 Gb SSD with 512? regards
ola m - Antwort
Do you have good Test Point Voltages? It appears there are silver colored Test points on the I/O Board. I am working on a water spill and trying to troubleshoot if both the I/O board and the Logic need replaced.
andrew - Antwort
It's probably not necessary but may be a little safer to completely discharge the old battery before replacing it.
Larry Smith - Antwort
tell a model that was not inferior to the speed of the one in the laptop.
Thank you
ilyabuhov - Antwort
Do i need to order tools separately to replace the battery i just ordered?
anne uhlir - Antwort
im looking for a Logic Board for a
Apple - MacBook Air® - 13.3" Display - Intel Core i5 - 8GB Memory - 128GB Flash Storage (Latest Model) - Silver Model: MQD32LL/A
Any help is appreciated.
Jamie Comstock - Antwort
P5 pentalobe screwdrivers are too big! The correct size for these screws are p4 pentalobe. P5 pentalobe was just able, with difficulty, to turn some of the screws. If the screws were at all tight, my p5 was unable to get them out, and started to strip the screws. A p4 screwdriver fit better and removed the screws with ease. (I was using high quality Wiha brand screwdrivers.)
William Skinner - Antwort
I had same experience (with MacBook Air 13-inch Mid-2012) … had to get P4, which worked swimmingly
eric -
Very simple installation. The screwdriver heads were exactly what we’re needed, one head for the outside case screws, the other for the screws holding the battery in place. The computer started right up. Now to see how the battery holds up, but I have a good feeling about this!
Dennis Eaton - Antwort
My P5 and the T5 worked perfectly with my early 2015 Air 13”! And it is super fast! Thank you iFixit!
Pennny Beach - Antwort
The supplied kit and instructions worked perfectly!
Nikolay Andreev - Antwort
Comments that the P5 pentalobe are too large are absolutely spot-on. There is no way the P5 pentalobe bit I have will work with the MacBook Air without destroying the screws. Hard target search for P4 pentalobe bit in progress…..
joemoog - Antwort
Bonjour j’aimerais changer mon SSD de 128 Go pour en mettre un de 512 Go. Je ne sais pas ce qu’il faut prendre car il faut qu’il soit compatible avec le macbook air A1466. J’aurais vu un Samsung Evo 970 500 Go mais si je ne me trompe pas, il faut un adaptateur.
Merci pour votre aide.
chicco33 - Antwort
oui, vous aurez besoin d’un adaptateur, pour completez le changement.
Dan -
The tool kit should include tweezers for re-inserting the battery connector.
Andre Clement - Antwort
P5 pentalobe worked perfectly for me. Instructions were spot-on. Antenna connections were a bit fiddly to refit but got them in ok.
michaelquinnell - Antwort
Maybe the problem some are experiencing is that the designations are confusing (blame Apple rather than iFixit). the P2 is also known as PL1. The P5 is also known as PL4. The P6 is also known as PL5. So it is possible to mistake the P6 (PL5) for the P5 (PL4), meaning it (P6-PL5) will be too big, while the P5 (PL4) will be just right. Sort of a 3 Bears explanation, but it is very confusing.
Thomas Lewis - Antwort
To add to this. In searching for the P5 screwdriver to buy in UK, as far as I can tell, it is also known as
Pentalobe 1.2(mm)
also
P4 = 0.8
P6 = 1.5
Just unscrewed the back case of MacBook Air 13” mid 2011, with no problems using Pentalobe 1.2
nijafe -
I have not replaced a display on the A1369 but have done many A1466 which is a newer 13” model. They seem really similar and its not clear why one needs to remove the logic board to remove the display. The antenna cables on the A1466 dont have to rest under the logic board but can be tucked in the hinge crevice. Cant this same thing be done with the A1369?
Sean Love - Antwort
Did mine today - but new battery wasnt charging. Went back in and noticed the battery connector cable was not quite 100% “seated. It was sticking out by less than a millimetre! - you need to give it quite a firm push in to get it seated properly. Otherwise - all ok .
John Brennand - Antwort
Just installed on a MacBookAir6,2 (13-inch, Early 2014).
Was very easy.
New iFixit battery looks great so far:
Jonathan Cross - Antwort
can you tell me which size of screwdrivers you’ve used to crack it up, please? I have the same model and size,
hawk_lpc -
Screw P5 Pentalobe 1.2
Mario Verlent - Antwort
Install went flawlessly. Only challange was reattaching blue tooth antennas. Those sockets are so tiny.
Joel Sebastian - Antwort
Installation was a little challenging at first because the instructions on this site did not perfectly match my model (late 2013 to early 2015).
Found this video on YouTube which described the procedure perfectly https://www.youtube.com/watch?v=Lue6lVWh...
Also the Ifixit kit I received was well put together with everything I needed and more. The calibration went perfectly and I am very pleased. Will buy again!!
Donald Niamath - Antwort
Gently pulled out connector of old battery, then pressed and held the power switch for 1 minute. Unscrewed and removed the old battery. Pressed and held power switch for 1 minute again. I know from previous work that this helps drain charge from spontaneous recharging as the dielectric recovers. Gently “fine tuned” leads from new battery to connector till connector stuck out at right angle to the edge of battery. Held the battery by the edges and let the connector slide into the socket. Set the battery down and put the screws in all the way. Then checked that the connector was completely seated before tightening the screws. The laptop come on immediately and showed 98% charge and registered normal (checked in “About this Mac”. Very happy to this point. Now for calibration.
Amir Zaidi - Antwort
Thank you very much for the guilde. My MBA2011 had reborn !
Billy Wong - Antwort
Allow for electrostatics, otherwise you may cook components on the logicboard /motherboard (like I did with one of these!)
See great advice: Electrostatic Discharge
Fletcher Cole - Antwort
… und wenn du eines von diesen wirklich kleinen Schräubchen vermisst: bevor du den Boden aufkehrst oder mit einem starken Magneten absuchst, schau mal am seitlichen (magnetischen) Ladekabelanschluss nach … ?
... and if you miss one of these really small screws: before you sweep the floor or search it with a strong magnet, take a look at the (magnetic) charging cable connection on the side … ?
Blatt - Antwort
Fot All People ha ing trouble finding their SSD
DONT PRESS CMD +R + POWER
instead press
OPTION+CMD+R +POWER
I just installed Monterrey with WD black sn 770 SSD in m'y macbook air 2015
Albert - Antwort
IFixit just had me submit "my story" re. fixing my MacBook Air 2013.
This repair was NOT difficult. The battery is enclosed in a plastic frame. It is NOT glued in like the newer models of Apple laptops. And unlike older laptops, the battery is not totally enclosed in a plastic housing. So once you remove the screws holding the batterie's frame, you can remove the battery.
Follow the instructions. Read the comments. Also read the comments re. installing a new battery.
Good luck. - Eric J.
ECJohansen - Antwort
On the back of the laptop, notice that each screw is angled a little bit inward, aiming toward the middle of the laptop. Keep your screwdriver lined up with the screw (angled a bit outward as seen at 01:23 in the video: https://youtu.be/tToAwO6f-SY&t=83). This will help you get a good bite on the screw to get it out and avoid stripping the head of the screw.
Use the same angle when putting each screw back in. If the screw is in line with its hole it should not feel like you are fighting to screw it in. If it does, check your angle and back up a little; you should feel the screw fall into line.
Rich Garella - Antwort
IFixit just had me submit "my story" re. fixing my MacBook Air 2013.
This repair was NOT difficult. The battery is enclosed in a plastic frame.
shrhh - Antwort
Is it possible to change an upper case with a german keyboard for an english one?
Rogerio Pefi - Antwort
if you are intending to change it to British layout you don't need to change the keyboard at all, just the keys, buy either a set of a1466 key caps ( I assume you have a 2017 MacBook Air?) or a cheap a1466 keyboard (can even be a broken one), remove the keys that are different and replace them with the other keycaps, and then set the macbook's language to British and you are set
Kai Mcpherson -