Einleitung
Diese Anleitung zeigt dir, wie du den Akku austauschen kannst. Ein normaler Akku hält bei täglichem Gebrauch 18 - 24 Monate, bevor seine Speicherfähigkeit nachlässt. Wenn dein Akku die Ladung nicht mehr hält oder sich dein Smartphone unerwartet ausschaltet, kannst du mit Hilfe der Anleitung dein Gerät wieder in Ordnung bringen.
Bevor du dein Gerät öffnest, musst du den Akku auf unter 25% entladen. Ein geladener Akku kann Feuer fangen und/oder explodieren, wenn er versehentlich perforiert oder beschädigt wird.
Wenn dein Akku aufgebläht ist, dann treffe entsprechende Vorsichtsmaßnahmen und erwärme dein Smartphone in diesem Fall nicht.. Falls nötig, kannst du mit einer Pipette oder einer Spritze etwas Isopropylalkohol (mehr als 90%ig) um die Kanten des Displays geben, um den Kleber zu schwächen. Aufgeblähte Akkus können sehr gefährlich sein, trage deshalb eine Schutzbrille und sei besonders vorsichtig. Wenn du unsicher bist, dann gehe lieber zu einem Fachmann.
Was du brauchst
-
-
Nimm ein SIM Auswurfwerkzeug oder eine Büroklammer und entferne den SIM Karteneinschub.
-
-
-
Bereite einen iOpener vor und erhitze die Vorderseite des Smartphones entlang der linken Kante für etwa 2 Minuten oder so lange, bis es zu heiß ist, um es anfassen zu können. Das hilft den Kleber des Displays zu lösen.
Heat not only along the phone’s left edge, right?
I used two suction cups on the screen. Just above the finger print reader and the other near the top. Then used my heatgun set at 390 degrees. Low speed and had the wide, flat blade attachment so the heat spread to a narrow/wide area. Heated the left edge from corner to corner, then pulled up on the suction cups until I could work in a plastic triangle guitar-like-pic under the screen. Continued to heat and add another pick around the screen . Do not rush and take your time. Got the screen off and didn’t damage the adhesive too bad. Was able to reuse it. Once reassembled, I heated the screen around the edge and rubbed with a plastic tool to make sure the adhesive was working. So far so good with the adhesive. Good Luck!
-
-
-
Betrachte das zweite und das dritte Bild und mache dich vertraut damit, wie breit die Klebestreifen um die Kanten des Displays sind.
2mm ONLY on the SIDES of the display. The top can have adhesive as far as 10mm from the edge, and at the bottom as much as 12mm. And there’s no way to cut this adhesive with the tools at 45 degrees. Once the left side is open, carefully insert the tool a little further at a time on the top and bottom, whilst attempting to keep a little pull force on the suction cup. Hard to do, and almost inevitably the on-off button will be hit at some point unless you’re really careful. The adhesive pieces are quite tough, and I used a tiny scissors to cut some of the adhesive “ropes” when the case was far enough open. A highly detailed photo of the adhesive locations top and bottom (and on both parts) would help here. This is likely the most difficult step (well, don’t know for certain, ‘cause I haven’t got further yet…), and warrants better photos and explanation IMO.
-
-
-
Setze einen Saugheber nahe der Mitte der linken Seite an.
-
Ziehe den Sauggeber mit fester und konstanter Kraft hoch, so dass ein kleiner Spalt zwischen dem Displaypanel und dem Rückgehäuse entsteht.
-
Wenn sich das Display selbst mit größerem Kraftaufwand nicht ablösen lässt, dann erwärme es nochmals und probieren erneut. Der Kleber kühlt schnell ab und muss häufig wieder erwärmt werden.
-
-
-
Schiebe das Werkzeug an der linken Kante des Smartphones entlang und trenne so den Kleber des Displays auf.
-
-
-
Schiebe das Plektrum nach unten und trenne den Kleber am unteren Rand des Displays auf.
-
-
-
Fahre mit dem Auftrennen des Klebers an der oberen und rechten Seite des Smartphones fort.
Pues se me fastidia la pantalla al hacer esto
This is a great guide except for one thing. My screen works fine but it is separating from the phone on both sides. I need to remove it just enough to clean up the old adhesive and reattach. The instructions on repeating the steps in reverse order to replace the screen doesn't help with getting the regluing right, what kind of glue or double sided tape to use, etc …
-
-
-
-
Wenn der Kleber komplett getrennt ist, dann hebe das Display vorsichtig von der linken Seite her an.
-
Stütze die Displayeinheit im 90° Winkel gegen eine Schachtel, so dass die Kabel vom Display und vom Fingerabdrucksensor nicht verbogen oder zerrissen werden können.
-
-
-
Entferne den gelben Aufkleber, welcher zwei der schwarzen Kreuzschlitzschrauben unterhalb des Ohrhörers bedeckt.
Attention must be paid not to lose the small rubber gasket around the proximity sensor - I found it best to collect it with all the screws of the midframe and reinstall it at the end during re-assembly.
-
-
-
Entferne folgende Kreuzschlitzschrauben vom Mittelrahmen:
-
Sechzehn schwarze 3,8 mm Schrauben
-
Drei silberfarbene 2,4 mm Schrauben
Esa placa se levanta por el otro lado, por donde estan los botones de volumen por ahi se puede levantar de una mejor manera.
-
-
-
Setze das flache Ende des Spudgers zwischen Mittelrahmen und der linken Seitenkante des Smartphones ein. Heble vorsichtig nach oben, damit sich die beiden Rasten lösen, welche den Mittelrahmen festhalten.
-
-
-
Hebe den Mittelrahmen hoch und entferne ihn vom Smartphone.
-
-
-
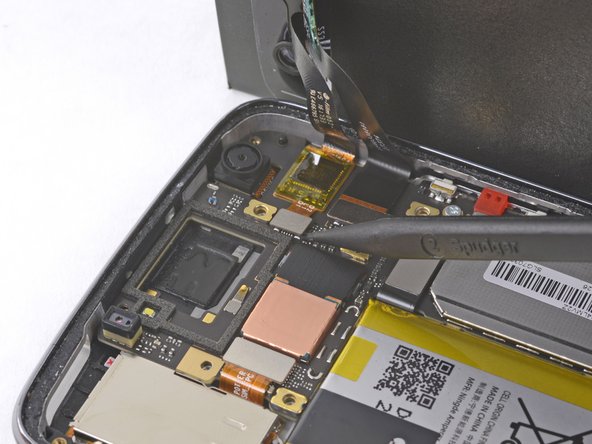
Löse den kleineren Displaykabelstecker.
-
Fahre vorsichtig fort, das Kabel hochzuheben, damit sich die Klebeverbindung löst. Ziehe das Kabel von der Hauptplatine weg.
-
-
-
Löse das Kabel zum Fingerabdrucksensor am gegenüberliegenden Ende des Smartphones ab.
-
-
-
Entferne die Displayeinheit vom Smartphone.
If your digitizer appears to be "dead", power down the phone (which you can't because the digitizer is dead) and disconnect the battery connector by prying the connector up out of its socket (with something NONE conductive like your spudge tool) for few seconds. (It does not "slide" out, but pries straight up.) This will FORCE a cold boot and initialize the digitizer WITHOUT a factory reset, preserving all setups and all your files. :-)
-
-
-
Heble den Akkustecker mit der Spudgerspitze senkrecht zur Hauptplatine nach oben und trenne so den Akku ab.
-
-
-
Löse die schwarze Zuglasche oben am Akku ab und ziehe sie kräftig und gleichmäßig heraus, so dass die Klebeverbindung, welche den Akku befestigt, gelöst wird.
You don't even need to remove the battery! You can just leave it glued in and pop out the motherboard from around it.
-
-
-
Wenn die Zuglasche abgerissen ist oder die Klebeverbindung zu stark ist, dann heble den Akku vorsichtig mit einem Plektrum aus dem Gehäuse.
In my case the battery was very securely attached to the case. The only way I managed to get it out was by inserting one of the picks pointy-edge in on the same side where the pull tab is located. Even then, I bent the battery slightly and fully agree with the suggestion of not reusing it.
-
-
-
Wenn der Akku frei ist, dann entferne ihn vom Gerät.
-
Entferne alle Klebstoffreste vom Smartphone. Reinige den gesamten Bereich unter dem Akku mit Isopropylalkohol.
-
Bringe ein paar neue Streifen vorgestanztes Klebeband oder Tesaband an.
-
Drücke den neuen Akku 5 - 10 Sekunden lang fest.
It would be nice to have some instructions on how to use the adhesive sticker. I finally just kluged it on, then saw there was a double part to the blue shield, with part of the adhesive cut so that it can go behind the ribbon cables.
Hi Robert,
Thanks for the suggestion! I’ll add some more instructions on how to apply the battery adhesive.
Why won't anyone show a back door removal? Yes it's difficult, but you won't damage the display and other components between you and the battery. I did this procedure and I damaged the display, and when it was all put back together the proximity and fingerprint sensors didn't work, and the phone has a big bulge in it where before there was none. Yes it was operator error (me), but I'm not retarded and I had the proper tools. It could save much frustration and money if someone would show a back door removal for battery replacement on these phones (moto g5 plus, moto g6, moto g7). Thanks!
That’s an interesting idea! I’m not certain if the you can get in from the back panel, as it is attached to the frame and seemingly screwed in from underneath the display. But, I may be wrong!
Hmm, no mention of:
1. take the (black on mine) battery-removal/grab-able tape section off the old battery and install it on the new one in the appropriate place. Otherwise gonna be much harder to remove the battery next time. Too late for me.
2. what to do about the little foam-tape sections around the top and bottom of the phone between the screen and the interior cover plate. I’m just gonna leave ‘em in place, as I can’t see how you could effectively mimic the original factory stuff with the tesa tape.
3. how to install the perimeter seal. I saw on a you-tube that you should cut the “cable” side of the perimeter strip off of the rest of the sheet and to install that piece (must align very carefully with tape guides) before attempting to install the screen and its cables.
OK, correction on the perimeter seal; here’s how it should be done (don’t cut anything; ignore my comment item 3. above):
1. The perimeter seal is a sandwich of 4 layers, the translucent white release sheet, the adhesive layer (black), a removable release layer (turquoise) that matches almost exactly the shape and configuration of the adhesive layer, and then the positioning sheet (also turquoise). 2. BEFORE the internal frame/cover/whatever-it-is to be installed, BEFORE the screen ribbon cables are installed, the perimeter seal must be installed.
3. Remove the translucent white release sheet. VERY carefully align the entire rest of the sandwich over the open rear frame ledge (with battery already installed). Notice that where the frame ledge is a bit fatter at the upper corner, so is the seal width. The entire positioning sheet can fit just inside the edges of the rear frame when it is positioned properly. Start at the bottom and fit it very lightly into position (too hard—>it will be stuck). cont.
continued from above:
4. when the whole thing is fit properly into place, you can remove the entire positioning sheet—just peel it up. Note that it’s a bit tricky at the top where the rear camera and light protrude. But there is a tab in this area in the positioning sheet to pull up the positioning sheet and better allow for fitting the seal into place along the top.
5. At this point the seal should be properly positioned around the entire perimeter. Note that there is still the final release part of the sandwich still on top. Woo-hoo! You can now press that down with a tool so the seal is well-attached to the rear frame. Leave this in place until you’re ready to install the screen permanently.
6. When you’re ready to install the screen, THEN remove this final release and carefully fit the screen into position. And, yes, I’ve left out a LOT of steps between item 5. and 6. in this list. Those things are more straightforward and are just reversing what you did to disassemble. You’re welcome.
-


Um dein Gerät wieder zusammenzusetzen, folge den Schritten in umgekehrter Reihenfolge.
Nach Abschluss dieser Anleitung sollte der neu eingebaute Akku kalibriert werden.
Entsorge deinen Elektroabfall fachgerecht.
Die Reparatur hat nicht den gewünschten Erfolg gebracht? Dann schaue mal in unser Antwortforum, da kannst du Hilfe finden.
Rückgängig: Ich habe diese Anleitung nicht absolviert.
45 weitere Nutzer:innen haben diese Anleitung absolviert.
Besonderer Dank geht an diese Übersetzer:innen:
100%

Diese Übersetzer:innen helfen uns, die Welt zu reparieren! Wie kann ich mithelfen?
Hier starten ›

19 Kommentare
I agree with Andy. Tutorial is perfectly explained, but construction design obviously is to avoid buyers change without risk of damage in comparison like other phones like Moto G 2nd version or Nexus 4 which are not piece of cake however is not to difficult. I hate that mind of developers trying to fix on design “battery for life of device”. That is the issue. Almost the problem is the battery. No matter how much well it is, continue being the critical lifetime part. Must need replaceable for users.
I personally wish phone makers would stop doing this crud, the battery is the least of the worries and should be easily replaceable, likely folks will want to upgrade to a new phone before battery is “dead” and more likely you will have to buy a new screen because of how fragile they make these things especially the new fad of ALL GLASS design >:(…wish moto would not advertise any water proof of any sort, just had my moto G4 Play die because of a small bit of water getting on the screen, now have to buy a brand new one, there goes over $400 down the drain….got so mad I beat the crud out of it smashed it right to bits when it refused to power on at all after drying out in dry rice for a few days, but at least it had an easy to remove battery with nowhere to buy a $20 battery for less then $90 (ship and tax)
The article is great, but I wouldn’t go through such torture. And the cost to have a repair shop do it might be 40% of the price of a new phone. I agree with Andy and Zacarias. This practice of non-replaceable batteries, claiming that this design is “waterproof” and makes the phone slimmer, is all just a racket. I kept my Samsung S3 with replaceable battery for four years, and only gave it up because it couldn’t take the Android updates anymore. Now only LG sells phones with replaceable batteries, but the LG phone I tried was a piece of junk. It looks like I’ll just have to replace my Moto phone every two years now. That’s unfair.
Totally agree to comments by Claude. Real Water sealing is not being achieved by making batteries non replaceable. Now nano coating technology is there to make circuits water repellent. So water sealing is no longer an excuse for manufacturers. Hard to replace battery is just planned obsolescence.
Rineez -
Ok. It was stressful, but thanks to author and Moto G5 Plus Replacement Battery Kit I managed to get my phone back to full power again. One small note: Step 11 show flat side of spudger, but it was too tight to fit spudger there. I end up using iFixit Opening tool and opening picks. Except of that - everything was quite clear. Still scary as heck to cut the glue around the screen, but clear and reassuring that everything is gonna be ok :)
my phone is motto g5s plus, there is any significant difference from the one from the guide motto g5 plus ?
Emil, the battery replacement procedure for the G5s Plus is similar, but slightly different! You can find the guide for that repair here: Moto G5s Plus Battery Replacement
Brilliant write up. Thank you.
Where can I get the adhesive to reattach the screen? I’d like to get a pre-cut sheet that’s the right shape instead of fiddling with super thin tape.
You can find replacement display adhesive here: Moto G5 Plus Display Adhesive. Definitely easier than fiddling around with Tesa tape!
Had two issues with the repair: With opening I found myself picking in between the backlight and the LCD instead of behind the LCD and the midframe Now I have a few dust particles between there.
And concerning the midframe: Wow that is fit in thight! I found it easier to open it by picking from the plastic at the right side at both the top and the bottom of the phone.
For the second half of removing the battery I found it easier to drip a bit of alcohol on the end of a spudger and then pick between the battery and the frame.
Great instruction for the G5 s Plus. Took about 1 1/2 hours but easy to do.
Thank you for the magnetic bits.
I used the same glass glue, just put the heating pad on to soften and bingo..
Calibrated the battery as instructed..
Thank you!
Frank Haas 1-7-2020
Some instructions on replacing the adhesive would have been nice, but I got it done anyway.
Thank you for this guide. This revived my Moto!
The process is easier than it looks at first glance.
moderate difficulty? not at all. I repair phones for a living this is a difficult repair
I bought this kit because I had an excellent experience replacing a HDD on an older iMac with iFixit support a few years ago. Unfortunately, I underestimated the skill necessary to accomplish this battery replacement. Specifically, I could not get any edge of the ‘guitar picks’ between the display and the body of the phone as shown in the photographs. I cannot understand how that could work. They seemed too thick. I resorted to a razor blade and playing cards and ended up destroying the display thereby rendering the phone unresponsive to input. For anyone contemplating this operation, here are my thoughts: if you do not have prior experience opening phones, I would avoid attempting to do this unless you are prepared to buy another phone. If I knew then what I know now, I would have shopped for a good power pack to recharge my phone away from home and kept that up until the the short life span of the battery necessitated buying a new phone.
If you are just a little bit skilled or working with hands it should not be hard to do this, just be patient.
one thing:
on last step when you put new battery in be super careful where you put cable from new battery, it can be CUT of with that small metal near it. Just put it as it is on image (old battery) and it should be fine.
anyway, my 6 years old phone is like new :)
thank you