Einleitung
Follow this guide to remove or replace the battery on your Motorola Moto G7 Power.
Before you begin, download the Rescue and Smart Assistant app to backup your device and diagnose whether your problem is software or hardware related.
Some images may have visual discrepancies, such as the SIM card tray being removed from the phone. You don’t need to remove the SIM card tray for this procedure.
You’ll need some double-sided tape (such as Tesa tape) in order to adhere some components.
Was du brauchst
-
-
Apply a heated iOpener or a heat gun to the bottom edge of the screen for approximately two minutes to help soften the adhesive.
-
-
-
Apply a suction cup to the rear cover, as close to the heated edge as possible.
-
Pull up on the suction cup with strong, steady force to create a gap.
-
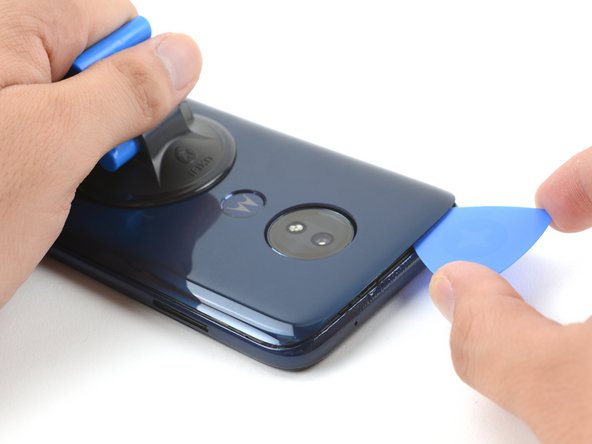
Insert an opening pick into the gap you created under the rear cover.
-
-
-
Slide the pick along the bottom of the gap to slice through the adhesive securing the rear cover to the midframe.
-
-
-
Slide the pick along the gap on the same side of the phone as the SIM card tray to slice through the adhesive securing the rear cover to the midframe.
-
-
-
Slide the pick along the gap at the top of the phone to slice through the adhesive securing the rear cover to the midframe.
-
-
-
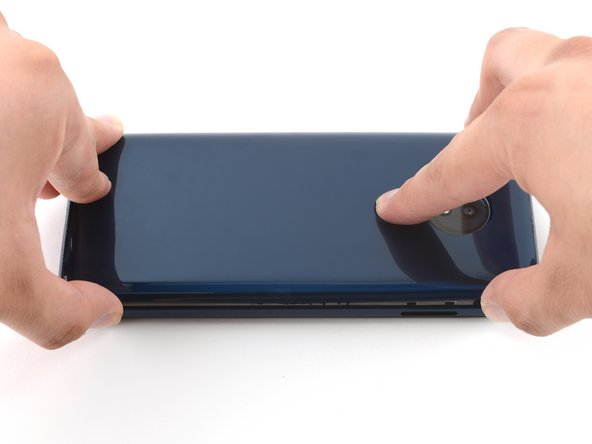
Slightly lift up the rear cover starting from the right side.
-
This will prevent damage to the fingerprint sensor connector under the left side of the rear cover.
-
Use a finger to press down on the fingerprint sensor until it separates from the rear cover.
-
-
-
-
Remove the rear cover, taking care not to damage the fingerprint sensor.
-
-
-
Insert the pointed end of a spudger into the divot at the top of the fingerprint sensor connector cover.
-
Gently pry the cover open.
-
Remove the cover.
-
-
-
Use the pointed end of a spudger to pry up on the fingerprint sensor connector to disconnect it.
-
-
-
Use a T5 Torx screwdriver to remove the ten screws securing the motherboard cover to the midframe:
-
Nine 3.5 mm screws
-
One 3.0 mm screw
-
-
-
Insert the flat end of a spudger under the motherboard cover.
-
Pry the motherboard cover upwards to lift it from the motherboard.
-
Remove the motherboard cover.
-
-
-
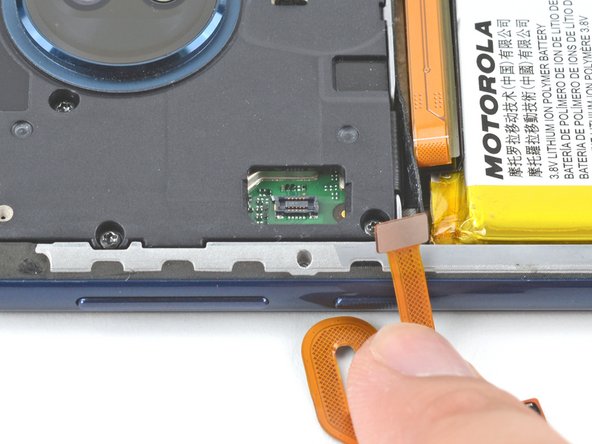
Use the flat end of a spudger to pry up on the battery connector to disconnect it.
-
-
-
Apply 2-3 drops of high concentration (over 90%) isopropyl alcohol under each corner of the battery and allow it to penetrate for several minutes to help weaken the adhesive.
-
-
-
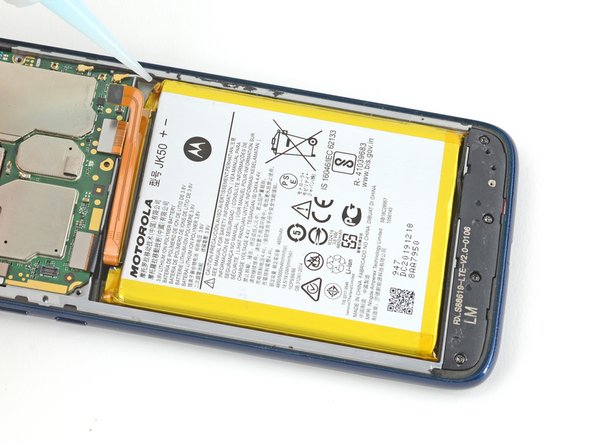
Insert an opening pick into the small gap between the battery and its compartment.
-
Remove the opening pick and insert it into the small gap on the other side of the battery. This will jiggle the battery around in its compartment, further weakening the adhesive under the battery.
-
Repeat the process until you can easily insert the pick into both gaps.
-
-
-
Insert a pick into the gap to the left of the battery and slide its tip underneath the battery.
-
Slide the pick along the left side of the battery to slice through the adhesive securing it to the midframe.
-
Once the left side of the battery begins to separate from the midframe, leave an opening pick in the gap to keep the battery slightly raised.
-
Apply four to five drops of isopropyl alcohol directly to the adhesive securing the battery to the midframe.
-
-
-
Repeat the previous step until you've sliced through most of the adhesive.
-
-
-
Remove the battery from the midframe.
-
Remove any remaining adhesive from the phone, and clean the entire area under the battery with isopropyl alcohol.
-
Apply a few new strips of pre-cut adhesive or Tesa tape.
-
Press the new battery firmly into place for 5-10 seconds.
-


To reassemble your device, follow these instructions in reverse order.
For optimal performance, calibrate your newly installed battery after completing this guide.
Take your e-waste to an R2 or e-Stewards certified recycler.
Repair didn’t go as planned? Try some basic troubleshooting, or ask our Motorola Moto G7 Power Answers community for help.
Compare your new replacement part to the original part—you may need to transfer remaining components or remove adhesive backings from the new part before you install it.
Rückgängig: Ich habe diese Anleitung nicht absolviert.
11 weitere Personen haben diese Anleitung absolviert.

5 Kommentare
If your battery is bulging, and the phone case has already begun to separate, and there's already a gap in the case big enough to fit an opening tool inside, then you can proceed to open the case from there with just a plastic opening tool. You won't need to use any heat or suction devices.
Could I change the connector under the battery, on the phone case,? It's those black strips that you can see in Step 18. I think I damaged them when I removed the battery
You'd need replacement cables as those connect to the daughterboard.
My battery died on this phone but I don't want to replace it, just want to use the phone with usb power. Any ideas how to do it ? I think there's a temp sensor in the battery that blocks the phone if it's not there and you can boot without it... but not sure.
Thanks, and great site !
Excellent instructions. I am 68 with severe tremors and arthritis which posed some problems for sure. However I was able to follow these instructions and easily change the battery. I did have the advantage of the battery swelling so bad it blew the back cover off and broke my armor case so that disassembly step was already completed!!