Einleitung
Folge dieser Anleitung, um den Akku aus dem OnePlus 5 auszubauen und zu ersetzen. Der schwierigste Teil ist das Lösen der Rasten am Rahmen. Wenn du das geschafft hast, kommen die restlichen Teile leicht heraus.
Wenn dein Akku aufgebläht ist, triff entsprechende Vorsichtsmaßnahmen.
Entlade deinen Akku zur Sicherheit auf unter 25%, bevor du dein Smartphone auseinanderbaust. Das verringert das Risiko eines Feuers oder einer Explosion, falls der Akku während der Reparatur aus Versehen beschädigt wird.
Was du brauchst
-
-
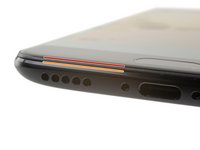
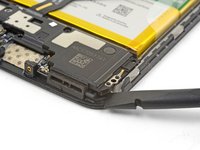
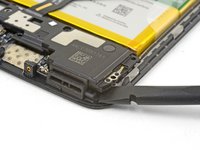
Setze ein SIM-Auswurfwerkzeug, Bit oder eine aufgebogene Büroklammer in das kleine Loch unter dem SIM-Einschub nahe bei den Rückkameras an der Kante des Smartphones ein.
-
Drücke fest drauf, bis der SIM-Einschub herauskommt.
-
-
-
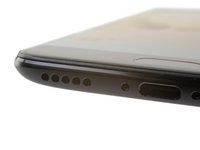
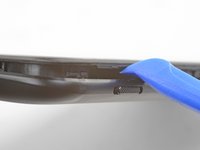
Entferne die beiden 2,6 mm Torx T2 Schrauben, mit denen der USB-C Anschluss an der Unterkante des Smartphones befestigt ist.
What are the reference of the screws ? They are missing in the one I bought !
Hi Yôken,
They help hold the back cover on. Most of the time, the clips are enough to hold the phone together.
Just FYI, for whatever reason my brand new OnePlus 5 had 0,8 mm stars screws instead of T2 Torx.
Definitely T2 for me. Do watch out during assembly. I have a feeling that it’s easy to strip these.
T2 for me too. It was missing in my kit and iFixit sent it later when I asked them about it.
-
-
-
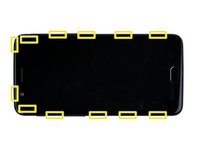
Displaynaht: Diese Naht gehört zur Displayeinheit. Heble nicht an dieser Naht, sonst trennst du die Displayeinheit auf und beschädigst sie.
-
Rahmennaht: Das ist die Naht zwischen Kunstoffrahmen und Rückgehäuse. Heble nur an dieser Naht.
-
Der Rahmen ist mit zwölf Rasten am Rückgehäuse befestigt. Du musst die Stellen, wo sie sich befinden, beim Abhebeln in den folgenden Schritten genau kennen.
-
-
-
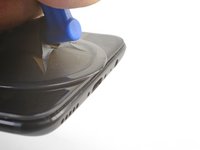
Setze einen Saugheber nahe am unteren Rand auf das Displays.
-
Ziehe gleichmäßig und kräftig am Saugheber.
-
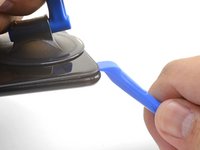
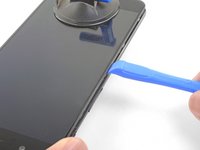
Drücke die Kante eines Plastiköffnungswerkzeugs nahe am Saugheber in die Rahmennaht hinein, bis sie sich zwischen den Kunstoffrahmen und dem Rand der Rückabdeckung hineinzwängt.
I found the suction cup to be more of a hindrance and kept hitting the power button, making it necessary to stop and turn the phone off again. I watched a youtube video where the person didn't use a suction cup at all and decided to try that. I also found that a guitar pick type spudger worked far better than the one shown in the picture. If you're having trouble getting it started, I suggest trying those two things.
-
-
-
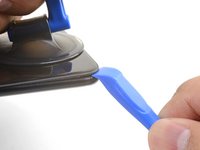
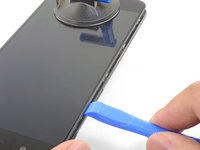
Wenn das Plastiköffnungswerkzeug drinnen ist, dann schiebe es behutsam an der Unterkante des Smartphones entlang.
-
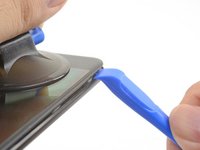
Führe das Werkzeug vorsichtig um die linke Ecke des Smartphones herum, wobei es in der Naht drin bleiben muss.
This was extremely difficult & took a lot of force. I needed a thin flat metal spudger and wrecked a couple of plastic ones in the process. I left a few scratches along the join in the process. It would be easier if I had something to hold the phone, in my hand I kept turning it on by accident.
what was the metal spudger did you use? I am having trouble as well. I cannot seem to pry the back cover and it feels like it is shut tightly, there are no crevices I can pry into. What was your strategy may I ask?
At first, I slightly opened the body with a plastic tool, but it was not enough to actually open the back cover. Then I used a thin metal screwdriver for this. It was difficult but nothing special. Just be sure that you are opening the correct seam between the body and the screen and don’t make sudden moves. I bent nothing, everything came back in place when reassembled.
ivan -
Same as David here: the plastic opening tools/guitar picks were doing nothing (not even creating the first "crack") . In the end I managed to open it using Jimmy (the metal knife/spudger), but not without scratching the whole metal cover.
-
-
-
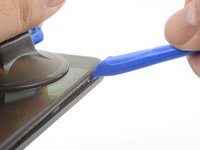
Lasse das Werkzeug an der langen Kante entlang gleiten, wobei du die Rasten öffnest.
If you have difficulties with the last clip on the upper left. Try to go round the other side (right side), beginning at the bottom. This worked very well for me after having some difficulties with the clip near the front camera.
This helped me a lot as well. Couldn't get the upper left clip, but after going all the way around to the top right as well (keeping left clips released of course), it was pretty easy. Thanks, Sebastian!
-
-
-
-
Wenn die Unterkante und die linke Kante des Smartphones frei sind, dann kannst du die Rasten an der Oberkante und rechten Kante mit wackelnden Bewegungen befreien.
-
Richte die Oberkante des Rahmens an der Rückabdeckung aus und achte darauf, dass die oberen Rasten richtig hineingeglitten sind.
-
Drücke fest auf die langen Kanten des Smartphones, bis die restlichen Rasten einschnappen.
Reinstalling the back cover stumped me for a second… If you’re struggling with aligning the top edge of the frame, remember that the camera is going to look off/pointed a bit too low until you actually clip the frame back in.
Really stupid but it was the only thing that tripped me up in this guide.
-
-
-
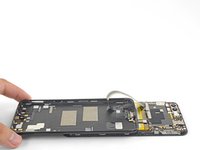
Wenn alle Rasten gelöst sind, dann drehe das Smartphone herum, so dass das Display nach unten zeigt.
-
Klappe die Rückabdeckung auf und lege sie auf den geöffneten Rahmen.
-
-
-
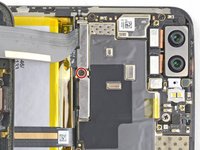
Entferne die 2,6 mm Kreuzschlitzschraube, mit denen die Kabelhalterung über dem Akku befestigt ist.
-
Hebe die Kabelhalterung hoch und entferne sie.
-
-
-
Heble das Flachbandkabel der Rückabdeckung mit der Spudgerspitze hoch und trenne es von seinem Anschluss ab.
If the flex cable pins are damaged, the flex cable can be replaced.
If the connecter pins (on the motherboard) are damaged, you might need to do microsoldering (or contact a microsoldering company) to replace the damaged connector.
Brendan -
-
-
-
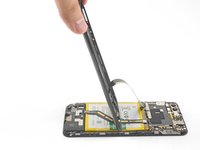
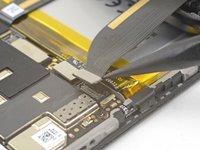
Heble den Akkustecker mit der Spudgerspitze hoch und löse ihn aus seinem Anschluss heraus.
-
-
-
Entferne die sechs 2,6 mm Kreuzschlitzschrauben, mit denen der Lautsprecher am Rahmen befestigt ist.
-
-
-
Setze den Spudger mit seinem flachen Ende in der Ecke der Lautsprechereinheit ein und heble leicht hoch, bis sich der Lautsprecher aus seiner Vertiefung löst.
-
-
-
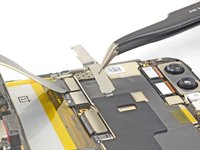
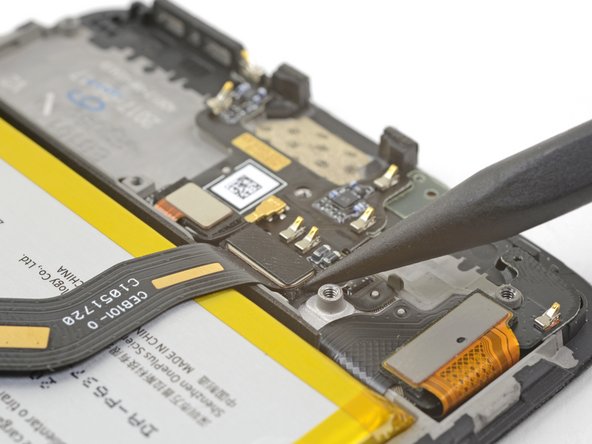
Heble das Zwischenverbindungskabel mit der Spudgerspitze hoch und löse es aus seinem Anschluss heraus.
This step is used in multiple guides, and not all of them require the cable to be bent away. You can just leave it sitting there, disconnected.
This image seems to show the daughterboard removed but there is no corresponding previous step. I see no way to remove the interconnect flex cable without removing the daughterboard. Possibly the volume switch can be removed with the cable still connected but I'm not confident enough to try this so will remove the daughterboard.
David,
Thanks for bringing this up. That's indeed a procedural error! I've added the missing steps in the affected guides.
-
-
-
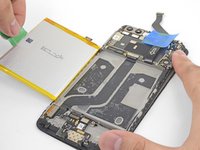
Stütze das Smartphone am Tisch ab.
-
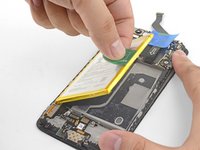
Ziehe gleichmäßig und fest die grüne Zuglasche nach oben, bis der Akku aus seiner Vertiefung herauskommt.
-
Klappe den Akku ganz aus seiner Vertiefung heraus und ziehe ihn von seiner Klebefolie ab.
-


Um dein Gerät wieder zusammenzubauen, folge den Anweisungen in umgekehrter Reihenfolge.
Für eine optimale Leistung sollte der neu eingebaute Akku kalibriert werden: Lade ihn auf 100% auf und lasse das Pixel mindestens zwei weitere Stunden am Ladegerät. Benutze dann dein OnePlus 5, bis es sich aufgrund eines leeren Akkus von alleine ausschaltet. Lade es dann ununterbrochen auf 100%.
Bitte entsorge deinen Elektroschrott bei einem professionellem Abfallentsorgungsunternehmen.
Deine Reparatur klappte nicht, wie geplant? Auf unserem OnePlus 5 Antwortenforum findest du Hilfe bei der Fehlersuche.
Rückgängig: Ich habe diese Anleitung nicht absolviert.
95 weitere Personen haben diese Anleitung absolviert.
Besonderer Dank geht an diese Übersetzer:innen:
100%

Diese Übersetzer:innen helfen uns, die Welt zu reparieren! Wie kann ich mithelfen?
Hier starten ›


29 Kommentare zur Anleitung
Thanks a lot for your contribution! It worked perfectly.
I follow the instructions but it said the battery is too slow
Charge the battery for at least a few hours. If the battery does not charge, double-check all connectors, especially the interconnect cable. Does the phone react to a charging cable? If not, something may be broken between the USB port and the motherboard.
It honestly took an hour to get the back cover off, and then another hour to take the rest apart and put it back together. But this guide was useful.
Thanks so much for this guide. Worked out great!
Followed the guide and worked perfectly. Thank you!
Thank a lot, pretty easy.
Thanks a lot for these instructions. It took me about 20min. to undertake the full process.
Finally changed my battery after more than couple months of buying. My phone had started getting stuck in bootloop and after rebooting twice it would go blank with a light blue LED. I thought no way this is a battery issue. Guess I was wrong.
Opening the display part looked scary and I kept putting it off. Definitely takes a substantial amount of force to pry it open from the bottom, specially the bottom left corner for me. Make sure you read the whole thing first and Don’t go trying to open from top if the bottom feels tight.
Took me an hour tops. Thanks a lot!
After putting it back together I wondered what to do with the screw I had left over. Had to go through the process of opening it back up to find somewhere for it to go!
Great help, thanks for the instructions.
Battery was slightly thicker than the available space. This is causing the screen to be pushed out from its frame a bit when put back together. otherwise everything worked as described.
I also had a battery that was 0.5mm thicker. the screen was bent and the glass on the sides was detaching from the display, I had to replace the old battery. do you know where to find the exact measurements of the battery?
After first charge of new battery, it seems that the battery will only charge to 85%. What should I do. It has been 2+ hrs that it is stuck at 85%, and (if I understand correctly) this is a critical step for battery conditioning.
Just try to unplug then plug the phone to the charger again :)
Brendan -
Great guide. Mind you, the cover is REALLY, REALLY hard to get off. I broke a few plastic tools, tried it with a metal one but made a tiny crack on the screen under the home button, so don’t do that. You can also expect some blood, as I damaged my skin a few times trying to get it open ;) Once this was done it was quite easy, though some screws don’t come out very easily. Oh, and I had some cheap tools which wore out, so I had to find better ones. I’m currently attempting to calibrate the battery, and I’ll see how it goes. I also changes the charging port while I was there, which is even simpler than the battery. So if you’re changing the battery, change the port also, it’s really cheap and it does make a change.
Thanks for the guide.. only ended up taking me about 30 mins but I already have some experience with phone repairs. This guide was bang on!
Worked perfectly! Managed to get through the whole thing in half an hour. Thank you :)
Everything worked great! Full battery install complete! :D I'd say the only thing I was confusing was receiving the adhesive for the OP5 battery replacement. You don't really need the adhesive to do the install since the factory adhesive seems to do the trick just fine. That's maybe the only thing I'd explain more (how to use the adhesive's given, or not).
Thank you!
I replaced my battery! It worked! Thanks author!
The screws either side of the charging port are not T2 - they are T1. This is an unusual size and should be emphasised.
It would be useful to know what size Phillips screwdriver is needed for internal screws. I assume that the mentioned 2.6mm refers to the screw length. This does not help.
I ordered the battery and had to remove a piece of the tap as the cabel was bent way way way to far to be plugged in so i had to rebend it IM NOT A FAN OF BENDING THOSE FLAT CABELS! I took fotos of it was thinking i got send the wrong battery... Made me really !#^&@@ off rebended the cabel amd pluged it in... Pls check next time that the connect is in the right spot be fore sending out a battery
Did it! The screen suction handle did not work. I kind of pressed it very very hard, but after that it did not apply enough suction force. So I just used the Jimmy tool, which scraped the edge of cover from black to metallic a bit until I understood that it has to be not horizontal but pointing kind of down, then it worked and I could get in the blue plastic opening tools to pry the bottom side outwards.
Also reassembly had to be made first on the power button side, then top, after that it went well.
Muchísimas gracias por compartir vuestro conocimiento. Con esta guía la sustitución resultó extrañamente sencilla a la par de que resulta entretenido el reparar las cosas por ti mismo. Espero darle una buena segunda vida a mi móvil :) Thanks so much!!!
I had a lot of trouble getting the first two screws off, and I figured out they were dirty lmao. The torx bit wasn't fitting right because it's so small and a little bit of grime was enough to keep it from fitting right. Other than that, what everyone else already said here. Those clips suck ass, but the guide really helped! Repair successful!
Besides getting the phone open, which was very hard, the repair is quite manageable and quick. Loving the new battery so far. Thank you for the guide!
Had to use T1 instead of T2 for the first two screws, think it might be all the accumulated grime and dust. The guide itself was very helpful and I managed to change the battery within 30 minutes even with those stupid clips giving me a hard time.
And because I read it in the comments above: I used a PH000 (1.5) screwdriver inside.
Regading the battery itself, I had to rebend the cable a bit and adjust the tape on the battery, because the position of the connector was off by about 3mm.