Einleitung
Benutze diese Anleitung, um bei deinem iPhone 5s, 5c oder SE die Akku-Klebestreifen korrekt zu befestigen.
Jedesmal, wenn du den Akku entfernt, musst du neue Akkuklebestreifen anbringen. Diese Streifen werden leicht beschädigt, wenn du sie nicht korrekt festklebst. Es empfiehlt sich, einen Satz Ersatzstreifen bereit zu halten, wenn du diese Anleitung zum ersten Mal durchführst.
Bevor du anfängst, musst du den Akku mit Hilfe einer der weiter unten verlinkten Anleitungen entfernen. Beachte: das iPhone 5 und frühere Modelle haben keine Akku Klebestreifen.
Wenn du den Akku bei einem anderen iPhone Modell austauschen willst, dann benutze eine der folgenden Anleitungen:
Was du brauchst
-
-
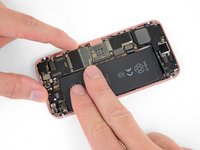
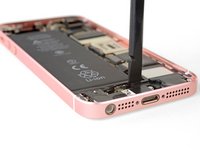
Bevor du neue Klebestreifen anbringst, solltest du zuerst den neuen Akku testweise anschließen und prüfen, ob er gut sitzt.
-
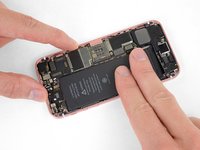
Wenn alles gut aussieht, dann trenne den Akku wieder ab und entferne ihn.
-
-
-
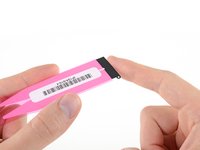
Ziehe die große blaue Schutzfolie aus Plastik ab und entferne sie komplett von den Klebestreifen.
-
Wenn dir das passiert und du hast die Ersatzstreifen von iFixit, dann frage bei uns nach, und wir schicken dir einen Satz neuer Streifen.
-
In der Zwischenzeit kannst du den Akku deines iPhones behelfsweise mit doppelseitigem Klebeband befestigen.
Be cautious: On some adhesive strip packages (I didn’t buy my at iFixit) they have mixed the colours! Be sure to peel off the largest piece of plastic.
I wish I had read your comment first; this happened to me too with another company’s adhesive strips and my tab ended up back-to-front. I know now for next time what to look for when orienting the strips and their tab (black surface of the tabs facing upward when laying the strips in to the case).
-
-
-
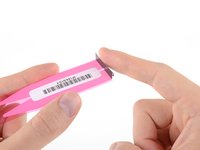
Halte die Klebeseite nach unten und falte die schwarze Lasche um 90° nach oben.
-
-
-
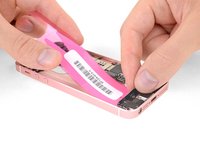
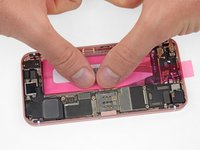
Richte die Klebestreifen mit der Klebeseite nach unten sorgfältig im Rückgehäuse deines iPhones aus.
-
Setze die Klebestreifen in das Rückgehäuse ein und klebe sie fest.
Should have mentioned to leave a 1/16” gap at bottom so there's room to fold adhesive removal tab back down, mine so tight no room to fold back ,Hope it goes back together again !
Use a piece of cardboard paper behind the black tab, to give you some room.
Fold the adhesive removal black tab before sticking the adhesive,, to give it the shape, and be better prepare for step 10.
-
-
-
-
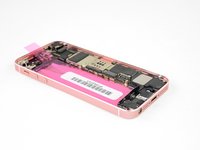
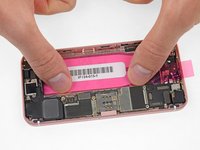
Drücke die Klebestreifen in das Rückgehäuse, damit sie gut festkleben. Beginne in der Mitte und arbeite dich nach außen zu den Enden hin.
-
-
-
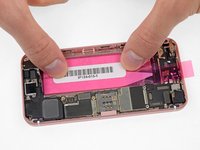
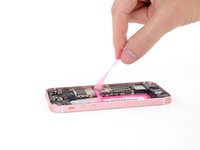
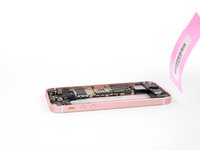
Ziehe den großen rosafarbenen Schutzstreifen ab und entferne ihn ganz.
I propose to fold the black tab in the middle downward, as desribed in step 10, already now, before removing the pink film and inserting the battery. For the next steps, press the so folded tab towards the speaker. I used a plastic card for this (old credit card cut to the correct width). Remove the pink film using the other hand, then insert the battery. This is much easier than squeezing it into the narrow gap after the battery has been mounted. I die some photos, but I don't know whether I can opload them.
-
-
-
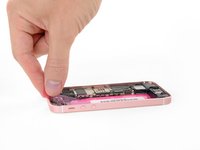
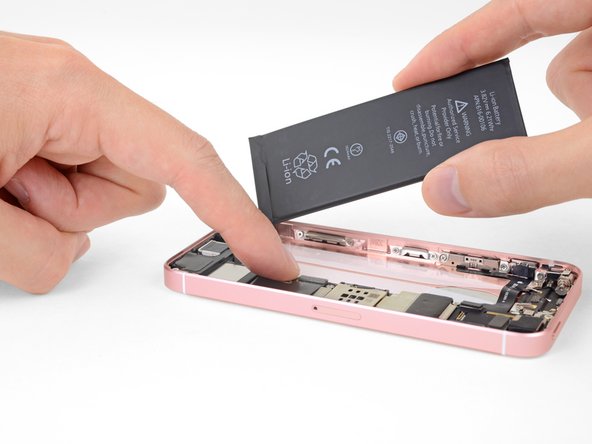
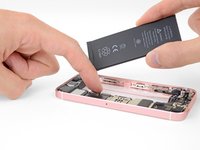
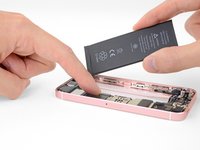
Drücke den Akku noch nicht zum Ankleben nach unten, aber setze den Akkustecker auf seinen Anschluss auf dem Logic Board.
-
Schließe den Akku an.
I connected the battery before removing the pink strip; removing the strip was easy with battery connected and the chance of touching adhesive while fiddling with the connector was reduced.
-
-
-
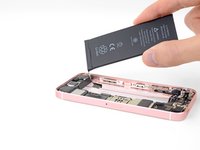
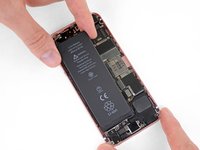
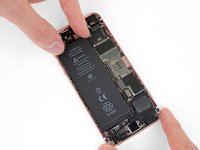
Positioniere den Akku sorgfältig und setze ihn in das iPhone ein.
Be sure to set the battery closely towards to top of the phone to leave space to fold the black tap of the adhesive tape at the bottom.
***** ALERT This is a non obvious failure point. If the battery is too close to the right (lower) end in picture, you can’t fold the black Tab down which is two steps further down. This should be in the main instruction, not as a note. Mine is too close to the home button connector socket, I will try folding the black tab over battery. Report to follow
Thank you both for your comments; I’ve added your tips to the instructions. That said, when photographing this guide, I installed the battery pretty much bang up against the speaker, and was still able to fold the tab down—it just took a little patience. So, don’t anybody panic if you installed your battery a little too far down! You can still complete the repair.
Report on previous ALERT comment…I successfully completed the battery installation and closed up the phone with the black tab lying over the battery rather than tucked down and into the space between the end of the battery and the other components. The case closed up ok, and the end screws went in successfully ( I had to squeeze the case closed to get the screws at the end to line up with the holes on the little tabs inside.
-
-
In diesem Schritt verwendetes Werkzeug:Tweezers$4.99
-
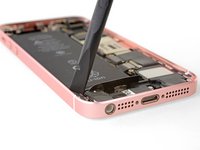
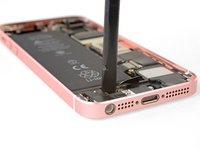
Benutze das flache Ende des Spudgers oder eine stumpfe Pinzette, um die schwarze Lasche nach unten zu falten. Verstaue sie zwischen der unteren Kante des Akkus und der Reihe von Komponenten an der Unterkante des iPhones.
This is literally impossible. My battery pack had to be all the way down and the plug piece was still too high and I could barely connect it. There’s no room for the tab to go.
Attatch the adhesive strips to the battery first, putting the black tabs over the front edge and sticking them down then peel the backing off-that's the Top done. Then fold the strips under the battery and allow the strips to adhere underneath on the back of the battery. Remove the backing from the strips underneath that are stuck to the bottom of the phone , plug in new Battery and carefully seat the battery down on to the rear phone case. Be careful, you will only get ONE go at this per set of strips. It is always worth an extra Buck for 2 sets of strips in case you make a mistake.
-
-
-
Trenne den Akku wieder ab, bevor du dein iPhone wieder zusammenbaust.
No fault of the author(good job credit coming your way), but my adhesive strips were a bear to install. My tabs were two separate as opposed to one long tab. Of course, I messed them up by letting one of the aforementioned tabs touch the adhesive strip. I had to use some double sided tape to finish the install. At least my iPhone 5S is working!
Geschafft aber man braucht sehr viel Fingerspitzengefühl,insbesondere beim Aufstecken der Kontakte !
Danke für die Hilfe !
You may want to rephrase step 11. If I disconnect the battery before reassembly, I'm pretty sure the phone won't work.
-


Kehre wieder zu der Anleitung zurück, die dir beim Ausbau des Akkus geholfen hat und folge dort den Schritten in umgekehrter Reihenfolge, um dein iPhone wieder zusammenzubauen.
Entsorge deinen alten Akku fachgerecht.
Kehre wieder zu der Anleitung zurück, die dir beim Ausbau des Akkus geholfen hat und folge dort den Schritten in umgekehrter Reihenfolge, um dein iPhone wieder zusammenzubauen.
Entsorge deinen alten Akku fachgerecht.
Rückgängig: Ich habe diese Anleitung nicht absolviert.
241 weitere Personen haben diese Anleitung absolviert.
Besonderer Dank geht an diese Übersetzer:innen:
100%

Diese Übersetzer:innen helfen uns, die Welt zu reparieren! Wie kann ich mithelfen?
Hier starten ›


4 Kommentare
Maybe, but the adhesive strips are designed to be very strong and very thin, and reasonably heat-resistant. This keeps the battery secure even if you shake the phone (or take it jogging), and it won’t come loose if the phone gets hot. The thin profile also means the battery has room to expand slightly without contacting or putting pressure on the display. Considering how cheap the strips are vs. the cost of the expensive phone you are repairing, I tend to err in favor of putting it back together the way it’s designed. But, your phone, your choice!
All worked well except removing one of the adhesive strips. I used a “Bed Buddy” microwavable heat pack to warm the phone as directed and it worked fine. So far I’m pleased. Now comes the re-assembly challenge.
Use this iFixit video guide for applying the adhesive instead IMO—many people will tell you to apply it to the battery itself instead of the bottom of the case:
https://www.youtube.com/watch?v=Xthi6DOx...
At least you have options now. :)
Non-Sticky Run Through
Critical to Success is doing a non-sticky run through of these steps. I realized:
1) Need to remove the screen. I was going to attempt the battery replacement without removing the screen, but after running throught these steps, it was clear I needed the freedom of movement. You only get one shot.
2) Shape of the connector cable at the socket was more shallow on the new battery. The connector cable has a shape like a flag and flag pole. The original had a ‘V’ shape between flag pole & flag. The new battery had an ‘L’ shape. Using the spluger and a plastic card, I carefully reshaped the connector cable. I was not too picky about matching the shape; Seems like this cable could break. I made just enough shape to route the cable off the socket level, down to the back of the phone where it rejoins the flag pole— If you can imagine it.
3) Step 7 and 8. In my infinite wisdom, I was going to do steps 7 & 8 differently. Thankfully, I paid attention to these steps. You only get one shot.
xtian - Antwort