Einleitung
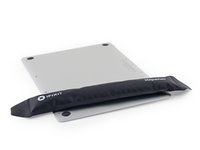
Apple beschreibt sein neues Retina MacBook als "die Zukunft des Notebooks." Sein nagelneues Design hat uns sehr gespannt gemacht. Der Aluminumduft in der Luft und und das Geräusch sich aufdrehender Schrauben, die dann ihre Geheimnisse preisgeben, das alles kann nur eines bedeuten: der Teardown hat angefangen. Begleite uns beim Entreißen der Geheimnisse des Retina MacBooks 2015.
Möchtest du dabei sein, wenn wir weitere Reparaturgeschichten enthüllen? Folge uns auf Instagram, Twitter und Facebook!
Was du brauchst
Einführungsvideo
-
-
Seit der Ankündigung am 9. März waren wir total begierig darauf, das neue MacBook in die Hand nehmen zu können. Bevor wir dieses schöne Gerät zerlegen, werfen wir erst mal einen Blick auf die technischen Daten:
-
12", 2304-x-1440 Pixel (~226 ppi) IPS "Retina" Display
-
1,1 GHz oder 1,2 GHz dual-Core Intel Core M Prozessor (auch mit 1,3 GHz Prozessor erhältlich)
-
8 GB 1600 MHz LPDDR3 Arbeitsspeicher
-
256 GB oder 512 GB Flashspeicher
-
Intel HD Graphics 5300
-
Ein einzelner USB-C Anschluss
-
-
-
Wir applaudieren Apple erst mal zur Annahme des neuen USB-C Standards. Allerdings können die alten Netzadapter nicht an den neuen Geräten benutzt werden. Der Magsafe und der Thunderbolt Anschluss haben ausgedient. Das neue MacBook verwendet USB -C, um sie alle zu knechten.
-
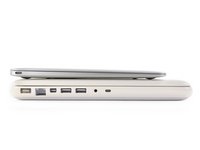
Zum Vergleich :
-
10-Watt iPad USB Adapter (links)
-
29-Watt USB-C Netzadapter vom MacBook (in der Mitte )
-
60-Watt MacBook Air Magsafe 2 (rechts)
-
Die Benutzer werden hoffentlich von diesem Standard profitieren und nicht allzu oft über die Kabel stolpern.
Can we heap some scorn on Apple for not also including/designing in a 1A USB Type A connector on this charger block? An additional 5W wouldn't have made the guts substantially bigger, if at all. Coupled with the ridiculously short Type-C cable that they ship it with, if a road warrior wants to charge their MacBook and iPhone "on the go", they're SOL. And since the Type-C cable is so short, the charger block is likely to be ON your desk, not under it; the exact same place you'd expect an iPhone charging block. Not seeing fit to put both functions in one block speaks multitudes to me about Apple's design philosophy towards its users: greedy contempt. They are, in effect, saying "We know you're going to have to buy another, 3rd party block. Haha."
@ScooterComputer,
The one thing most folks are missing about this laptop - it is designed to be used on your lap! No cables, no cords, no restrictions on movement, the battery lasts all day. You use it like an iPhone or an iPad, carry it around, move it, take it here, take it there. You plug it in to charge at the end of the day.
You do not leave it on a desk. Get an iMac or MacBook Pro if you want to leave it on your desk plugged in. "Think different."
Did "think different" magically become "defend whatever apple shoves down our throats" ?
Cmon, sometimes they make stupid choices, and the reality here is that in their ecosystem those choices are forced onto their consumers because there is no "other makers" it's either use the device apple makes or move on.
That being the case then this is a bad decision. Because it creates a situation that doesn't benefit their userbase in any way. It creates a situation of dissatisfaction with their products. They are basically forcing you to buy dongles for ports that cost ridiculous amounts of money when designing in even just a usb 3 port would have cost them pennies.
I want to be able to charge the stupid thing along with my iPhone without having to carry around two power bricks. Is that so much to ask? With older MacBook models I could plug in my MacBook and plug my phone into that and they'd both charge. What is the point of having an ultra portable if you're forced to carry around a 5lb gear bag to hump all the rest of the necess-ories??
Scott -
What an apple fan-boi comment. Just because you can sit it on your lap doesn’t mean that you won’t *ALSO* put it on your desk for part of the day. It never fails to amaze me how some people identify themselves so strongly with the brans they buy that they have to be unofficial spokesman and apologist. Sad.
ndolam -
-
-
-
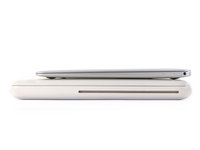
Das neue MacBook misst an der dicksten Stelle 1,32 cm und damit weniger als halb so viel wie sein Urahn aus dem Jahr 2009.
-
Bei einer Dicke von 2,74 cm lassen die 2,27 kg des Polycarbonatgehäuses des 2009er MacBook die 0,92 kg unseres Retina MacBooks wie einen Zwerg aussehen.
-
Apple hat wahrscheinlich eine ganze Menge Gewicht durch das Entfernen der Anschlüsse eingespart. 2009 hatten wir einen MagSafe, ethernet, Mini DisplayPort, 2x USB, Audio und einen security slot.
-
Denkt auch dran, euch auch von eurem optischen Laufwerk zu verabschieden, aber dieser Zug ist längst abgefahren.
-
-
-
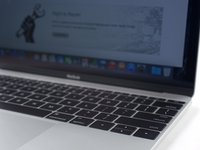
Das sind aber ziemlich kurze Tasten. Apples neu entwickelteTastatur ist aus dem Kokon geschlüpft, versehen mit der neuen Butterfly Mechanik. Wir wollen mal sehen, ob diese Tastatur doppelt so hoch geht, wie der herkömmliche Scherenschaltermechanismus.
-
Wir richten unser Augenmerk auf das Retina Display, von Apple beschrieben als das dünnste, energieeffizienteste Retina Display, das es je in einem Mac gab. Die Pixel selbst sind flächiger ausgebreitet, so dass sie mehr Licht aussenden können. Das spart bei gleicher Helligkeit Energie.
I was searching for the reference in this, what do they even mean by twice as high?
The keyboard has a "butterfly mechanism". The "twice as high" line is a reference to the Reading Rainbow theme song, which has the lyrics "Butterfly in the sky/I can go twice as high". The link is to Jimmy Fallon as Jim Morrison in The Doors, doing a parody cover of the referenced theme song.
-
-
-
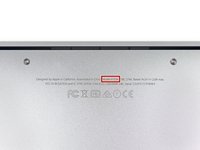
Wir nehmen kurz Notiz von der neuen Modellnummer —A1534 —bevor wir weitermachen.
-
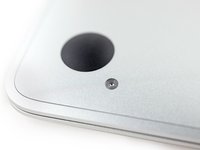
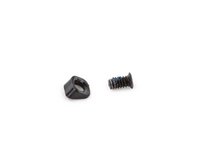
Kann ja sein, dass das die Zukunft bei Laptops ist, aber Apple hält immer noch an seinen manipulationssicheren Pentalobe Schrauben für das neue MacBook fest. Seufz.
-
-
-
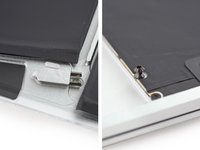
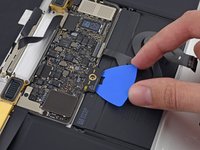
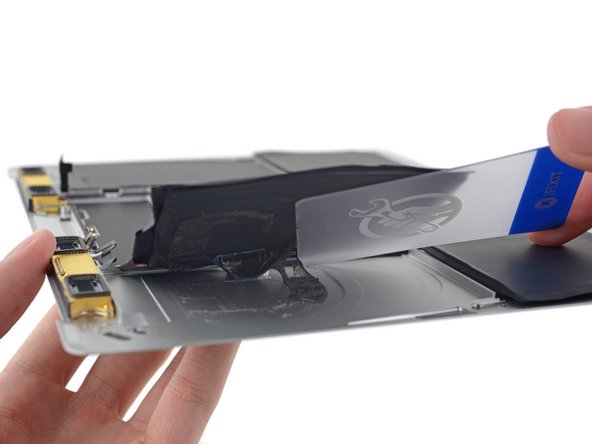
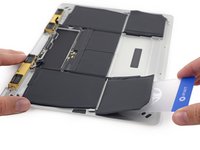
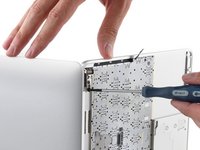
Es ist an der Zeit dieses langweilige, popelige Gehäuseunterteil aus Aluminium abzulösen, um an die wirklich wichtigen Sachen zu kommen —
-
Was sind das für neue Sachen? Kabel? Ein Akku und das Logic Board am Gehäuseunterteil?
-
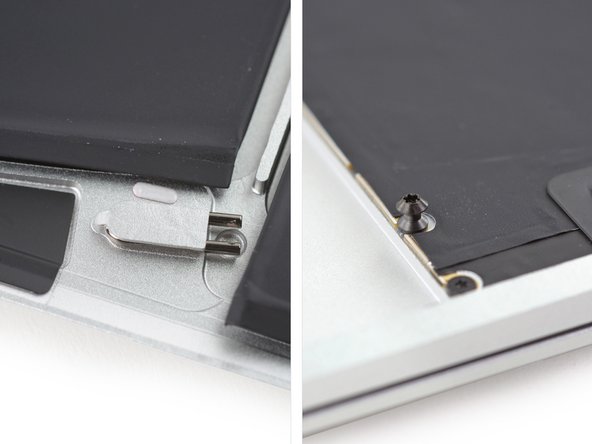
Das Standardverfahren mit Aufhebeln am Scharnier funktioniert noch, dann werden aber die Kabel stramm angepannt. Dann musst du das Gehäuse wieder etwas zurück und nach vorne klappen, um an die Stecker zu gelangen und das Gehäuse zu öffnen.
-
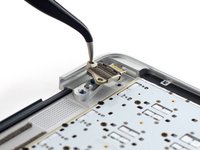
Was ist das? Ein iPhone der mittleren Generation?
-
Die Standard Plastikclips von früher wurden durch futuristische Stifte und ungewöhnliche Federklammern ersetzt.
-
-
-
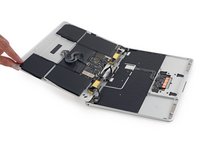
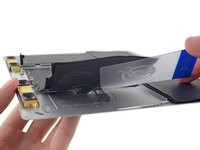
In Erinnerung an das Macbook Pro 13" Retina vom März 2015, ist dieses MacBook mit dem schicken Force Touch Tackpad ausgestattet. Wir lösen das Trackpad/Tastaturkabel, um ein bisschen mehr Spielraum zu erhalten.
-
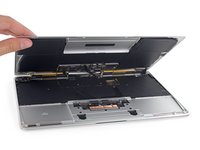
Nachdem wir das federnde Trackpad/Tastaturkabel gelöst haben, können wir die ganze Enchilada flach auf dem Tisch ausbreiten. Jetzt können wir das Feld sichten und sehen, was diesmal auf uns zukommt.
-
-
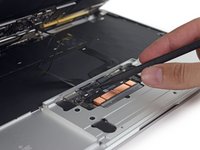
In diesem Schritt verwendetes Werkzeug:Battery Blocker$3.99
-
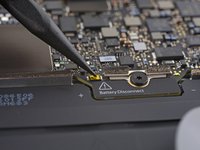
Warte, das ist doch ein Notebook, oder? Wo ist der Akkustecker?
-
Etwas ratlos spielen wir mit diesem kleinen gelben Knopf. Boop.
-
Wir haben sowas schon gesehen — im iPad. Apple versteckt den Akkustecker gerne unter dem Logic Board. Das ist das erste Mal, dass wir das an einem Laptop sehen, es wird also Zeit für...
-
Unser neu entwickelter Batterie Blocker hat sich als die trickreiche Hilfe erwiesen, die wir brauchen, um den Saft von den Federkontakten des Logic Boards fernzuhalten.
Did you guys ever find out what the button is for on the battery connection tab for the PCB?
Yeah, it’s explained in the repair guide—just a way to power everything down for servicing without physically disconnecting the battery.
IMPORTANT: If you don’t press the yellow button before removing the trackpad cable on new models, it will KILL your Mac. This I’m reading from fellow contributors. Please tell me, I have not destroyed two MacBooks this way.
-
-
In diesem Schritt verwendetes Werkzeug:Flexible Extension$6.99
-
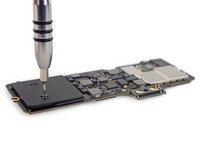
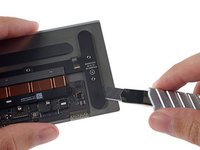
Beim Bestreben mit dem Großen Kabellösewettbewerb von 2015 zu beginnen, finden wir eine Tri-wing Schraube!
-
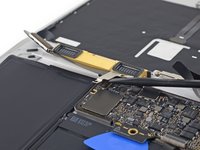
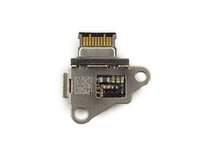
Zum Schluss lösen wir das 3-in-1 Display/Lade/I/O-Anschlusskabel, welches zum einsamen USB-C Anschluss verläuft.
-
Schon spaßig, es gibt drei Funktionen, aber nur einen einzigen Anschluss und keine I/O Platine.
-
-
-
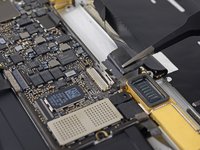
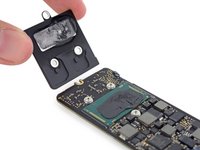
Wir haben vermutet, dass am dünnsten Retina Display aller Zeiten noch mehr Änderungen wären — aber das ist ein merkwürdiger Displaystecker!
-
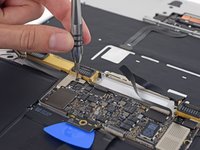
Wir zupfen den "Audioplatinen"stecker, mit dem die Kopfhörerbuchse und das Doppelmikrofon verbunden sind, mit der Pinzette ab.
-
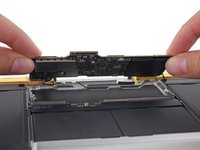
Endlich können beide Hälften frei segeln. Jetzt ist das Logic Board dran!
-
-
-
-
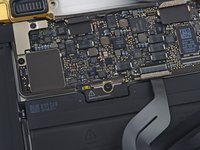
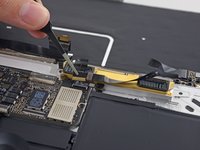
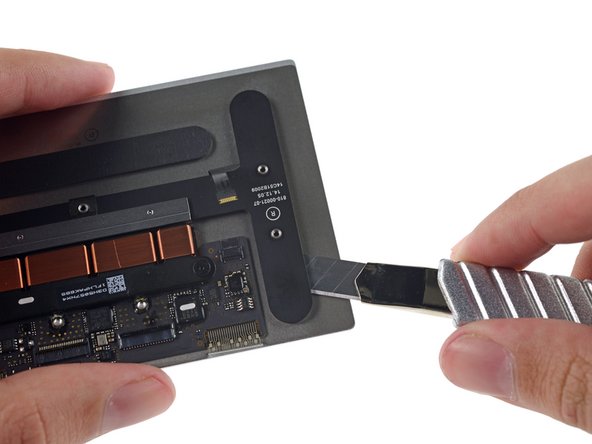
Wir holen das wunderbare Logic Board aus seinem Aluminiumnest heraus.
-
Der Einsatz von Intel Core M Prozessoren erlaubt Apple einen kleineren Formfaktor und lustige kleine Kühlkörperabdeckungen.
-
Der Kühlkörper ist hübsch so konstruiert, dass er vielfachen Kontakt mit dem Logic Board hat — er kann vielleicht sogar die Rückseite des Logic Boards ein wenig kühl halten.
Would you please measure the logic board? I'd like to know how small it actually is.
It's about 4.5" x 1.5", not including the battery contact protrusion.
I have a base model 1.1/256GB. Seems exporting 1080p video in iMovie generates the most heat. Mine hovered between 84-87C thru the 12 minute process with a high them reading of 88.20 Cooling was immediate after export was complete. Down to 54C within 10 seconds. Intel lists the high gem for the 5Y31 at 95C
Seems to be significant thickness of paste between the heat sink and the CPU.
Apple is going down, I better buy a few second hand 2012 model for the future, when mine will give up, no way I'm buying an no upgradable computer! I might have to think seriously to try to make a hackintosh also!
-
-
-
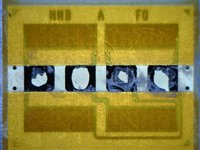
Jetzt legen wir die Chips aufs Tablett! Schauen wir mal, was das Logic Board anzubieten hat:
-
Elpida/Micron FB164A1MA-GD-F 8 GB LPDDR3 Mobile RAM
-
Toshiba TH58TFT0DFKLAVF NB2953 128 GB MLC NAND Flashspeicher (+ 128 GB auf der anderen Seite, also insgesamt 256 GB)
-
NXP 11U37 Microkontroller; 128 kB Flash, 10kB SRAM
-
SMSC 1704-2 Temperatursensor
-
Texas Instruments SN650811 (wahrscheinlich ein Leistungswandler, verwandt mit dem SN6501)
That can't be SLC but MLC or TLC, right? Also, where is the %#*@ SSD controller?
SSD is scolded into logicboard. It's immovable. SSD controller is on the rear part.
I wonder how one would extract/recover data from a retina MacBook 2015 with a dead logic board (you know s..t happen)? On MacBook Pros/previous gen MacBooks you could simply remove the SSD and place it to another Mac or external enclosure (not to mention the older models with the usual SATA interface).
It's OK if you backup your data regularly (most users don't hence the data recovery business is flourishing) what will you do if there is no backup? Sure sometimes logic boards can be repaired, but sometimes even L. Rossmann can't fix them...
I need to restore my mail back from SSD drives. My logic board is dead. Is there a way I can do it. I am willing to remove SSD from the dead logic board. Any ideas on how I may do this.
I need to replace Texas Instruments SN650811. I tried buying it online on their web, but they don’t sell the part. Any replacement or ideas on how to get it fixed?
-
-
-
Während wir die logical Melodie summen, nehmen wir die Rückseite des Logic Boards in Augenschein:
-
Intel SR23G Core M-5Y31 CPU (Dual-Core, 1,1 GHz, Turbo Boost bis zu 2,4 GHz) mit Intel HD Graphics 5300
-
SK Hynix H9TKNNN4GDMRRR-NGM 4 Gb (512 MB) LPDDR2-SDRAM
-
Toshiba TH58TFT0DFKLAVF 128 GB MLC NAND Flash
-
Elpida/Micron J4216EFBG-GNL-F DDR3 SDRAM
-
Broadcom BCM15700A2, scheint ein Chipset für die Drahtlosverbindung zu sein
-
Murata 339S0250 (Vermutlich eine Fortschreibung des 339S02541 Wi-Fi Moduls aus dem iPad Air 2)
-
Texas Instruments/Stellaris LM4FS1EH SMC Controller (Ersatzcodename für den TM4EA231)
The Toshiba 128GB NAND Flash is not SLC. It is 128GB MLC NAND Flash. As the information Apple announced on the web site, MacBook uses PCIe-based SSD. There should be an PCIe-based NAND Flash controller. And, as the teardown result you did, there is an additional memory chip, SK Hynix H9TKNNN4GDMRRR-NGM. Can you recheck the chip? Is there a chip under SK Hynix H9TKNNN4GDMRRR-NGM? I guessed the PCIe-based NAND Flash controller is under SK Hynix H9TKNNN4GDMRRR-NGM which is PoP package.
Should SK Hynix H9TKNNN4GDMRRR-NGM be LPDDR2?
It would be interesting, if the components on the whole board are something new, or can be found in similar configuration in other models on the market.
There are voices saying, that the hardware is highly overpriced. It would like to have objective comparisons or analyses, not emotion and religion-driven affects of the Apple haters and on the other hand of the fan boys.
Is anybody here with real expertise?
Yes. It is something new. Mostly, PoP package is used on SmartPhone and Tablet. Apple should be the first one to use PoP package on the SSD controller.
JJ Wu -
where is the Graphic ic ?
-
-
-
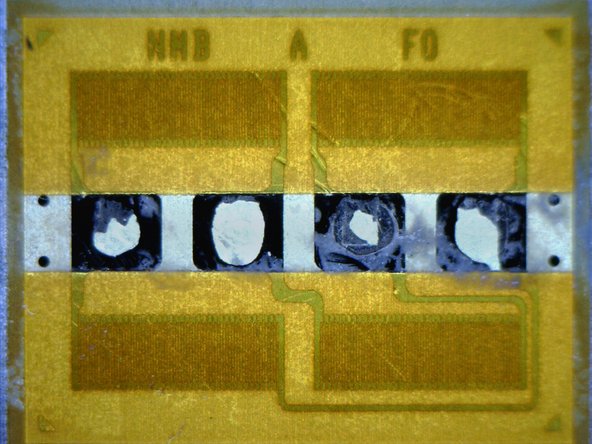
2011 übernahm Apple Anobit, eine israelische Entwicklerfirma für Kontroller von Flashspeichern.
-
Vier Jahre später sieht es so aus, als ob sich das ausgezahlt hätte — Ergebnissen von Anandtech zufolge sieht die SSD des MacBooks im Systemprofil etwas ungewöhnlich aus. Wir nahmen also unser Heißluftgebläse und hielten es auf das SK Hynix SDRAM, um zu sehen, was darunter versteckt ist.
-
Dort wo wir etwas von Samsung oder Toshiba erwartet hätten, fanden wir einen markenlosen Chip mit einer Teilenummer 338S00055, die sehr nach Apple aussah.
Is it possible to remove the whole logic board and try to use As an external hard drive?
-
-
-
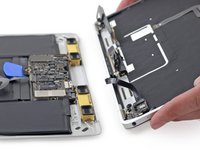
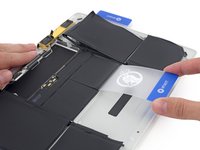
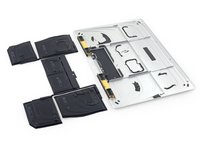
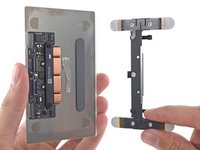
Es war einfach zu viel zu erhoffen, dass der Akku nur mit ein paar Schrauben befestigt wäre, im Stil vom MacBook Air. Jetzt ist es an der Zeit die Hitze und die Karten loszulassen.
-
Wir hatten gehofft, dass dies den Platz für ein paar Schrauben geschaffen hätte, oder einige dieser famosen kleinen Clips vom Gehäuse. Anscheinend doch nicht!
-
Ein iOpener auf einem unteren Gehäuse? Sieht verrückt aus...
-
Schaben, abziehen, schaben, abziehen. Guck dir diesen hässlichen Kleber an.
-
-
-
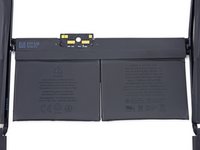
Ohweh! Sogar die mittlere Zelle des Akkus ist festgeklebt - und wir hatten gehofft, dass die verklebten Zellen aus dem neuen 13" MacBook Pro kein Trend wären...
-
Um die Sache noch komplizierter zu machen: der Akku sitzt in einer Vertiefung. Die einzige Stelle, von der aus man sicher hebeln kann, ist der Aluminiumrand.
-
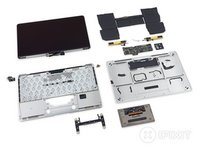
Na gut, endlich ist er draußen — in all seiner vielfach aufgeteilten Pracht.
-
-
-
Um dieses schlanke Gadget mit Energie zu versorgen, hat Apple diesen formschlüssigen 7,55 V, 39,71 Wh und 5263 mAh Akku produziert.
-
Den Daten nach zu urteilen ist dies grade um Haaresbreite mehr als das, was du vom diesjährigen, vergleichsweise pummeligen 5100 mAh MacBook Air 11" erhältst — obwohl Apple die gleiche Akkulaufzeit mit bis zu neun Stunden Surfen im Netz oder zehn Stunden Videoabspielen verspricht.
-
-
-
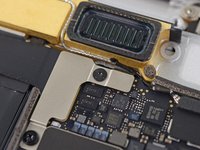
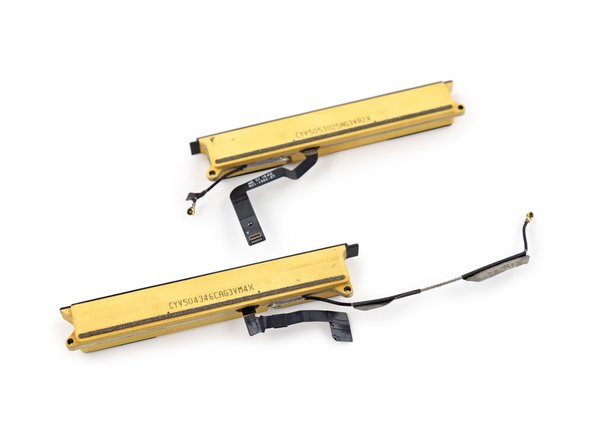
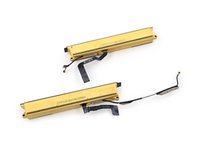
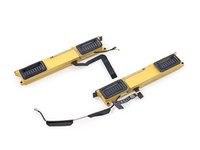
Wir sind auf Gold gestoßen! ...Oder vielleicht nur auf eine dielektrische Beschichtung des Aluminiums.
-
Die
SchatztruheAntennen befinden sich in Kanälen eingebaut in jeder Lautsprechereinheit..
-
-
-
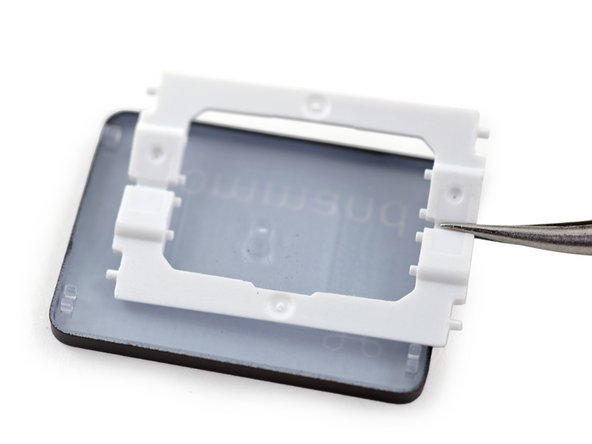
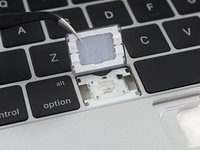
Das Trackpad war das Stadtgespräch, jetzt haben wir es endlich erreicht. Wie erwartet sieht das Force Touch Trackpad wie eine schlankere und zierlichere Version im Vergleich zu dem vom 13" MacBook Pro aus.
-
Nachdem wir die Halteklammer weggeschnitten haben, erhielten wir eine freie Sicht auf die Taptic Engeine.
-
-
-
Nur vier Dehnungsmessstreifen? Ungewöhnlich... Zeit etwas herumzuschnüffeln
-
Ahah! Ein merkwürdiger gummiartiger Kleber hält ein Kabel über der zweiten Hälfte jedes Paars von Dehnungsmessstreifen fest.
-
So wie wir vorher schon in Apples Force Touch herausgefunden haben, spüren die Dehnungsmessstreifen den Druck von deinem Finger, ohne sich richtig zu bewegen.
I'm sure the new strain gauge trackpads are more durable than the old diving board trackpads (which had a tiny dome switch + fragile plastic/rubber nub making up the physical button, mine failed there), but the strain gauges DO wear out, don't they?
Is it likely to be something that people who press hard will see failing at some point during the Macbooks lifetime?
-
-
-
Nachdem die Halterung der Dehnungsstreifen entfernt ist, können wir uns die Chips anschauen, die dieses neumodische Trackpad antreiben:
-
Broadcom BCM5976 Touchscreen Kontroller
-
STMicroelectronics 32F103 ARM Cortex-M basierter Microkontroller
-
Linear Technology LT3954 LED Konverter mit internem PWM Generator
-
-
-
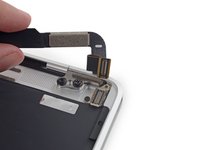
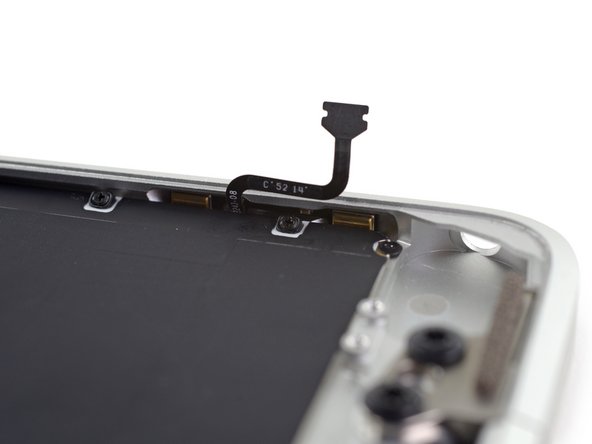
Eine weitere Tri-Wing muss raus und dann zeigt sich, dass das USB-C Kabel ein Zwischenverbindungskabel ist.
-
Und der arme Anschluss wird vom Displayscharnier gefangen gehalten! Wie grob.
-
Wir kommen später nochmal zurück, USB-C.
-
-
In diesem Schritt verwendetes Werkzeug:P2 Pentalobe Screwdriver iPhone$11.99
-
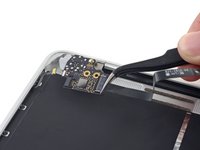
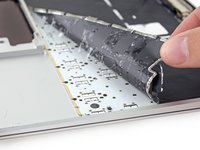
Wenigstens ist die Audioeinheit modular, so dass die Platine der Audiobuchse leicht entfernt werden kann. Das heißt aber auch, dass das Doppelmikrofon zurückgelassen wird.
-
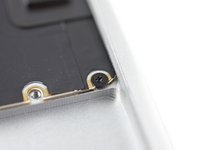
Hinter der Tastatur ist — Mist!
-
Warte, sind das etwa Schrauben? Keine Nieten? Wir kommen da tatsächlich rein? Nett!
-
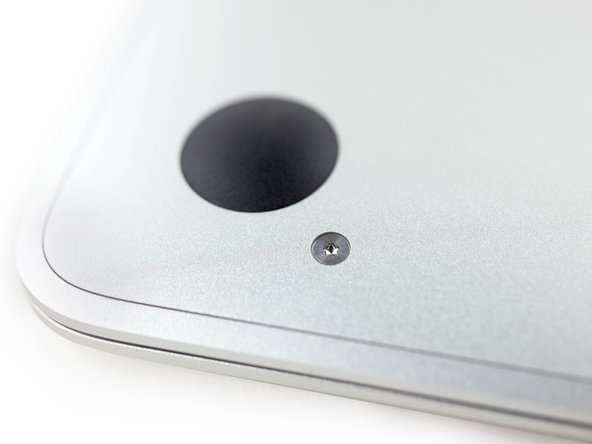
Wir wollen fair bleiben, die Schraube, die du in der Ecke sehen kannst, ist eine Pentalobe Schraube — eine P2. Das ist von der Größe her eine iPhone-typische Schraube. Apple will uns nicht wirklich reinlassen.
-
-
-
Drei Pentalobe Schrauben später...
-
...und zehn Kreuzschlitzschrauben mit merkwürdigen Abstandshaltern, mit denen die Tastatur unter einem Winkel befestigt werden kann...
-
...und endlich zwei Schrauben, die in die Clips am Gehäuse passen (Rückblick auf Schritt6).
-
Wir können uns nicht zu sehr beschweren, Schrauben sind immer noch besser als Kleber — du meine Güte.
-
Die Schutzfolie auf der Rückseite (so eine Art geschichtetes Klebeband) klebt an der Tastatur fest und hält beim Abziehen kaum zusammen.
-
Unter der Foliendecke ist ein Feld von entmutigenden Sternen.. Zwei Pentalobe Schrauben pro Taste, dazu eine Reihe oben und unten, insgesamt 83, plus die drei von vorhin.
On either side of the keyboard are phillips screws which I assumed were 000 size because that is the only screwdriver of that size that was listed in your tools needed section - I even ordered the driver from ifixit but it does not work. Can someone please tell me the correct size driver for these screws - I ordered the JIS version of the 000 today - I think that might be it. Thanks!
-
-
-
Die Pentalobe-gespickte Rückwand hat uns entmutigt, wir gehen es jetzt frontal an. Die Tasten schnappen leicht heraus und wahrscheinlich auch wieder ein.
-
Könnte der Plastik- Butterfly-Mechanismus mit seinen wenigen inneren Teilen vielleicht ein Vorteil für die Reparierbarkeit sein?
-
Die Halterung wird von zarten kleinen Klämmerchen gehalten; so süß.
How much pressure did you apply to pop the keys off?
Not a lot. A pretty light flick with a thing plastic tool like our opening pick works well enough, once you get it jammed in the gap between the key and the aluminum frame.
Do the keys go back on after doing this? Being able to remove keys could be useful for cleaning.
How bout the plastic cup where the plastic butterfly mechanism can you able to detach it also?
What mechanism controls the "spring" in the key (driving the key back up)? The hinge controls the up and down motion, but where is the spring that drives the key up? And is it easy to replace this spring portion for keys that appear slightly less responsive?
I can't put the shift key back in properly, it won't snap back to it's place. Do you have any ideas?
Me too OTL. Did you solve the problem?
"Although we're a tiny bit worried about the plastic hinge fatiguing and breaking at its flex-point, we'll give Apple the benefit of the doubt and assume they've thought of that and designed for it."
I went back and watched the introduction keynote. It's not plastic, it's glass-filled nylon.
How do replace the Spacebar? Do I put in the hinge first than the key. Or do I put the hinge and key already attached together back into the Spacebar area and apply firm pressure?
If you remove the butterfly mechanism, be very careful to not flex it the 'other' way. The plastic will become fatigued and you will lose the pop-up action of the key.
I feel I should point out that the removal of that key cracked one of the itty bitty plastic clips on its underside, no good.
so the spacebar on my mb12 became inoperable; the 1st attempt to remove it and clean the inside yield no results (lots of gunk went out and the plastic bits holding the key to the butterfly mechanism were intact though) so i tried again and this time, applying minimal force, some of the plastic bits gave and now the key is loose and won’t stay in place much; that being said, at least i can use it when typing!
any thoughts on how to fix that? did anyone try using any form of adhesive perhaps? i don’t suppose one can simply buy the spacebar / butterfly mechanism as a replacement part? i want to avoid spending 200usd to replace an otherwise perfect and scratch free top chassis part… thanks!
@mikebppla The Bookyard has individual keys as well as full key replacement sets. The keys are pretty tricky to replace without damage in my experience, but definitely worth a shot before you resort to replacing the entire upper case.
-
-
-
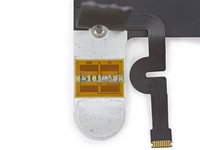
Nun bauen wir das Display aus und kommen zu dem lästigen Vielzweckanschluss!
-
Ahh, USB-C! Dieser kleine Kerl vereinigt Laden, Datenübertragung und Videoausgang in einem einzigen Anschluss.
-
USB-C unterstützt eine Geschwindigkeit von bis zu 10 Gb/s (dieser hier maximal 5 Gb/s), eine bi-direktionale Leistung von 20V/5A und das Design ohne Vorzugsrichtung soll alle deine USB Wehwehchen lindern.
I'd like to see a bit more contempt for Apple's decision to wedge that USB Type-C connector behind the display hinge. Looking at the design, by using the aluminum case as the connector body they clearly are -trying- to make that port robust; but in doing that they're pushing the failure point onto the plastic tongue. The amount of aluminum on the part shows they KNOW that. The design is clever, modular. But to then wedge the thing IN, that's just asinine. They're over-engineering one point in an attempt to compensate for poor design at another. Then again, can't knock 'em much more than the 1 out of 10.
Not sure what you're getting at - what would a solution be? Make the aluminum weaker? I think that the extra metal there is to keep the corner from denting during a drop. As for the "wedging the connector in" part, that's a non issue since it is probably installed before the display is attached.
@Jeffrey Daniels: By removing MagSafe, Apple is necessarily making the user accept a greater risk of breaking the Type-C connector. That the connector is modular, and designed the way it is, pretty much reflects Apple understands that. However, instead of merely making the connector modular AND easy to replace (a fast repair job), they make it a substantially longer job requiring the removal of the display (and a bunch else to get that far). The one part that carries the most risk of causing repair...they then go and make replacing it puzzlingly more difficult than the part's modularity would convey. (If you have to do that much work to get it out, why bother even making the thing compactly modular at all?)
Scott -
USB 3.1 Gen 2 supports 10Gbps, however Apple's implementation is USB 3.1 Gen 1…which only supports 5Gbps (just 1 lane of HiSpeed USB). AKA USB 3.0. See http://www.apple.com/macbook/specs/
What Scooter said. Type-C is a form-factor.
How much stress / abuse / ware etc. do you think the hinges can take? Say repeatedly picking the computer up by the hinge while open.... I mean at the extreme corner only?
-
-
-
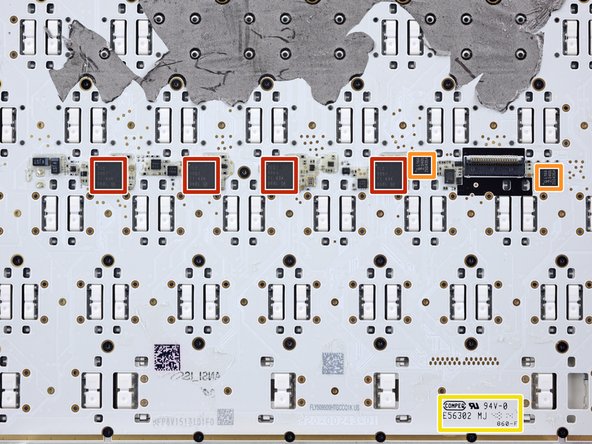
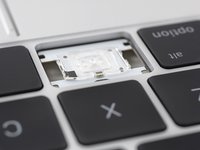
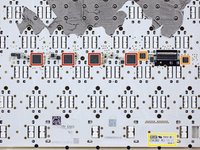
Apple hat sich dafür entschieden, anstatt einer Zeile von LEDs mit Lichtleitern jetzt einzelne LEDs unter jeder einzelnen Taste einzubauen.
-
Und hinter diesen LEDs finden wir:
-
Eine Anordnung von Texas Instruments TLC5951 PWM LED Treibern
-
Ein Paar NXP PCAL6416A I/O Verbreiterern
-
Platinenhersteller Compeq berichtet für März von höheren Gewinnen.
Array of 4 Drivers for the keyboard LEDS, each supported 24 output channels. Someone's going to have to make a bit of software to led flash sequences of keys for alerting. Email from mom? M-O-M lights up, goes dark, lights up. etc. That would be awesome.
That would be awesome. Im guessing theyre all wired in parallel to the same control signal and doubt they would be individually addressable.
It'd be cool, but I don't think each key has its own led. At least, in the past models there were 4 leds for the whole keyboard.
Each key has its own led. Apple has touted this itself.
Any idea if Apple's design allow for the individual LEDs to be controlled by user programs?
.
Since they use those TLC5951 LED drivers with 24 channels and that chip allows each channel to be adjustable individually, for 24 channels x 4 chips that's 96 channels total... is it possible to use them like disco lights? :D
or maybe as a strobe / morse code blinker / other light games?
One of the most common repairs we do in our shop is to replace the keyboard after failures. (Usually spills). It looks like this previously arduous but fairly inexpensive task will remain arduous but no longer inexpensive.
When repairing the keyboard after liquid damage, do you swap out the keyboard, or must you swap out the whole topcase?
Audricus -
-
-
-
Die Reparaturbewertung des MacBook 2015: 1 von 10 (10 ist am leichtesten zu reparieren)
-
Proprietäre Pentalobe Schrauben erschweren das Öffnen des Gerätes weiterhin unnötig und neue Kabelführungen machen das Verfahren zusätzlich noch komplizierter.
-
Der USB-C Anschluss ist mit Tri-Wing Schrauben befestigt und unter den Displayhalterungen begraben, das erschwert den Austausch. Außerdem handelt es sich um den einzigen Anschluss, also wird er stärker abgenutzt werden, als ein Anschluss mit nur einer Nutzungsart.
-
Die Akkueinheit ist als Ganzes, und das sehr fest, im unteren Gehäuse verklebt.
-
Das Retina Display ist weiterhin eine verklebte Einheit, das Schutzglas lässt sich nicht einzeln abtrennen. Wenn das Display ausgetauscht werden muss, kommt einiges an Kosten auf dich zu.
-
Prozessor, RAM und Flashspeicher sind auf dem Logic Board verlötet.
Just replace the bottom case with the battery together. I don't see why you guys are so determined to pull the battery off the case when replacing it, it's just a cheap stupid metal bottom.
Also pentalobe screws are no longer "proprietary" when you can get 10 for like 1 dollar.
Apart from those. I agree this thing gets no more than 1 score on repairability though
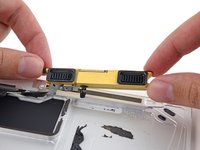
There's slightly MORE than the battery on the bottom case. Things you *might* need - like the logic board, speakers, antennae...
It may not be as trivial as you seem to think.
Just don't pull the battery off the case, replace those two as an assembly.
Speakers and antennas are not so expensive either, but they are easily removable so not a problem.
Tom Chai -
-


Besonderer Dank geht an diese Übersetzer:innen:
100%

Diese Übersetzer:innen helfen uns, die Welt zu reparieren! Wie kann ich mithelfen?
Hier starten ›

21 Kommentare
Hello,
Have you checked the content of the power adapters?
Le commentaire. As you say, pentalobe is tamperproof, and surely most of us now have a screw driver set? About time we forgave Apple, and it's good for your merchandising business ;-)
Yeah I'm thinking the same… I vaguely got the point behind the complaints when iPhone 4 came out, but that is now five years ago, and I am sure that anyone trying to fix the MacBook has ordered some part for one of the *last five iPhone models* and gotten the pentalobe screwdriver with it, so… And then the tri-wing screws just get a quick mention, although tri-wing screwdrivers are far less common by now, which just isn't fair :D
I could not find - what sound chip is used inside?
Definitely not an upgradable computer. Even the little bigger MacBook Air offers easy battery, SSD and cpu fan replacement.
Considering there is no fan in the new Macbook Retina. You can't really hold that against it.
Robert B -
I believe the BCM15700A2 chip is related to the camera:
02:00.0 Multimedia controller [0480]: Broadcom Corporation 720p FaceTime HD Camera [14e4:1570]
Thanks for the teardown, iFixit. Are the camera and microphone(s) unpluggable? I've been able to unplug my camera/microphones based on your teardowns of past Apple devices, but I can't tell from any of these pictures. Thanks!
Savvy comments - I learned a lot from the info - Does someone know where I could grab a template WI DoT MV2118 version to edit ?
It helps lot when you shown the repairing posts. I know that people can understand the problems they faced with apple products like phone, laptop etc. you given the guarantee to the people these apple products once problem gets can be replaced and repaired. Thanks for your efforts in showing interest for us.
Is there a tutorial to remove the space button? thank you
Thanks You. very useful.
Any idea what this screw is for. It was rattling around my MacBook Air, https://imgur.com/gallery/hkYIK
Physically the differences are very minor. We break them down for you in the Retina MacBook 2016 Teardown.
It is very useful information. Thanks for sharing.
Is the 2017 topcase similar to the 2015 or 2016 version?
Sehr schöner Bericht von euch, ich bin immer wieder erstaunt wie Ihr mit den teilen umgeht und es immer wieder auf die Reihe bekommt die Teile wieder zusammen zu bekommen irre Danke macht weiter so.
Gruss aus Hamburg Germany
I replaced the battery on my MacBook 12 2015 A1534, after the battery replacement, the power button key doesn't work, all other keys on the keyboard works except the power button. Please help
Can you replace the motherboard in macbook 12 with the motherboard of macbook m1?