Zum Hauptinhalt wechseln
Cricut Maker 3 Top Cover Replacement

Cricut Maker 3 Top Cover Replacement

Spencer Pennington

Spencer Pennington

Zuletzt aktualisiert am October 7, 2024

15 - 30 Minuten
Mittel

Follow this guide to replace the top cover in your Cricut Maker 3.

If the top cover is cracked or loose, it may need to be replaced.

Was du brauchst

Ersatzteile

Werkzeuge

Mehr anzeigen …

  1. Cricut Maker 3 Top Cover Replacement, Prepare your Cricut for disassembly: Schritt 1, Bild 1 von 3 Cricut Maker 3 Top Cover Replacement, Prepare your Cricut for disassembly: Schritt 1, Bild 2 von 3 Cricut Maker 3 Top Cover Replacement, Prepare your Cricut for disassembly: Schritt 1, Bild 3 von 3
    • Be very careful not to cut yourself when working near the Cricut's small, sharp blade, located in the tool holder within the Cricut.

    • Power off the Cricut and unplug all cables.

  2. Cricut Maker 3 Top Cover Replacement, Remove the rubber feet: Schritt 2, Bild 1 von 3 Cricut Maker 3 Top Cover Replacement, Remove the rubber feet: Schritt 2, Bild 2 von 3 Cricut Maker 3 Top Cover Replacement, Remove the rubber feet: Schritt 2, Bild 3 von 3
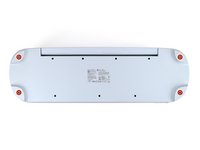
    • Flip the Cricut over so the bottom is facing up.

    • Use your finger to pry up and remove all four rubber feet from the bottom of the Cricut.

  3. Cricut Maker 3 Top Cover Replacement, Remove the screws from the base: Schritt 3, Bild 1 von 2 Cricut Maker 3 Top Cover Replacement, Remove the screws from the base: Schritt 3, Bild 2 von 2
    In diesem Schritt verwendetes Werkzeug:
    FixMat
    $36.95
    • Use a Phillips screwdriver to remove the four 41 mm‑long screws securing the top cover to the base. There's one screw under each foot.

    • Throughout this repair, keep track of each screw and make sure it goes back exactly where it came from.

  4. Cricut Maker 3 Top Cover Replacement, Open the Cricut: Schritt 4, Bild 1 von 2 Cricut Maker 3 Top Cover Replacement, Open the Cricut: Schritt 4, Bild 2 von 2
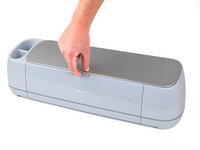
    • Flip the Cricut over so the silver lid is facing up.

    • You may replace the rubber feet before flipping your Cricut to avoid damaging the Cricut or your work surface.

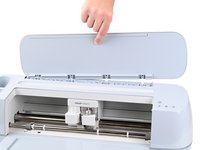
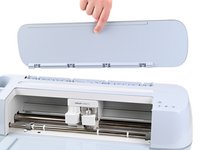
    • Open the Cricut by lifting the top silver lid. The front tray will also open.

  5. Cricut Maker 3 Top Cover Replacement, Remove the screws from the metal track: Schritt 5, Bild 1 von 3 Cricut Maker 3 Top Cover Replacement, Remove the screws from the metal track: Schritt 5, Bild 2 von 3 Cricut Maker 3 Top Cover Replacement, Remove the screws from the metal track: Schritt 5, Bild 3 von 3
    • Inside the Cricut are seven screws securing the top cover to the metal track that guides the tool holder. You can reach these screws by putting a screwdriver bit in a ratcheting socket wrench. If you're using iFixit bits, the smaller bits work with a 4‑mm socket and the larger bits work with a 1/4‑inch socket.

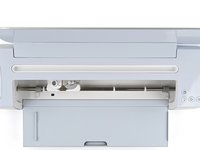
    • Remove the seven 9.8 mm‑long Phillips screws securing the top cover to the metal track.

  6. Cricut Maker 3 Top Cover Replacement, Remove the lid hinge cover: Schritt 6, Bild 1 von 2 Cricut Maker 3 Top Cover Replacement, Remove the lid hinge cover: Schritt 6, Bild 2 von 2
    • The lid hinge cover is located at the base of the silver lid and is held in place by five pegs which are lightly glued in place.

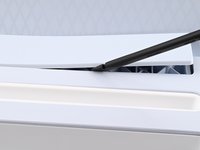
    • Insert the flat end of a spudger between the right side of the lid hinge cover and the top cover.

    • If there's not enough space to insert a spudger, push the silver lid to the left.

    • Use the spudger to pry up the cover.

    • Firmly pry near the pegs to avoid cracking the cover.

  7. Cricut Maker 3 Top Cover Replacement: Schritt 7, Bild 1 von 3 Cricut Maker 3 Top Cover Replacement: Schritt 7, Bild 2 von 3 Cricut Maker 3 Top Cover Replacement: Schritt 7, Bild 3 von 3
    • Use the flat end of a spudger to pry up along the long edge of the lid hinge cover until the cover is free.

  8. Cricut Maker 3 Top Cover Replacement: Schritt 8, Bild 1 von 2 Cricut Maker 3 Top Cover Replacement: Schritt 8, Bild 2 von 2
    • Lift and remove the lid hinge cover.

  9. Cricut Maker 3 Top Cover Replacement, Remove the lid screws: Schritt 9, Bild 1 von 1
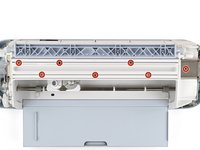
    • Use a Torx T8 screwdriver to remove the four 10.2 mm‑long screws securing the lid to the hinge.

  10. Cricut Maker 3 Top Cover Replacement, Remove the lid: Schritt 10, Bild 1 von 2 Cricut Maker 3 Top Cover Replacement, Remove the lid: Schritt 10, Bild 2 von 2
    • Use the flat end of spudger to pry the lid out of the hinge while lifting the lid.

  11. Cricut Maker 3 Top Cover Replacement: Schritt 11, Bild 1 von 2 Cricut Maker 3 Top Cover Replacement: Schritt 11, Bild 2 von 2
    • Lift and remove the lid

  12. Cricut Maker 3 Top Cover Replacement, Lift the top cover: Schritt 12, Bild 1 von 2 Cricut Maker 3 Top Cover Replacement, Lift the top cover: Schritt 12, Bild 2 von 2
    • There's still a cable connected to the inside of the top cover. Don't attempt to fully remove the top cover yet.

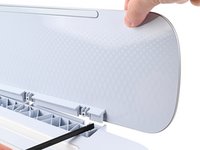
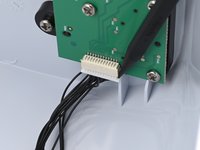
    • Lift the top cover up from the Cricut just until it comes free of the base.

  13. Cricut Maker 3 Top Cover Replacement: Schritt 13, Bild 1 von 3 Cricut Maker 3 Top Cover Replacement: Schritt 13, Bild 2 von 3 Cricut Maker 3 Top Cover Replacement: Schritt 13, Bild 3 von 3
    • Rotate the top cover to the right and prop it up so the right side of the cover is resting on your work surface.
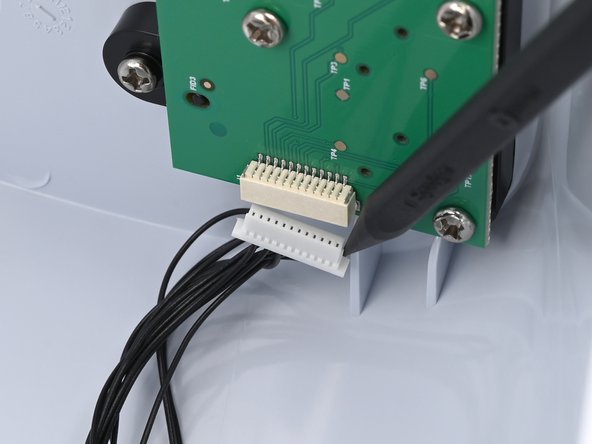
  14. Cricut Maker 3 Top Cover Replacement, Disconnect the button board: Schritt 14, Bild 1 von 2 Cricut Maker 3 Top Cover Replacement, Disconnect the button board: Schritt 14, Bild 2 von 2
  15. Cricut Maker 3 Top Cover Replacement: Schritt 15, Bild 1 von 2 Cricut Maker 3 Top Cover Replacement: Schritt 15, Bild 2 von 2
    • Peel up the tape securing the button wires to the inside of the top cover.

    • During reassembly, if this tape isn't sticking well, replace it with a piece of electrical tape to make sure these wires don't get caught in the gears.

  16. Cricut Maker 3 Top Cover Replacement, Remove the top cover: Schritt 16, Bild 1 von 1
    • Lift and remove the top cover.

Abschluss

To reassemble your device, follow these instructions in reverse order.

Repair didn’t go as planned? Try some basic troubleshooting, or ask our Answers community for help.

Eine weitere Person hat diese Anleitung absolviert.

Spencer Pennington

Mitglied seit: 09/09/23

17.058 Reputation

113 Anleitungen geschrieben

Team

iFixit Mitglied von iFixit

Staff

118 Mitglieder

19.465 Anleitungen geschrieben

0 Kommentare

Kommentar hinzufügen

Seitenaufrufe:

Letzte 24 Stunden: 1

Letzte 7 Tage: 21

Letzte 30 Tage: 58

Insgesamt: 257